ARTISAN™-ESPRESSOMACHINE GIDS VOOR HET BESTE RESULTAAT ARTISAN™ ESPRESSO MACHINE GUIDE TO EXPERT RESULTS MACHINE À ESPRESSO ARTISAN™ GUIDE DU CONNAISSEUR ARTISAN™ ESPRESSOMASCHINE ANLEITUNG FÜR PROFESSIONELLE ERGEBNISSE MACCHINA PER CAFFÈ ESPRESSO ARTISAN™ GUIDA AI RISULTATI EXPERT CAFETERA EXPRÉS ARTISAN™ GUÍA PARA CONSEGUIR RESULTADOS PROFESIONALES ARTISAN™ ESPRESSO MASKIN GUIDE FÖR BÄSTA RESULTAT ARTISAN® ESPRESSOMASKIN OPPNÅ BEST MULIG RESULTATER ARTISAN™ ESPRESSOKEITIN OPAS PARHAISIIN TULOKSIIN
Table of Contents English Espresso Machine Safety....................................................2 What is Espresso?............................................................12 Important Safeguards........................................................3 Overextraction and Underextraction ...............................12 Electrical Requirements ......................................................3 Before Brewing: The Elements of a Great Espresso...........12 Model 5KES100...................
When using electrical appliances, basic safety precautions should always be followed, including the following: 1. Read all instructions. 2. Do not touch hot surfaces. Use handles or knobs. 3. To protect against fire, electric shock and personal injury do not immerse cord, plugs, or appliance in water or other liquids. 4. The appliance is not intended for use by young children or infirm persons without supervision. 5. Unplug from outlet when not in use and before cleaning.
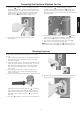
Model 5KES100 Cup Rail Espresso ( ) Boiler Temperature Gauge O/I Power Switch English Power-On (I) Indicator Hot Water ( Button Espresso ( Steam ( ) Button ) ) Dial Brew Head Filter holder Frothing Arm & Nozzle Water Tank (in back) Frothing ( ) Boiler Temperature Gauge Drip Tray Indicator Drip Tray Model 5KES100 Espresso Machine Frothing Jug Coffee Scoop and Shower-Screen Brush Filter Baskets Tamper Espresso Machine Features O/I Power Switch Hot Water ( ) Button Press once to turn the
Espresso Machine Features Brew Head Filter holder Commercial-size brew head is chrome-plated brass for exceptional durability and brew temperature stability. Brewing boiler is bolted directly to group head, so brew group heats quickly and thoroughly. Commercial-size filter holder features chrome-plated brass construction and an easy-to-grip flared handle. Attaches to the brew head with a firm twist to the right. Stainless steel filter baskets snap into filter holder.
Preparing the Espresso Machine for Use Attach the Cup Rail Fill and Rinse the Boilers Align the three rail posts with the holes on top of the espresso machine. Then press the rail posts firmly into the holes. The boilers need to be filled and rinsed before the espresso machine is used for the first time.
Preparing the Espresso Machine for Use 7. Press the “ ” Button – it is not necessary to wait for the boiler to heat. This activates the water pump and fills the brewing boiler with water. After a few seconds, water will flow from the brew head. When the cup is full, press the “ ” Button again to stop the water pump. The brewing boiler is now ready for use. English 9. Slowly open the “ ” Dial by turning it counterclockwise, then press and hold the “ ” Button.
Brewing Espresso English When the espresso boiler temperature gauge needle climbs into the “ ” zone, the espresso machine is ready to brew. 7. Remove the filter holder from the brew head by moving the handle to the left. Place one level measure of ground coffee (or a paper coffee pod) in the small filter basket, or two measures of ground coffee in the large basket. Be sure to use a fine espresso-style grind for your coffee. 8. Using the tamper, tamp the coffee down firmly with a twisting motion.
Frothing and steaming milk requires a bit of practice, but you’ll be surprised how quickly your skills will develop. The Artisan™ Espresso Machine gives you all the tools you need: a stainless steel jug shaped especially for frothing, a frothing arm that adjusts horizontally and vertically for a comfortable working position, a frothing nozzle designed to enhance frothing, and a “ ” Dial that lets you precisely control the volume of frothing steam. 1. Press the “ ” Button to turn the espresso machine on. 2.
Dispensing Hot Water English Hot water can also be dispensed from the frothing arm. This provides a convenient way to make Americanos, tea, or hot chocolate. Filling a demitasse with hot water is also a great way to warm it before brewing espresso. NOTE: Always dispense hot water into an empty container – dispensing into a cup or jug containing other ingredients may cause splattering. 1. Press the “ ” Button to turn the espresso machine on. 2.
Cleaning the Shower Screen Descaling Once every 75 to 100 cups of espresso, the shower screen should be removed from the brew head to clean thoroughly. 1. Using a short screwdriver, remove the screw at the center of the shower screen by turning it counterclockwise. Once the screw is free, the shower screen should drop from the brew head. Calcium deposits (“scale”) from water will build up in the espresso machine over time and may impair espresso quality.
What is Espresso? Espresso began as an attempt in the 1800s to quickly brew coffee on demand, by the cup. The goal was to serve the freshest, most flavorful coffee possible and avoid the burned, stale taste of coffee kept warm on a stovetop. To speed the brewing process, coffee pioneers struck upon the idea of forcing water through the grounds under pressure. Steam was initially used to supply the pressure, followed by compressed air, lever operated pistons, and finally, the electric water pump.
Brewing Temperature Dosing Water temperature and temperature consistency have a direct impact on the flavor of espresso. Great espresso comes from brewing at an optimum temperature, ideally between 90º–96º C. Modern boilers and thermostats excel at producing and maintaining the right temperature, but there is a complicating factor that is a major concern for baristas: maintaining heat in the brew group.
Espresso Brewing Technique English Tamping Measuring Tamping Pressure Tamping compresses the coffee into a level disc that provides uniform resistance to the high-pressure brew water. Properly leveled and tamped coffee will produce an even extraction of coffee compounds – and great espresso. Coffee that is tamped too softly will be deformed by the brew water, resulting in uneven extraction, a fast brewing time, and mediocre espresso.
Espresso Brewing Technique As it pours, if your espresso… …has more of a cinnamon color, instead of being deep brown: • make sure your brew group and boilers are fully heated • use a less acidic blend of coffee …barely dribbles out the filter holder: • review your tamping technique – the tamp could be too firm • use a coarser grind …is whitish with thin brown streaks: • review your tamping technique – the tamped coffee has fractured, or a gap has developed between the coffee and the side of the filter bas
Household KitchenAid® Espresso Machine Warranty Length of Warranty: KitchenAid Will Pay For: KitchenAid Will Not Pay For: Europe, Australia and New Zealand: Two year Full Warranty from date of purchase. Replacement parts and repair labor costs to correct defects in materials or workmanship. Service must be provided by an Authorized KitchenAid Service Center. A. Repairs when Espresso Machine is used for operations other than normal household food preparation.