ARTISAN™ FOODPROCESSOR INSTRUCTIES EN RECEPTEN ARTISAN™ Food processor Instructions and Recipes English ROBOT MÉNAGER ARTISAN™ MODE D’EMPLOI ET RECETTES ARTISAN™ FOOD PROCESSOR Bedienungsanleitung und Rezepte FOOD PROCESSOR ARTISAN™ ISTRUZIONI PER L’USO E RICETTE PROCESADOR DE ALIMENTOS ARTISAN™ INSTRUCCIONES Y RECETAS ARTISAN™ MATBEREDARE INSTRUKTIONER OCH RECEPT ARTISAN™ FoodproSessor Bruksanvisning og Oppskrifter ARTISAN™ MONITOIMIKONE KÄYTTÖOHJEET JA RESEPTIT ARTISAN™ Food processor INSTRUKTIO
Table of Contents Food Processor Safety.......................................................................................................3 Electrical Requirements.....................................................................................................3 Important Safeguards.......................................................................................................4 Food Processor Features . ...........................................................................................
Food Processor Safety Your safety and the safety of others are very important. We have provided many important safety messages in this manual and on your appliance. Always read and obey all safety messages. This is the safety alert symbol. All safety messages will follow the safety alert symbol and either the word “DANGER” or “WARNING.” These words mean: Danger You can be killed or seriously injured if you don’t immediately follow instructions.
Important SafeGUARDS English When using electrical appliances, basic safety precautions should always be followed, including the following: 1. Read all instructions. 2. To protect against risk of electrical shock do not put Food Processor in water or other liquid. 3. Unplug from the outlet when not in use, before putting on or taking off parts, and before cleaning. 4. Avoid contacting moving parts. 5.
Food Processor Features* Fine (2 mm) Slicing Disc Disc produces approximately 1.6 mm slices of most foods, from delicate strawberries to partially frozen meats. 2-Piece Food Pusher For smaller items, remove the small pusher from the central tube in the large pusher. The small pusher and feed tube make it easy to process herbs, nuts, single carrots and celery. The small pusher can also be used as a convenient 115 ml measuring cup. Medium (4 mm) Slicing Disc Disc produces approximately 3.
Food Processor Features* Heavy-Duty Base The base features the “O”, “I”, and Pulse Buttons along with the power shaft, which rotates the blades and discs. Disc Stem Stem fits over the power shaft on the base and into the bottom of a slicing or shredding disc. English Stainless Steel Multipurpose Blade Versatile blade chops, minces, blends, mixes, and emulsifies in a matter of seconds. Spatula/Cleaning Tool Special shape facilitates food removal from bowls, discs, and blades.
Preparing the Food Processor for Use 4. Insert the desired accessory into the work bowl. See pages 8–11 for accessory instructions. 5. Place the work bowl cover on the work bowl with the feed tube just to the left of the work bowl handle. Grasp the feed tube and turn the cover to the right until it locks into place. WARNING Cut Hazard Handle blades carefully. English Failure to do so can result in cuts.
Preparing the Food Processor for Use WARNING WARNING Cut Hazard Handle blades carefully. Failure to do so can result in cuts. English Multipurpose Blade and Dough Blade Assembly Electrical Shock Hazard Plug into a grounded 3 prong outlet. Place the blade on the power shaft. Rotate the blade so it falls into place on the shaft. Do not remove ground prong. Do not use an adapter. Do not use an extension cord. Failure to follow these instructions can result in death, fire or electrical shock. 7.
Preparing the Food Processor for Use WARNING Cut Hazard Handle blades carefully. 2. Fit the disc over the metal pin on the disc stem with the raised-blade side up. The disc has a raised nub on the top and grooves underneath to help align it properly. Rotate the disc until it falls fully onto the stem. 3. To remove the mini bowl after processing, lift the bowl using the two finger grips located along the top edge of the bowl. Off On Pulse Mini Bowl Assembly Off 1.
Preparing the Food Processor for Use 5. Place the work bowl cover on the work bowl with the feed tube just to the left of the handle. Make sure the center pin of the egg whip fits into the center opening of the cover. Grasp the feed tube and turn the cover to the right to lock it into place. Insert the pusher into the feed tube. The egg whip is now ready to operate. 6. Press the “I” Button and whip ingredients to the desired texture and volume. Press the “O” Button when finished.
9. Operate the citrus press by pressing the “I” Button or the “Pulse” Button. 10. When juice is fully extracted, press the “O” Button. NOTE: Do not exceed the maximum liquid level line (see page 12) on the work bowl, or juice will leak from the bowl. 11. Unplug the Food Processor. 12. Unlock the strainer basket by turning it clockwise. Remove juiced fruit, cone, and strainer basket from the work bowl. 13. Remove the work bowl from Food Processor and pour juice into desired container. 14.
Using the Food Processor Maximum Liquid Level WARNING This line on the work bowl indicates the maximum level of liquid that can be processed by the Food Processor. English Rotating Blade Hazard Always use food pusher. Keep fingers out of openings. Keep away from children. Turning the Food Processor “I” and “O” Failure to do so can result in amputation or cuts. 1. To turn on the Food Processor, press the “I” Button. The unit will run continuously and the indicator light will glow.
Using the Food Processor The pulse control allows precise control of the duration and frequency of processing. It’s great for jobs which require a light touch. Just press and hold the “Pulse” Button to start processing, and release it to stop. The indicator light will glow each time the “Pulse” Button is pressed.
Disassembling the Food Processor 4. If using a disc, remove it before removing the bowl. Place two fingers under each side of the disc and lift it straight up. Remove the disc stem. 6. Turn the work bowl to the left to unlock it from the base. Lift to remove. English O I 5. If using the mini bowl or chef’s bowl, grasp and remove the bowl using the finger grips located along the top edge of the bowl. Pulse A R T I S A N Off On Pulse 7.
Care and Cleaning 5. To prevent damage to the interlock system, always store the work bowl and work bowl cover in the unlocked position when not in use. WARNING Cut Hazard Handle blades carefully. English Failure to do so can result in cuts. 1. Press the “O” Button. 2. Unplug the Food Processor before cleaning. 3. Wipe the base and cord with a warm, sudsy cloth, and wipe clean with a damp cloth. Dry with a soft cloth. Do not use abrasive cleansers or scouring pads. 4.
Troubleshooting • If your Food Processor should fail to slice or shred when using the disc: – Make sure the raised-blade side of the disc is positioned face up on the disc stem. The disc has a raised nub on the top and grooves underneath to help align it properly. English • If your Food Processor should fail to operate, check the following: – Make sure the work bowl and work bowl cover are properly locked on the base, and the food pusher is inserted to the maximum fill line on the feed tube.
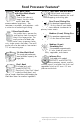
Food Processing Tips To mince garlic or to chop fresh herbs or small quantities of vegetables: Using the Multipurpose Blade To chop fresh fruits or vegetables: Peel, core, and/or remove seeds. Cut food in 2.54 to 3.81 cm pieces. Process food to desired size, using short pulses, 1 to 2 seconds each time. Scrape sides of bowl, if necessary. To chop nuts or make nut butters: Process up to 375 g (3 cups) of nuts to desired texture, using short pulses, 1 to 2 seconds each time.
Food Processing Tips To slice or shred fruits or vegetables that are long and relatively small in diameter, such as celery, carrots, and bananas: To grate hard cheeses, such as Parmesan and Pecorino: English Never attempt to process cheese that cannot be pierced with the tip of a sharp knife. You can use the multi-purpose blade to grate hard cheeses. Cut cheese in 2.54 cm pieces. Place in work bowl. Process, using short pulses, until coarsely chopped. Process continuously until finely grated.
Food Processing Tips The dough blade is specially designed for mixing and kneading yeast dough quickly and thoroughly. One minute or less of operating time is all that is needed to form a dough ball. Processing longer than one minute will make the dough come apart and stick to the sides of the bowl. For the best results, do not knead recipes which use more than 250 to 375 g (2-3 cups) of flour. Stack leaves. Roll up and stand up in feed tube.
Helpful Hints English 7. Soft and medium-hard cheese may spread out or roll up on the shredding disc. To avoid this, shred only wellchilled cheese. 8. Sometimes slender foods, such as carrots or celery, fall over in the feed tube, resulting in an uneven slice. To minimize this, cut food in several pieces and pack the feed tube with the food. For processing small or slender items, the small feed tube in the two-piece food pusher will prove especially convenient. 9.
17. Your Food Processor is not designed to perform the following functions: • grind coffee beans, grains, or hard spices • grind bones or other inedible parts of food • liquefy raw fruits or vegetables • slice hard-cooked eggs or unchilled meats. 18. If any plastic parts should discolor due to the types of food processed, clean them with lemon juice. 15. After removing the work bowl cover, place it upside down on the counter. This will help keep the counter clean. 16.
White Balsamic Vinaigrette English 1 tablespoon fresh basil leaves 1 tablespoon fresh oregano leaves 1 clove garlic 3 tablespoons white balsamic vinegar* 3 tablespoons white wine vinegar* 1 ⁄2 teaspoon salt 1 ⁄4 teaspoon dry mustard 1 ⁄8 teaspoon ground red pepper 180 ml (3⁄4 cup) extra virgin olive oil Position mini bowl and mini blade in work bowl. With processor running, add basil, oregano, and garlic through the small feed tube. Process until chopped, 5 to 8 seconds. Scrape sides of bowl.
Cheddar Broccoli Soup Position 4 mm shredding disc in work bowl. Add cheese. Process to shred. Remove and set aside. Exchange shredding disc for 2 mm slicing disc in work bowl. Add onion and celery. Process to slice. Melt butter in large saucepan or Dutch oven over medium heat. Remove onion and celery to saucepan. Cook 2 to 3 minutes, or until crisp-tender, stirring occasionally. Cut stems from broccoli, and peel tough coating from stems. Cut florets into small pieces.
Spring Mix Basmati Rice English 1 clove garlic 1 medium shallot, cut into quarters 1 tablespoon olive oil 1 ⁄4 pound (about 125 g) fresh green beans, trimmed 1 small carrot, peeled and cut into halves crosswise 356 ml (11⁄2 cups) chicken broth 237 ml (1 cup) water 1 teaspoon salt 1 ⁄4 teaspoon black pepper 1 teaspoon ground coriander, if desired 170 g (11⁄3 cups) rice 227 g (1⁄2 pound) fresh asparagus 2 teaspoons fresh thyme leaves 2 tablespoons loosely packed fresh parsley leaves 1 ⁄4 small red bell pepp
Chicken Satay with Peanut Sauce Sauce 80 ml (1⁄3 cup) coconut milk 30 g (1⁄4 cup) peanut butter 2 tablespoons soy sauce 1 ⁄2 teaspoon red curry paste Position multipurpose blade in work bowl. With processor running, add garlic and gingerroot through the small feed tube. Process until chopped, 5 to 10 seconds. Add soy sauce, oil, and brown sugar. Process until blended and sugar dissolves, 15 to 20 seconds. Remove to plastic resealable food storage bag or shallow pan. Add chicken; coat with marinade.
Fresh Fruit Tart English Crust 125 g (1 cup) all-purpose flour 2 teaspoons sugar 1 ⁄4 teaspoon salt 30 g (1⁄4 cup) cold butter, cut into 2.
Length of Warranty: KitchenAid Will Pay For: KitchenAid Will Not Pay For: Europe, Australia and New Zealand: Three years Full Warranty from date of purchase on the Food Processor. Ten years Full Warranty from date of purchase on the motor. Replacement parts and repair labor costs to correct defects in materials or workmanship. Service must be provided by an Authorized KitchenAid Service Center. A. Repairs when Food Processor is used for operations other than normal household food preparation.
Customer Service For U.K. & Northern Ireland: Freephone helpline number on: 0800 988 1266 (calls from mobiles are charged at your standard network rate) English For Southern Ireland: Helpline number on: +44 (0) 20 8616 5148 Address: KitchenAid Europa, Inc. PO BOX 19 B-2018 ANTWERP 11 BELGIUM www.KitchenAid.co.uk www.KitchenAid.com ® Registered Trademark/™ Trademark of KitchenAid, U.S.A. © 2009. All rights reserved. Specifications subject to change without notice.