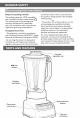
BLENDER INSTRUCTIONS TABLE OF CONTENTS BLENDER SAFETY Important safeguards. Electrical requirements . Electrical equipment waste disposal PARTS AND FEATURES... ASSEMBLING THE BLENDER Preparing the Blender for use .. OPERATING THE BLENDER Using the Blender Using the Hot Foods functor Using the Crush Ice function sing the Pulse function Using the Blender picker ingredient cup and Soft Start blending feature 14 Speed control guide... rennin Rene TIPS FOR GREAT RESULTS Quick tips How to.
lanes Your safety and the safety of others are very important. We have provided many important safety messages in this manual and on your appliance. Always read and obey all safety messages. This is the safety alert symbol, This symbol alerts you to potential hazards that can kill or hurt you and others, All safety messages will follow the safety alert symbol and either the word “DANGER” or “WARNING.
BLENDER SAFETY 7. Do not use outdoors. 8. Do not let cord hang over edge of table or counter. 9. Keep hands and utensils out of container while blending to reduce the risk of severe injury to persons or damage to the Blender. A scraper may be used but must be used only when the Blender is not running. 10. Blades are sharp. Handle carefully. I I. Always operate Blender with cover in place. 12. The use of attachments not recommended by Kitchen Aid may cause a risk of injury to persons. 13.
aaa Ein Ze de] rd Disposal of packing material and human health, which could otherwise The packing material is 100% recyclable be caused by inappropriate waste handling and is marked with the recycle symbol YF this product. The various parts of the packing must therefore be disposed of responsibly and in full compliance with local authority regulations governing waste disposal.
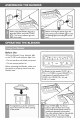
ASSEMBLING THE BLENDER Before First Use Before using your Blender for the first time, wipe Blender base with 2 warm damp doth, then wipe clean with a damp cloth. Dry with a soft cloth, Wash pitcher, lid, and ingredient cup in warm, sudsy water (see “Care and Cleaning” section). Rinse parts and wipe dry. 11 Align the pitcher tabs with the slots on the base.
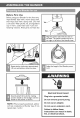
aol Before using the Blender, plug Inca 2 grounded outer, and press POWER (C1): The Power indicator tight wil fish when ready. | Before removing the pitcher from the © ‘base, always press POWER(CD)) to stop the flashing lights and unplug the power cord. Before Use While the Blender Power indicator light or the PULSE mode indicator light not interfere with blade movement. Do net remove pitcher lid. Before operating the Blender, make sure the pitcher is properly locked onto the Blender base.
OPERATING THE BLENDER NOTE: The Blender wil operate only when pressing the POWER (1) button (Power LED will flash) before selecting the desired speed. 5310 he Elena then press US OD a second time to turn off. Unplug | Blender before removing the pitcher. Tr remove the lid, firs use the loco TI] Then life the lid from the side to remove. | on the back of tha ld ta If the Ji and Completely from the parch. break the seal.
OPERATING THE BLENDER HOT FOODS Or y patio The. indicator light abe the Hot Foods button will Tight up. The Hot Foods feature starts at 2 low speed.and slowly parsnips up io higher speeds over 50 “seconds to avoid splashing of hot liquids. When the Hot Foods. function is fished he Blender sits.
Before operating the Blender, make sure Put ingredients into the pitcher and “+ the pitcher is. properly. positioned on firmly place tid the base. NOTE: PULSE mode will not quark with the HOT FOODS (2) or CRUSH ICE (57) modes. Tr Crass POWER (1), then press | Pres sand hold a speed bison for the 5 PULSE The indicator lights above | [168 devised length of tine.
OPERATING THE BLENDER Ee Lae : * The Blender pitcher ingredient cup can * The Soft Start blending feature be used to measure and add ingredients. automatically starts the Blender ata Remove cup and add ingredients at CHOP lower speed to draw ingredients inch ar MIX speeds. When operating at higher the blades. then quickly increases to the speeds with a full pitcher or with hot selected speed for optimal performance. contents, stop the Blender and then add The Soft Start blending feature only ingredients.
Eel eh ang you're making beverages using ice, start with CRUSH ICE (4), then finish with LIQUEFY { 5) in order ta produce a smoother texture, * lee directly from the freezer will crush better than partially melted ice for snow, * Smaller ice cubes can be cheeped or crushed faster than large ones. + For many ingredient mixtures, start the blending process at CHOP { 4) to thoroughly corniness the ingredients.
[TIPS FOR GREAT RESULTS Prepare pancake or waffle batter from Grate cheeses Cut very cold cheese into mix: Place mix and other ingredients in 1.5 cm cubes, Place up to 1/2 cup (120 mL) pitcher. Cover and blend at MIX { 4 until cheese in the pitcher. Cover, and blend at well-mixed, 10 to 20 seconds. Stop the LIQUEFY { 2) about § to |0 seconds. Blender and scrape sides of the pitcher For hard cheeses, such as Parmesan, bring as needed. to room temperature then blend at LIQUEFY for 1040 15 seconds.
TROUBLESHOOTING IMPORTANT: The Blonder will nat operate at any speed unless the POWER (1) butter is pressed first Check to see if the Blender is plugged into a grounded outlet. if it is, press POWER (1): then unplug the Blender. Plug it back into the same outlet, and Press POWER «hy. if the Blender still does not work, check the fuse or circuit breaker an the electrical circuit the Blender is connected to and make sure the circuit is closed.
WARRANTY AND, SERVICE ea Ls Length of Kitchen Aid Will Pay | Kitchen Aid Will Mot Warranty: For: Pay For: Europe, Middle East The replacement A. Repairs when Blender is used and Africa: parts and repair labor for operations other than For model 3KSB1585: CODES tO Correct dermal household fed Two years full warranty from | defects in materials preparation. date of purchase. or workmanship. B.