
Operation Manual

15
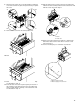
8. Attach the side shelf to the control panel (D) by inserting the
screw removed from the grill control panel in Step
4. Tighten
the screw.
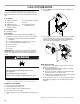
9. Remove the 3 screws from the searing side burner.
10. Remove the searing side burrner.
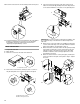
11. Remove the 2 screws from the side burner valve assembly.
See illustration in Step
13.
12. Push the valve stem out through the opening in the front of
the side burner shelf, lining up the holes in the side burner
valve assembly with the openings on the side burner shelf.
See illustration in Step
13.
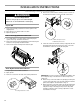
13. Slide the bezel opening over the valve stem and attach the
side burner valve assembly and bezel to the side burner shelf
with the screws removed in Step 11.
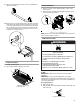
14. Replace the searing side burner, angling it so that the side
burner tube slides over the valve orifice. Locked 3 screws
removed in step 9.
15. Connect electrical plugs on underside of sear burner.
A
B
CD
A. Bezel
B. Valve stem
A. Electrical plug from grill
B. Electrical plug from sear burner
A
B
A
B