
Instructions / Assembly


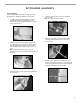


7. Assembly instructions for the plastic handle (L)
as shown in Fig. 7.
Fig.7
8. Plug into a grounded 3 prong outlet.
Fig.8
9. Completed Assembly as shown in Fig. 8.
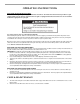
Non-Kitchen-Aid grills:
A: For Horizontal Firebox Mount Holes:
1. Align the holes in the support bracket (J) to the pre-
drilled holes on the right side of the grill. Attach the
support bracket using two 3/16-in. screws with flat
washers/lock washers/nuts (K) as shown in Fig. A1.
Fig.A1
2. Follow Kitchen-Aid Grills assembly instructions from
step 1 to step 8 to finish assembly.
Note: You need to place shaft collar (F) into the slot
on the support bracket (J).
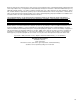
Fig.B1
B: For Vertical Firebox Mount Holes:
1 Align the holes in the motor bracket (B) to the pre-
drilled holes on the left side of the grill. Attach the
motor bracket using two 2-3/4 -in. screws with flat
washer/lock washers/nuts (C) provided as shown in
Fig. B1.
2 Following Kitchen-Aid Grill assembly instructions
from step 2 to step 8 to finish assembly.
7