
User Manual


13
English
®
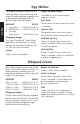
Attachments and Accessories
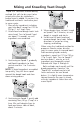
To Attach
1. Turn speed control to “O”.
2. Unplug Stand Mixer or disconnect
power.
3. Loosen attachment knob by
turning it counterclockwise.
4. Remove attachment hub cover.
5. Insert attachment shaft housing
into attachment hub, making
certain that attachment power
shaft fits into square attachment
hub socket. It may be necessary to
rotate attachment back and forth.
When attachment is in proper
position, the pin on the
attachment will fit into the notch
on the hub rim.
6. Tighten attachment knob by
turning clockwise until attachment
is completely secured to Stand
Mixer.
7. Plug into proper electrical outlet.
To Remove
1. Turn speed control to “O”.
2. Unplug Stand Mixer or disconnect
power.
3. Loosen attachment knob by
turning it counterclockwise. Rotate
attachment slightly back and forth
while pulling out.
4. Replace attachment hub cover.
Tighten attachment knob by
turning it clockwise.
General Information
KitchenAid
®
Attachments are designed to assure long life. The attachment
power shaft and hub socket are of a square design, to eliminate any possibility
of slipping during the transmission of power to the attachment. The hub and
shaft housing are tapered to assure a snug fit, even after prolonged use and
wear. KitchenAid
®
Attachments require no extra power unit to operate them;
the power unit is built-in.
‡Not part of mixer.
General Instructions
Attachment
Hub Socket
Attachment
Knob
Notch
Pin
Attachment Shaft
Housing
Attachment
Power Shaft‡
Attachment
Housing