CLASSIC COMMERCIAL STYLE DUAL FUEL CONVECTION RANGES WITH STEAM-ASSIST Use & Care Guide For questions about features, operation/performance, parts, accessories or service, call: 1-800-422-1230 or visit our website at www.kitchenaid.com In Canada, call: 1-800-807-6777 or visit our website at www.KitchenAid.ca Table of Contents............................................................................................................
TABLE OF CONTENTS RANGE SAFETY .............................................................................3 The Anti-Tip Bracket ....................................................................4 PARTS AND FEATURES................................................................6 COOKTOP USE ..............................................................................8 Cooktop Controls.........................................................................8 Cooktop Surface ............................
RANGE SAFETY Your safety and the safety of others are very important. We have provided many important safety messages in this manual and on your appliance. Always read and obey all safety messages. This is the safety alert symbol. This symbol alerts you to potential hazards that can kill or hurt you and others. All safety messages will follow the safety alert symbol and either the word “DANGER” or “WARNING.
In the State of Massachusetts, the following installation instructions apply: ■ ■ ■ Installations and repairs must be performed by a qualified or licensed contractor, plumber, or gasfitter qualified or licensed by the State of Massachusetts. If using a ball valve, it shall be a T-handle type. A flexible gas connector, when used, must not exceed 3 feet.
IMPORTANT SAFETY INSTRUCTIONS WARNING: To reduce the risk of fire, electrical shock, injury to persons, or damage when using the range, follow basic precautions, including the following: ■ WARNING: TO REDUCE THE RISK OF TIPPING OF THE RANGE, THE RANGE MUST BE SECURED BY PROPERLY INSTALLED ANTI-TIP DEVICES. TO CHECK IF THE DEVICES ARE INSTALLED PROPERLY, SLIDE RANGE FORWARD, LOOK FOR ANTI-TIP BRACKET SECURELY ATTACHED TO FLOOR, AND SLIDE RANGE BACK SO REAR RANGE FOOT IS UNDER ANTI-TIP BRACKET.
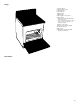
PARTS AND FEATURES This manual covers several different models. The range you have purchased may have some or all of the items listed. The locations and appearances of the features shown here may not match those of your model. Control Panels 36" (91.4 cm) Model A B C D E F G H I J K L M Cooktop Oven Cooktop A. Surface burner locator B. Left rear control knob (15,000 BTU) C. Left front control knob (6,000 BTU) D. Rear center control knob (15,000 BTU) E. Drain button F.
Range A. Surface burner B. Surface burner grate C. Water fill inlet D. Control panel E. Drain button F. Drain outlet G. Gas regulator (rear of unit) H. Door gasket I. Stainless steel backguard (island trim not shown) J. 2-pin connector (not shown; rear of unit - not for consumer use - for factory test only) K. Filler or center grate L. Electronic oven control display M. Self-cleaning latch N. Oven rack O.
COOKTOP USE Cooktop Controls IMPORTANT: Your cooktop is factory-set for use with Natural gas. If you wish to use LP gas, an LP Gas Conversion Kit is included with your new range. See the instructions included with the LP Gas conversion kit for details on making this conversion. Electric igniters automatically light the surface burners when control knobs are turned to LITE.
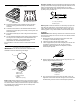
Gas tube opening: Gas must flow freely throughout the gas tube opening for the burner to light properly. Keep this area free of soil and do not allow spills, food, cleaning agents or any other material to enter the gas tube opening. Protect it from spillovers by always using a burner cap. Simmer Plate A B ■ The Simmer Plate is made of aluminum with a nonstick coating to evenly spread the heat over the bottom of cookware.
Cookware Home Canning IMPORTANT: Do not leave empty cookware on a hot surface cooking area, element or surface burner. Ideal cookware should have a flat bottom, straight sides, and a well-fitting lid and the material should be of medium-to-heavy thickness. Rough finishes may scratch the cooktop. Aluminum and copper may be used as a core or base in cookware. However, when used as a base they can leave permanent marks on the cooktop or grates.
ELECTRONIC OVEN CONTROL A C B A. Display B. Oven selector knob C. Oven set knob First Use/Power Interruption When power is first supplied to the range or if power is interrupted, all indicator lights in the display will appear on for 2 seconds. Then, a buzzer will beep one time and “PF” will appear in the display window. Anytime “PF” appears, a power failure has occurred.
It is recommended that distilled water be used. The water reservoir holds 8 cups (2,000 mL) of water. For more information, see the “Steam-Assisted Cooking” section. If you will be on vacation or not using your range for an extended period of time, you should drain the water from the reservoir. See the “Water Reservoir Drain Operation” section. Descale Oven Timer The Oven Timer can be set in hours and minutes and counts down the set time.
Aluminum Foil Preheating IMPORTANT: Do not line the oven bottom with any type of foil, liners or cookware because permanent damage will occur to the oven bottom finish. ■ Do not cover food with aluminum foil when convection or steam-assisted cooking. The time the oven takes to preheat will vary according to the set temperature. It will also vary according to the existing oven cavity temperature, which is measured by the oven cavity sensor.
TRADITIONAL COOKING Baking and Roasting The BAKE function is ideal for baking, roasting or heating casseroles. During baking or roasting, the bake and broil elements will cycle on and off in intervals to maintain oven temperature. Broiling Broiling uses direct radiant heat to cook food. A A A. Broil element (example only) B A. Broil element (example only) B. Brake element (example only) If the oven door is opened during baking or roasting, the broil and bake elements will turn off immediately.
8. When the broiling time ends, “0:00” will appear on the display and 4 tones will sound. The oven will remain on. Four reminder tones will sound every minute, and the time will count up in 1-minute increments. The display will alternate between “0:00” and the count up time until you reset or turn off the oven. 9. Press CANCEL and turn the SELECTOR knob to the RESET position when finished cooking. BROIL SETTINGS Use the following chart when setting broiling levels and broiling temperatures.
CONVECTION COOKING During convection cooking, the fan provides increased hot air circulation continuously and more consistently throughout the oven. The movement of heated air around the food helps to speed up cooking by penetrating the cooler outer surfaces. Food cooks more evenly, browning and crisping outer surfaces while sealing moisture inside. Many foods can be cooked by lowering cooking temperatures 25°F (10°C) and/or cooking time can be shortened by as much as 30 percent.
Convection Roasting In the Convect Roast function, the bake and broil elements operate, along with the fan, to provide heat in the oven cavity. Use Convect Roast when cooking food on a single rack, such as chicken, turkey, tender roasts and vegetables. It may also be used when baking bread, pies, tube and loaf cakes on a single rack. During Convect Roast preheating, the fan and the bake and broil elements heat the oven cavity.
STEAM-ASSISTED COOKING Steam-assisted cooking builds on the benefits of convection cooking by helping to retain moisture, texture and flavor in food. Steam or moisture is automatically added during the cooking cycles. There are 2 categories of steam-assisted cooking; Auto Steam and Select Steam. ■ Steam eliminates the need for the use of parchment paper wraps, water baths and spritzing during the cooking process. ■ When cooking with steam, place meat, poultry, fish and desserts into a cool oven.
Fish The Fish setting bakes at a lower temperature than traditional baking. This gives you moist, tender, evenly-cooked fish with results similar to those achieved when steaming fish in parchment paper. You can cook fillets, steaks or whole fish with this setting. ■ Use the broiler pan, grid and roasting rack or a low-sided baking pan for best results. ■ Preheating is not recommended. ■ Very little to no browning will occur throughout the cycle. If browning is desired, use a higher temperature.
Select Steam Select Steam has 3 settings: High Steam, Low Steam and Keep Warm. Select Steam Settings High Steam The High Steam setting gives best results to vegetables, shellfish and other foods that benefit from a very moist environment with minimal browning By setting the temperature at 250°F (120°C), the lowest setting allowed, you can achieve similar results to steaming on the cooktop. ■ Use the broiler pan and grid or a low-sided baking dish for best results. ■ Preheating is not recommended.
Keep Warm IMPORTANT: Food must be at serving temperature before placing it in the warmed oven. The steam-assisted Keep Warm function adds moisture into the oven to keep food from drying out, keeping food warm and moist before serving. ■ Do not use Keep Warm to heat cold food. Use only cooked, hot foods with Keep Warm. ■ Follow manufacturer’s recommendations when warming empty serving bowls and plates. ■ For best results, do not cover food with foil or lids. ■ Use rack positions 1-4.
COOKING CHARTS Bread Baking Chart Yeast Breads** FOOD Basic White Bread [8½" x 4½" x 2½" (21.6 cm x 11.4 cm x 6.4 cm) pan] Recipe: Bake Auto Steam Breads Convection Bake Sixty-Minute Rolls Recipe: Bake Auto Steam Breads Convection Bake French Bread [approximately 1½ lbs (680 g) loaves] Recipe: Bake Auto Steam Breads Convection Bake Honey Oatmeal Bread [8½" x 4½" x 2½" (21.6 cm x 11.4 cm x 6.
Desserts Baking Chart FOOD OVEN TEMPERATURE BAKING TIME (in minutes) Black Satin Fudge Cake [9" (22.9 cm) springform pan] Recipe: Bake (in waterbath) Auto Steam Desserts 350°F (175°C) 300°F (150°C) 40-45 40 or until toothpick comes out slightly moist Garden Quiche [9" (22.9 cm) pie plate] Recipe: Bake (prebaked crust) Auto Steam Desserts (do not prebake crust) 350°F (175°C) 375°F (190°C) 30-35 28-30 or until knife inserted in center comes out clean Tawny Pumpkin Pie [9" (22.
Fish and Shellfish Cooking Chart Fish FOOD Fillets, ¼" (0.6 cm) thick Auto Steam Fish Convection Bake (preheated) Fillets, ½" (1.3 cm) thick Auto Steam Fish Convection Bake (preheated) Fillets, ¾" (1.9 cm) thick Auto Steam Fish Convection Bake (preheated) Fillets, 1" (2.5 cm) thick Auto Steam Fish Convection Bake (preheated) Fillets, 1½" (3.8 cm) thick Auto Steam Fish Convection Bake (preheated) Whole, dressed 1" (2.
High Steam Cooking Chart VEGETABLES* - arrange in a single layer OVEN TEMPERATURE COOKING TIME (in minutes) Asparagus spears Broccoli, cut up Cauliflower flowerets Cauliflower, whole Corn on cob without husk Corn on cob with husk, no soaking required Zucchini, sliced Acorn squash halves Mushrooms, small whole Carrots, whole Potatoes, tiny new 250°F (120°C) 250°F (120°C) 250°F (120°C) 250°F (120°C) 250°F (120°C) 250°F (120°C) 250°F (120°C) 250°F (120°C) 250°F (120°C) 250°F (120°C) 250°F (120°C) 12-18 18
Low Steam Cooking Chart FOODS OVEN TEMPERATURE COOKING TIME (in minutes) Cheese Strata [8" x 8" x 2" (20.3 cm x 20.3 cm x 5 cm) baking dish] Recipe: Bake Low Steam 325°F (165°C) 300°F (150°C) 45-50 30 or until set Baked Apples (4 medium) Recipe: Bake Low Steam 350°F (170°C) 325°F (165°C) 40-45 15 or until tender Chicken Pot Pie [8" x 8" x 2" (20.3 cm x 20.
Meats and Poultry Roasting Chart ■ Place meat or poultry on the convection roasting rack set on top of the broiler pan. ■ Insert a meat thermometer.
FOOD OVEN TEMPERATURE COOKING TIME (in hours and minutes) MINUTES/LB INTERNAL TEMPERATURE 325°F (165°C) 325°F (165°C) 1:30-2:00 2:00-2:15 15-19 min/lb 18-20 min/lb 130°F (54°C) 135°F (57°C) 400°F (200°C) 400°F (200°C) 1:00-1:05 1:00-1:10 17-21 min/lb 15-19 min/lb 130°F (54°C) 135°F (57°C) 350°F (175°C) 350°F (175°C) 0:40-1:05 1:00-1:15 9-17 min/lb 13-20 min/lb 180°F (82°C) 180°F (82°C) 350°F (175°C) 350°F (175°C) 1:00-1:15 1:15-1:30 12-15 min/lb 14-18 min/lb 180°F (82°C) 180°F (82°C) 32
RANGE CARE Self-Cleaning Cycle WARNING Once the oven has completely cooled, remove ash with a damp cloth. Do not wipe down any of the inside surfaces until the oven has completely cooled down. Applying a cool damp cloth to the inner door glass before it has cooled completely could result in the glass breaking. The oven light will not work during the Self-Cleaning cycle. To Self-Clean: Burn Hazard Do not touch the oven during the Self-Cleaning cycle.
General Cleaning IMPORTANT: Before cleaning, make sure all controls are off and the oven and cooktop are cool. Always follow label instructions on cleaning products. Soap, water and a soft cloth or sponge are suggested first unless otherwise noted. EXTERIOR PORCELAIN ENAMEL SURFACES Food spills containing acids, such as vinegar and tomato, should be cleaned as soon as the entire appliance is cool. These spills may affect the finish.
BROILER PAN AND GRID Oven Door Do not clean in the Self-Cleaning cycle. Cleaning Method: ■ Mildly abrasive cleanser: Scrub with wet scouring pad. ■ Solution of ¹ ₂ cup (125 mL) ammonia to 1 gal. (3.75 L) water: Soak for 20 minutes, then scrub with scouring or steel wool pad. ■ Oven cleaner: Follow product label instructions. Porcelain enamel only, not chrome Dishwasher ■ WARNING Excessive Weight Hazard Use two or more people to move and install range.
TROUBLESHOOTING Try the solutions suggested here first in order to avoid the cost of an unnecessary service call. Nothing will operate Has a household fuse blown or has the circuit breaker tripped? Replace the fuse or reset the circuit breaker. If the problem continues, call an electrician. ■ Surface burners will not operate Cooktop cooking results not what expected ■ Is the proper cookware being used? See “Cookware” section.
■ Is there proper air circulation around bakeware? See “Positioning Racks and Bakeware” section. ■ Is the batter evenly distributed in the pan? Make sure batter is level in the pan. ■ Is the proper length of time being used? Increase or decrease baking or roasting time. ■ Has the oven door been opened while cooking? Oven peeking releases oven heat (and moisture during a steam-assist cycle), this may result in longer cooking times.
ASSISTANCE OR SERVICE Before calling for assistance or service, please check “Troubleshooting.” It may save you the cost of a service call. If you still need help, follow the instructions below. When calling, please know the purchase date and the complete model and serial number of your appliance. This information will help us to better respond to your request. Accessories U.S.A.
KITCHENAID® COOKTOP, BUILT-IN OVEN AND RANGE WARRANTY ONE-YEAR LIMITED WARRANTY For one year from the date of purchase, when this appliance is operated and maintained according to instructions attached to or furnished with the product, KitchenAid or KitchenAid Canada will pay for factory specified parts and repair labor costs to correct defects in materials or workmanship. Service must be provided by a KitchenAid designated service company.
DISCLAIMER OF IMPLIED WARRANTIES; LIMITATION OF REMEDIES IMPLIED WARRANTIES, INCLUDING TO THE EXTENT APPLICABLE WARRANTIES OF MERCHANTABILITY OR FITNESS FOR A PARTICULAR PURPOSE, ARE EXCLUDED TO THE EXTENT LEGALLY PERMISSIBLE. ANY IMPLIED WARRANTIES THAT MAY BE IMPOSED BY LAW ARE LIMITED TO ONE YEAR, OR THE SHORTEST PERIOD ALLOWED BY LAW.