BOTTOM-MOUNT REFRIGERATOR Use & Care Guide For questions about features, operation/performance, parts accessories or service, call: 1-800-422-1230 In Canada, call for assistance 1-800-461-5681, for installation and service, call: 1-800-807-6777 or visit our website at... www.kitchenaid.com or www.KitchenAid.ca RÉFRIGÉRATEUR SUPERPOSÉ Guide d’utilisation et d’entretien Au Canada, pour assistance composez le 1-800-461-5681, pour installation ou service composez le 1-800-807-6777 ou visitez notre site web à..
TABLE OF CONTENTS TABLE DES MATIÈRES REFRIGERATOR SAFETY .......................................................... 3 Proper Disposal of Your Old Refrigerator....................................3 REFRIGERATOR INSTALLATION.................................................4 Unpacking ....................................................................................4 Location Requirements ................................................................4 Electrical Requirements ..............................
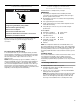
REFRIGERATOR SAFETY Your safety and the safety of others are very important. We have provided many important safety messages in this manual and on your appliance. Always read and obey all safety messages. This is the safety alert symbol. This symbol alerts you to potential hazards that can kill or hurt you and others. All safety messages will follow the safety alert symbol and either the word “DANGER” or “WARNING.
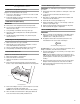
Location Requirements REFRIGERATOR INSTALLATION WARNING Unpacking WARNING Excessive Weight Hazard Use two or more people to move and install refrigerator. Explosion Hazard Keep flammable materials and vapors, such as gasoline, away from refrigerator. Failure to do so can result in back or other injury. Failure to do so can result in death, explosion, or fire. Removing packaging materials ■ Remove tape and glue residue from surfaces before turning on the refrigerator.
Electrical Requirements WARNING Water Supply Connection (For Automatic Ice Maker - Accessory) Read all directions carefully before you begin. IMPORTANT: Electrical Shock Hazard Plug into a grounded 3 prong outlet. Do not remove ground prong. Do not use an adapter. Do not use an extension cord. Failure to follow these instructions can result in death, fire, or electrical shock.
4. To determine the length of copper tubing you will need, measure from connection on lower left rear of refrigerator to water pipe. Add 7 ft. (2.1 m) to allow for moving refrigerator for cleaning. Use ¹⁄₄ in. (6.35 mm) O.D. (outside diameter) copper tubing. Be sure both ends of copper tubing are cut square. 5. Use a hammer and center punch to mark drilling location on water pipe. Using a grounded drill, drill a ¹⁄₄ in. hole in the cold water pipe you have selected. 2.
Freezer Drawer Replacement Refrigerator Doors Handle Removal (Architect® Series) (Graphics are included later in this section.) 1. Using a ³⁄₃₂ in. Allen wrench, loosen the 2 set screws located on the side of each handle. 2. Pull handle straight out from the door. Make sure you keep screws for reattaching handles. Handle Removal (Panel Series) IMPORTANT: ■ Remove door from refrigerator before removing handle. ■ You must remove handles to remove decorator panels or to reverse the door swing. 1.
Door Reversal (on some Architect® Series models) IMPORTANT: ■ Stainless steel refrigerator doors are not reversible. ■ If you want to reverse your non-stainless steel doors so they open from the opposite side, follow these steps. If you are not reversing the doors, see “Door and Hinge Replacement.” ■ You must first remove the handle from panel series refrigerator doors to reverse the door swing. Door Stop Screw Door Handle Seal Screw Front Flat-Head Handle Screw Cabinet Hinge Hole Plug Cabinet 1.
Architect® Series Door Removal & Replacement Door Swing Reversal (optional) 2 1-2 1 Top Hinge 1 1. Cabinet Hinge Hole Plugs 2 3 1-1 4 11 1. Hinge Screws 1. Hinge Cover Screw 2. Top Hinge Cover 3. 5/16" Hex-Head Hinge Screws 4. Top Hinge 1 1 Bottom Hinge 1 2 1. 3/32" Set Screw 3 Side View 3 Front View 1. Shim 2. Center Hinge 3. Hinge Screws 1 2 1. Door Stop Screws 2. Door Stop 5 4 Door Handle Seal Screw Front 1 1.
Panel Series Door Removal & Replacement Door Swing Reversal (optional) 1-2 1 Top Hinge 1. Cabinet Hinge Hole Plugs 1 1-1 2 1 2 1 2 1. Hinge Screws 1. 5/16" Hex-Head Hinge Screws 2. Top Hinge Bottom Hinge 1. 1/4" Hex-Head Screws 2. Top Door Extension 1 2 3 3 1. Shim 2. Center Hinge 3. Hinge Screws 1 2 1. Handle Trim 2. Side Door Trim 4 1 2 1. Bottom Door Cap 2.
Door Closing and Alignment Water System Preparation (on some models) Door Closing Your refrigerator has two front adjustable rollers which are at the base of the refrigerator on either side. If your refrigerator seems unsteady or you want the doors to close easier, adjust the refrigerator's tilt using the instructions below: 1. Plug into a grounded 3 prong outlet. 2. Move the refrigerator into its final position. 3. Remove the base grille and the bottom hinge covers (see “Base Grille” section).
Factory Trim Kit (on some models) There may be an occasion when you will need to remove the factory-installed trim kit, such as moving the refrigerator to a new home or installing custom-made decorator panels. Please read all instructions carefully before removing the trim kit and decorator panels. Replacing the Door Panel 1. Replace the refrigerator door panel: ■ Carefully slide the ¹⁄₄ in. (6.35 mm), maximum thickness, decorator panel in grooves provided by bottom door cap and side trim.
Dimensions for Routing Door Panel (Side View) Dimensions for Custom Wood Panels 1 /4" (6 mm) max. 20 cu. ft. Refrigerator door 355/8" (90.5 cm) 3 /4" (19 mm) min. 42" (106.7 cm) 1 1. Door panel Normal Sounds 36 /16" (91.6 cm) 1 231/4" (59.1 cm) Your new refrigerator may make sounds that your old one didn’t make. Because the sounds are new to you, you might be concerned about them. Most of the new sounds are normal.
Wait 24 hours before you put food into the refrigerator. If you add food before the refrigerator has cooled completely, your food may spoil. ■ REFRIGERATOR USE Ensuring Proper Air Circulation In order to ensure proper temperatures, you need to permit airflow between the refrigerator and freezer sections. As shown in the illustration, cool air enters the freezer section through vents in the rear and top. The air flows forward through the freezer section and recirculates under the freezer floor.
Water Dispenser (on some models) If you did not flush the water system when the refrigerator was first installed, dispense water into a container until you draw and discard 2 to 3 gal. (8 to 12 L) or for approximately 6 to 7 minutes after the water begins dispensing. The water you draw and discard rinses the pipes. Allow several hours for the refrigerator to cool down and chill water. 3. Remove the sealing label from end of new filter and insert into filter head.
REFRIGERATOR FEATURES Your model may have some or all of these features. Features that can be purchased separately as product accessories are labeled with the word “Accessory.” Not all accessories will fit all models. If you are interested in purchasing one of the accessories, please call the toll-free number on the cover or in the “Assistance or Service” section. Important information to know about glass shelves and covers: Do not clean glass shelves or covers with warm water when they are cold.
Crisper and Crisper Cover Utility or Egg Bin (on some models - Accessory) To remove and replace the crisper(s): 1. Slide crisper(s) straight out to the stop. Lift the front of the crisper(s) and slide out the rest of the way. 2. Replace the crisper(s) by sliding back in fully past the drawer stop. (on some models - Accessory) Depending on your model, you may have a one, two or three piece bin. Eggs may be stored in the egg tray or loose in the bin.
Lower basket divider The lower basket divider is designed to be non-removable and it should remain in the refrigerator. DOOR FEATURES Your model may have some or all of these features. Features that can be purchased separately as product accessories are labeled with the word “Accessory.” Not all accessories will fit all models. If you are interested in purchasing one of the accessories, please call the toll-free number on the cover or in the “Assistance or Service” section.
REFRIGERATOR CARE Cleaning 5. There is no need for routine condenser cleaning in normal home operating environments. If the environment is particularly greasy or dusty, or there is significant pet traffic in the home, the condenser should be cleaned every two to three months to ensure maximum efficiency. If you need to clean the condenser: ■ Remove the base grille (see “Base Grille” or “Door Removal” section).
Power Interruptions If the power will be out for 24 hours or less, keep both refrigerator doors closed to help food stay cold and frozen. If the power will be out for more than 24 hours, do one of the following: ■ Remove all frozen food and store it in a frozen food locker. ■ Place 2 lbs. (907 g) of dry ice in the freezer for every cubic foot (28 L) of freezer space. This will keep the food frozen for two to four days.
■ Are the doors opened often? The motor will run longer when this occurs. Conserve energy by getting all items out at one time, keeping food organized, and closing the door as soon as possible. ■ Is the control set correctly for the surrounding conditions? See the “Using the Control(s)” section. ■ Are the doors closed completely? Close the doors firmly. If they do not close completely, see “The doors will not close completely” later in this section.
Temperature is too warm ■ Are the air vents blocked in either compartment? This prevents cold air movement between the compartments. Move objects away from the air vents. See the “Ensuring Proper Air Circulation” section for air vent locations. ■ Are the door(s) opened often? The refrigerator will warm when this occurs. Keep the refrigerator cool by getting all items out at one time, keeping food organized, and closing the door as soon as possible.
In Canada Call the KitchenAid Canada Customer Interaction Center toll free: 1-800-461-5681 Monday to Friday 8:00 a.m. - 6:00 p.m. (EST). Saturday 8:30 a.m. - 4:30 p.m. (EST). Our consultants provide assistance with: ■ Features and specifications on our full line of appliances. ■ WATER FILTER CERTIFICATIONS Referrals to local dealers. For service in Canada Call 1-800-807-6777.
PERFORMANCE DATA SHEETS Interior Water Filtration System Model OWF50-NI300 capacity 300 Gallons (1136 Liters) Tested and Certified by NSF International against ANSI/NSF Standards 42 & 53 for the reduction of: Standard No. 42: Aesthetic Effects Taste & Odor Reduction Chlorine Reduction Mechanical Filtration Unit Particlate Reduction Class 1 Standard No.
KITCHENAID® REFRIGERATOR WARRANTY ONE-YEAR FULL WARRANTY ON REFRIGERATOR For one year from the date of purchase, when this refrigerator (excluding the water filter) is operated and maintained according to instructions attached to or furnished with the product, KitchenAid will pay for factory specified replacement parts and repair labor costs to correct defects in materials or workmanship. Service must be provided by a KitchenAid designated service company.
Notes 26
SÉCURITÉ DU RÉFRIGÉRATEUR Votre sécurité et celle des autres est très importante. Nous donnons de nombreux messages de sécurité importants dans ce manuel et sur votre appareil ménager. Assurez-vous de toujours lire tous les messages de sécurité et de vous y conformer. Voici le symbole d’alerte de sécurité. Ce symbole d’alerte de sécurité vous signale les dangers potentiels de décès et de blessures graves à vous et à d’autres.
Nettoyage avant l’utilisation INSTALLATION DU RÉFRIGÉRATEUR Après avoir enlevé tous les matériaux d’emballage, nettoyer l’intérieur du réfrigérateur avant de l’utiliser. Voir les instructions de nettoyage dans la section “Entretien du réfrigérateur”. Importants renseignements à savoir au sujet des tablettes et des couvercles en verre : Déballage Ne pas nettoyer les tablettes ou couvercles en verre avec de l’eau tiède quand ils sont froids.
■ Si votre réfrigérateur comporte une machine à glaçons, s’assurer qu’un espace additionnel est prévu à l’arrière pour permettre les connexions des conduits d’eau. REMARQUE : Ne pas installer le réfrigérateur près d’un four, d’un radiateur ou d’une autre source de chaleur, ni dans un endroit où la température baissera au-dessous de 55°F (13°C).
4. Pour déterminer la longueur du tube en cuivre, il faut mesurer la distance entre le point de connexion au bas du côté arrière gauche du réfrigérateur et le tuyau d’arrivée d’eau. Ajouter une longueur de 7 pi (2,1 m) pour permettre le déplacement du réfrigérateur pour le nettoyage. Utiliser un tube en cuivre de ¹⁄₄ po (6,35 mm) de diamètre extérieur. Veiller à ce que le tube soit coupé d’équerre aux deux extrémités. 5.
Portes du réfrigérateur Enlèvement de la poignée (série Architect®) (Les illustrations sont incluses plus loin dans cette section.) 1. À l'aide d'une clé Allen de ³⁄₃₂ po, desserrer les 2 vis de retenue situées sur le côté de chaque poignée. 2. Tirer sur la poignée tout droit pour la sortir de la porte. S'assurer de garder les vis pour réinstaller les poignées.
Inversion du sens d'ouverture de la porte (sur certains modèles de la série Architect®) IMPORTANT : ■ Les portes de réfrigérateur en acier inoxydable ne peuvent pas être inversées. ■ Si on souhaite inverser la position des portes qui ne sont pas en acier inoxydable pour pouvoir les ouvrir du côté opposé, procéder comme suit. S'il n'est pas nécessaire de changer l'orientation des portes, voir la section “Remplacement de la porte et des charnières”.
Série Architect® Démontage et réinstallation de la porte Inversion du sens d'ouverture des portes (option) 2 1-2 1 Charnière supérieure 1 1. Bouchons obturateurs de charnière de caisse 2 3 1-1 4 11 1. Vis de charnière 1. Vis de plaque de charnière 2. Plaque de charnière supérieure 3. Vis de charnière à tête hexagonale de 5/16" 4. Charnière supérieure 1 Charnière inférieure 1 1. Vis de retenue de 3/32" 2 3 Vue de côté 3 Vue avant 1. Cale 2. Charnière centrale 3. Vis de charnière 1 2 1.
Série avec panneaux décoratifs Démontage et réinstallation de la porte Inversion du sens d'ouverture des portes (option) 1-2 1 Charnière supérieure 1. Bouchons obturateurs de charnière de caisse 1 2 1-1 1 2 1 2 1. Vis de charnière 1. Vis de charnière à tête hexagonale de 5/16" 2. Charnière supérieure Charnière inférieure 1. Vis à tête hexagonale de 1/4" 2. Prolongement du dessus de la porte 1 2 3 3 1. Cale 2. Charnière centrale 3. Vis de charnière 1 2 1. Garniture de poignée 2.
Fermeture et alignement des portes Préparation du système d’eau (sur certains modèles) Fermeture des portes Votre réfrigérateur comporte deux roulettes réglables à l’avant qui sont à la base du réfrigérateur de chaque côté. Si votre réfrigérateur semble instable ou si vous désirez que les portes se ferment plus facilement, faire le réglage de l’inclinaison du réfrigérateur en suivant les instructions ci-dessous : 1. Brancher l’appareil sur une prise à 3 alvéoles reliée à la terre. 2.
■ Ensemble décoratif de l’usine (sur certains modèles) Une occasion peut survenir lorsque vous devez enlever l’ensemble décoratif installé à l’usine, comme les cas de déménagement du réfrigérateur à une nouvelle habitation ou l’installation de panneaux décoratifs personnalisés. Veuillez bien lire toutes les instructions avant d’enlever l’ensemble décoratif et les panneaux. Remplacement des panneaux de porte 1.
Dimensions pour les panneaux en bois personnalisés Sons normaux Porte du réfrigérateur de 20 pi cu 355/8" (90,5 cm) 42" (106,7 cm) 361/16" (91,6 cm) 231/4" (59,1 cm) Dimensions pour travailler le côté de la poignée de la porte en relief à la toupie (vue latérale) Il est possible que le réfrigérateur neuf émette des bruits que l’appareil précédent ne produisait pas. Comme ces bruits sont nouveaux, ils peuvent vous inquiéter. La plupart de ces nouveaux bruits sont normaux.
UTILISATION DU RÉFRIGÉRATEUR Pour s’assurer d’une circulation d’air appropriée Pour s’assurer d’avoir les températures appropriées, il faut permettre à l’air de circuler entre les sections du réfrigérateur et du congélateur. Comme l’indique l’illustration, l’air froid pénètre dans la section du congélateur par les ouvertures d’aération à l’arrière et au sommet. L’air passe à travers la section du congélateur et recircule sous le plancher du congélateur.
Ajustement des réglages de commande Donner au réfrigérateur le temps de refroidir complètement avant d’ajouter des aliments. Il vaut mieux attendre 24 heures avant de placer des aliments dans le réfrigérateur. Les réglages indiqués à la section précédente devraient être corrects pour l’utilisation normale du réfrigérateur domestique. Les réglages sont faits correctement lorsque le lait ou le jus est aussi froid que vous les aimez et lorsque la crème glacée est ferme.
Remplacement de la cartouche de filtre à eau intérieur 1. Tourner le filtre dans le sens antihoraire jusqu’à ce qu’il se dégage de la tête du filtre. 2. Vider l’eau du filtre dans l’évier et jeter. Essuyer l’excès d’eau dans le couvercle du filtre. 3. Enlever l’étiquette scellée de l’extrémité du filtre neuf et l’insérer dans la tête du filtre. Tourner délicatement le filtre dans le sens horaire jusqu’à ce que le filtre s’arrête, et enclencher le couvercle du filtre fermé.
Tablettes coulissantes (sur certains modèles) ■ Pour faire glisser la tablette vers l’extérieur, tirer la tablette soigneusement vers soi. ■ Pour faire glisser la tablette vers l’intérieur, pousser la tablette jusqu’au fond. 3. Abaisser le devant du couvercle en place et réinstaller le tiroir à viande. Guide d’entreposage des viandes Pour enlever et réinstaller une tablette dans un cadre en métal : 1. Retirer la tablette jusqu’à la butée. 2.
Pour réinstaller le couvercle du ou des bacs : REMARQUE : Avant de réinstaller le couvercle, s’assurer que la barre de renforcement en U est réinstallée à l’avant du couvercle du bac. 1. Introduire l’arrière du cadre du couvercle dans les supports sur les parois latérales du réfrigérateur et abaisser le devant du cadre du couvercle en place. 2. Faire glisser l’arrière de l’insertion en verre dans le cadre du couvercle et abaisser le devant en place.
Tablette à glaçons (sur certains modèles) Pour installer et enlever la tablette à glaçons : 1. Faire glisser la rainure en L de la tablette vers le bas sur la vis de la paroi arrière. Pousser vers l'arrière jusqu'à ce que la vis soit bloquée dans la rainure en L. 2. Placer la rainure avant sur la vis de la paroi avant et pousser vers le bas jusqu'à ce que la tablette soit en place. 3. Pour l'enlever, inverser les étapes ci-dessus. Balconnets dans la porte Pour retirer et réinstaller les balconnets : 1.
ENTRETIEN DU RÉFRIGÉRATEUR Nettoyage AVERTISSEMENT 4. Laver les surfaces extérieures en acier inoxydable ou métalliques peintes avec une éponge propre ou un linge doux et un détergent doux dans de l’eau tiède. Ne pas utiliser de nettoyants abrasifs. Sécher à fond avec un linge doux. Pour mieux protéger les surfaces métalliques extérieures peintes contre les dommages, appliquer une cire pour appareil électroménager (ou cire en pâte pour automobile) avec un linge propre et doux.
4. Remplacer la ou les ampoule(s) grillée(s) avec une ampoule électrique pour appareil ménager de pas plus de 40 watts. 5. Réinstaller le couvercle de l'ampoule en insérant les onglets de protection dans les trous appropriés de chaque côté de l'ensemble d'éclairage. Faire glisser l'écran de protection vers l'avant de l'unité jusqu'à ce qu'il se verrouille en place. REMARQUE : Ne pas forcer l'écran de protection au-delà du point de verrouillage; cela pourrait endommager l'écran de protection de la lumière.
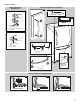
5. 6. 7. 8. Débrancher le réfrigérateur. Vider l’eau du plat de dégivrage. Nettoyer, essuyer et sécher à fond. Retirer toutes les pièces amovibles, bien les envelopper et les attacher ensemble à l’aide de ruban adhésif pour qu’elles ne bougent pas ni ne s’entrechoquent durant le déménagement. 9. Selon le modèle, soulever le devant du réfrigérateur pour qu’il roule plus facilement OU visser les pieds de nivellement pour qu’ils n’égratignent pas le plancher.
■ Le bras de commande en broche de la machine à glaçons est-il en position OFF (élevée)? Abaisser le bras de commande en broche à la position ON (abaissée). Voir la section “Machine à glaçons”. ■ La valve de la canalisation d’eau reliée au réfrigérateur est-elle ouverte? Ouvrir la valve d’eau. Voir la section “Raccordement du réfrigérateur à une canalisation d’eau”.
■ Les aliments sont-ils bien emballés? Vérifier que tous les aliments sont bien emballés. Essuyer les contenants humides d’aliments avant de les placer au réfrigérateur. ■ Les réglages sont-ils faits correctement pour les conditions ambiantes? Voir la section “Utilisation des commandes”. ■ Un programme autodégivreur vient-il de se terminer? Il est normal que des gouttelettes se forment après que le réfrigérateur se dégivre automatiquement.
ASSISTANCE OU SERVICE Accessoires Pour commander des accessoires, composer le 1-800-442-9991 et demander le numéro de pièce approprié ci-dessous ou contacter votre marchand KitchenAid autorisé. Au Canada, composer le 1-800-807-6777. Avant de demander une assistance ou un service, veuillez vérifier la section “Dépannage”. Cette vérification peut vous faire économiser le coût d’une visite de réparation. Si vous avez encore besoin d’aide, suivre les instructions ci-dessous.
FEUILLES DE DONNÉES SUR LE PRODUIT Système de filtration d’eau intérieur Modèle OWF50-NI300 capacité : 300 gallons (1136 litres) Testé et certifié par NSF International selon les normes ANSI/NSF 42 et 53 pour la réduction de : Norme n˚42 : Effets esthétiques Réduction de goût et d'odeur Réduction de chlore Unité de filtration mécanique Réduction des particules Classe 1 Norme n˚53 : Effets sur la santé Unité de réduction de produits chimiques Plomb, atrazine, lindane et réduction 2,4 D Unité de filtration m
GARANTIE DU RÉFRIGÉRATEUR KITCHENAID® GARANTIE COMPLÈTE DE UN AN SUR LE RÉFRIGÉRATEUR Pour une période de un an à partir de la date d’achat, lorsque ce réfrigérateur (à l'exclusion du filtre à eau) est utilisé et entretenu conformément aux instructions fournies avec le produit, KitchenAid paiera pour les pièces de rechange spécifiées par l’usine et les frais de réparation pour corriger les vices de matériaux ou de fabrication.
12642709SP/2225031A © 2003. All rights reserved. Tous droits réservés. ® Registered Trademark/TM Trademark of KitchenAid, U.S.A., KitchenAid Canada licensee in Canada ® Marque déposée/TM Marque de commerce de KitchenAid, U.S.A., Emploi licencié par KitchenAid Canada au Canada 1/03 Printed in U.S.A. Imprimé aux É.-U.