BRIVA™ IN-SINK DISHWASHER (For Residential Use Only) Use & Care Guide For questions about features, operation/performance, parts accessories or service, call: 1-800-422-1230 or visit our website at... www.kitchenaid.com Table of Contents............................................................................................................
TABLE OF CONTENTS DISHWASHER SAFETY.............................................................. 3 Before Using Your Dishwasher....................................................4 PARTS AND FEATURES ............................................................ 5 START-UP GUIDE ..........................................................................6 Using Your New Dishwasher .......................................................6 Using Your New Dishwasher As a Sink ......................................
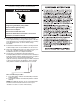
DISHWASHER SAFETY Your safety and the safety of others are very important. We have provided many important safety messages in this manual and on your appliance. Always read and obey all safety messages. This is the safety alert symbol. This symbol alerts you to potential hazards that can kill or hurt you and others. All safety messages will follow the safety alert symbol and either the word “DANGER” or “WARNING.
Before Using Your Dishwasher WARNING Electrical Shock Hazard Plug into a grounded 3 prong outlet. Do not remove ground prong. Do not use an adapter. Do not use an extension cord. Failure to follow these instructions can result in death, fire, or electrical shock. ■ Install where dishwasher is protected from the elements. Protect against freezing to avoid possible rupture of fill valve. Such ruptures are not covered by the warranty.
PARTS AND FEATURES 1 2 12 13 3 14 4 15 5 6 16 17 18 7 8 9 10 11 19 1. 2. 3. 4. 5. 6. Large rack insert Fold-down cup shelf Spray arm Drain air gap Fill air gap Water inlet opening 7. Control panel 8. Model and serial number label [on the front of the sink under the counter] 9. Drain screen basket 10. Drain stopper 11. Drain fine screen 12. Medium rack insert 13. Silverware basket 14. 15. 16. 17. 18. 19.
START-UP GUIDE 7. If you do not have the hot water tank accessory, run hot water at the sink until the water is hot. (See “Dishwasher Performance Tips.”) Turn off water. Before using your dishwasher, remove all packaging materials. Read this entire Use and Care Guide. You will find important safety information and useful operating tips. Using Your New Dishwasher 1. Rinse aid is essential for good drying. Be sure to fill the dispenser before you use your new dishwasher.
Using Your New Dishwasher As a Sink When you need more sink area, remove the rack and spray arm completely. Loading Rack The rack is designed for cups, glasses, plates, pans, casseroles. and utensils. Many items, up to 11 in. (27.94 cm), fit in the rack. (See recommended loading patterns shown.) To open drain 5 place setting 1. Turn the drain stopper one-quarter turn counterclockwise and lift to allow water to drain. To close drain 1.
Fold-Down Cup Shelf To remove insert Fold down the cup shelf on the rack front to hold additional cups, stemware or long items such as utensils and spatulas. Fold up when you need room for larger items in the main rack. Lift up on insert handle and lift insert out of rack. To install insert Place the insert end legs under the rack cross wire. Gently push down until handle fits against outer rack edge.
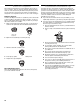
How much detergent to use Loading Silverware Basket ■ The amount of detergent to use depends on the hardness of your water and the type of detergent. If you use too little, dishes won’t be clean. If you use too much in soft water, glassware will etch. ■ Water hardness can change over a period of time. Find out your water’s hardness by asking your local water department, water softener company, or county extension agent. ■ You can order a water hardness test strip. In the U.S.A.
Rinse Aid Dispenser Dishwasher Performance Tips Rinse aids prevent water from forming droplets that can dry as spots or streaks. They also improve drying by allowing water to drain off of the dishes during the final rinse by releasing a small amount of the rinse aid into the rinse water. Your dishwasher is designed to use a liquid rinse aid. Do not use a solid or bar-type. Hot water dissolves and activates the dishwashing detergent.
Use this cycle for light loads, light soil or glassware. Cycle Selection Charts Select the wash cycle and option desired or press the Start pad to repeat the same cycle and option as the previous cycle. NOTE: If the last cycle you completed was a rinse cycle, the dishwasher will run the last full wash cycle and option that you selected when you press the Start pad. A “●” shows what steps are in each cycle. Temperatures indicate where extra heat is added. Water usage is shown in U.S. gallons/liters.
Changing a Cycle or Setting During the first fill of a cycle 1. Open the lid. 2. Press a new cycle and/or options. 3. Check the detergent. Dishwasher must contain the proper amount for the new cycle. 4. Close and latch the lid. The dishwasher resumes the new cycle and/or option after a 5-second pause. After the first fill of a cycle 1. Open the lid. 2. Press the Cancel pad. Option Selections You can customize your cycles by pressing the SANI RINSE™ option.
Status Indicators BRIVA™ In-Sink Wash System The three-level wash system provides excellent cleaning results. Three levels of filtration filter the wash water and prevent food particles from redepositing on the clean dishes. ■ A coarse strainer as part of the drain stopper assembly, prevents bones, pits, and other large objects from entering the pump system. Control Lock ■ Items small enough to pass through the coarse stainer are caught in the drain screen basket.
Drying System The BRIVA™ in-sink wash system features FLASHDRY™ instant drying. At the end of the cycle, the lid automatically pops open, and vapor escapes. This results in fast, efficient drying of your dishes. IMPORTANT: The vapor is hot. Do not touch the lid opening during drying. Do not place anything on top of the lid when running a cycle. WASHING SPECIAL ITEMS If you have doubts about washing a particular item, check with the manufacturer to see if it is dishwasher safe.
Cleaning the exterior DISHWASHER CARE In most cases, regular use of a soft, damp cloth or sponge and a mild detergent is all that is necessary to keep the outside of your dishwasher looking nice and clean. Cleaning Cleaning the drain screen assembly Before each wash load, check the coarse strainer, the drain screen basket and the drain fine screen filter and remove any objects and soil particles. To remove the drain screen assembly for cleaning 1.
Drain Air Gap Check the drain air gap anytime your dishwasher isn’t draining well. If a drain is clogged, the drain air gap protects your dishwasher from water backing up into it. TROUBLESHOOTING First try the solutions suggested here and possibly avoid the cost of a service call... Dishwasher is not operating properly ■ Dishwasher does not run or stops during a cycle Is the lid closed tightly and latched? Is the right cycle selected? Refer to the “Cycle Selection Charts.
Did you use the correct amount of fresh detergent? Use recommended dishwasher detergents only. Refer to the “Detergent Dispenser” section. Never use less than 1 tsp (5 g) per load. Detergent must be fresh to be effective. Store detergent in a cool, dry area. Heavy soil and/or hard water generally require extra detergent. To slow this process use a minimum amount of detergent but not less than 1 tsp (5 g) per load. Use a liquid rinse aid and underload the dishwasher to allow thorough rinsing.
ASSISTANCE OR SERVICE Before calling for assistance or service, please check “Troubleshooting.” It may save you the cost of a service call. If you still need help, follow the instructions below. When calling, please know the purchase date and the complete model and serial number of your appliance. This information will help us to better respond to your request. If you need replacement parts If you need to order replacement parts, we recommend that you only use factory specified parts.
Notes 19
KITCHENAID® DISHWASHER WARRANTY ONE-YEAR FULL WARRANTY For one year from the date of purchase, when this dishwasher is operated and maintained according to instructions attached to or furnished with the product, KitchenAid will pay for replacement parts and repair labor to correct defects in materials or workmanship. Service must be provided by a KitchenAid designated service company.