
Owners Manual


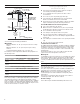


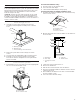
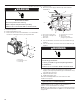
Table Of Contents

9
Install In-Line Smart Kit (Optional)
NOTE: Your range hood can work with either an internal or an
in-line (external) blower motor system. An optional In-Line Smart
Kit (purchased separately) allows the blower motor that comes
with this range hood to be installed in a location other than
inside the range hood cavity.
CAUTION: To reduce the risk of re and electric shock, install
this range hood only with the In-Line Smart Kit manufactured
by Whirlpool, part number W10692945. For installation see the
In-Line Smart Kit installation instructions. See the “Assistance or
Service” section to order.
Install Range Hood
1. Using two or more people, hang range hood on two
mounting screws through the mounting slots on back of
hood.
2. Remove the grease lter. See the “Range Hood Care”
section.
3. Level the range hood and tighten upper mounting screws.
4. Install two 5 x 45 mm lower mounting screws and two
D6.4x18mm washers and tighten. Use the optional wall
anchors if needed.
Connect Vent System
1. Install transition on top of hood (if removed for shipping) with
two 3.5 x 9.5 mm sheet metal screws.
For Vented Installations Only:
1. Fit vent system over the exhaust outlet.
2. Seal connection with clamps.
3. Check that back draft dampers work properly.
For Non-Vented (Recirculating) Installation Only:
1. Assemble the air deector with the duct cover bracket using
four 4.2 x 8 mm screws.
2. Measure from the bottom of the air deector to the bottom of
the hood outlet.
3. Cut the duct to the measured size “X.”
4. Remove the air deector.
5. Slide the duct onto the bottom of the air deector.
6. Place the assembled air deector and duct over the exhaust
outlet from the hood.
7. Reassemble the air deector to the duct cover bracket with
the four assembly screws.
8. Seal connections with vent clamps.
A
B
C
A. Mounting screws
B. Mounting slots
C. Lower mounting screws and washers
B
A
A. Vent transition
B. 3.5 x 9.5 mm screws
A
B
C
A. Assembly screws
B. Air deector
C. Duct cover bracket
X
A
C
D
B
E
A. Air deector
B. Vent clamp
C. X = length to cut vent
duct
D. Vent duct
E. Exhaust outlet