
Instruction Manual
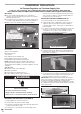

6. Attach the pressure regulator to the mounting clip in the
orientation shown (Vertical: Outlet on bottom / Inlet on top)
See Figure 5.
7. If necessary, add the two adhesive-backed tubing clips on
the household supply line to support the line and prevent
kinking. See Figure 6.
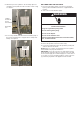
Figure 5
CONNEC-
TION FROM
HOUSE
HOLD WATER
MOUNTING
CLIP
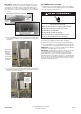
ADHESIVE
TUBING
CLIPS
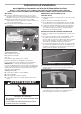
RECONNECTING THE APPLIANCE
1. Reconnect the water supply connections as specied
by the product installation instructions, supplied with the
product.
2. Turn on the household water supply.
3. Reconnect power to the product.
4. Ensure the product is turned on and cooling.
5. If servicing a refrigerator, purge the product by running the
water for at least one minute.
NOTE: If there is no water, check that the pressure regulator
was installed in the proper ow direction.
IMPORTANT: Check all connections for leaks. When placing
the product into its nal location for usage be sure not to kink
the household supply line. A kinked supply line could cause no
ice or water, or low ice and water problems. Leave a two inch
(2”) minimum gap between the appliance back and wall.
Electrical Shock Hazard
Plug into a grounded 3 prong outlet.
Do not remove ground prong.
Do not use an adapter.
Do not use an extension cord.
Failure to follow these instructions can result in death,
fire, or electrical shock.
WARNING
Figure 6