Models KAWS700G, KAWS750G, KAWS800G, KAWS850G 3950451C
TABLE OF CONTENTS WASHER SAFETY ............................................................ 3 PARTS AND FEATURES .................................................... 4 USING YOUR WASHER...................................................... 5 Understanding Washer Cycles ......................................... 5 Loading.............................................................................. 5 Normal Washer Sounds.................................................... 5 Starting Your Washer..............
WASHER SAFETY Your safety and the safety of others are very important. We have provided many important safety messages in this manual and on your appliance. Always read and obey all safety messages. This is the safety alert symbol. This symbol alerts you to potential hazards that can kill or hurt you and others. All safety messages will follow the safety alert symbol and either the word “DANGER” or “WARNING.
PARTS AND FEATURES This manual covers several different models. The washer you have purchased may have some or all of the parts and features listed below. 1. Control panel 7. Basket 2. Model and serial number label 8. Tub 3. Liquid fabric softener dispenser 9. Self-cleaning lint filter 4. SURE CARE agitator 10. White porcelain basket ® 5. Lid 6.
USING YOUR WASHER Understanding Washer Cycles When the Cycle Control knob is set to a number and pulled out, the washer fills (to the selected load size) before agitation and timing start. The washer begins agitating immediately after filling; agitation occurs with the washer lid up or down. During agitation, the agitator creates a continuous rollover action that provides a thorough cleaning of the wash load.
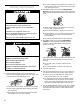
■ Starting Your Washer To reduce wrinkling of permanent press clothes and some synthetic knits, use a large load size to provide more space (see step 5). 2. (OPTIONAL STEP) Pour measured liquid chlorine bleach into the liquid chlorine bleach dispenser. Bleach will be diluted automatically during the wash part of the cycle. Fire Hazard Never place items in the washer that are dampened with gasoline or other flammable fluids. ■ Never use more than 1 cup (250 mL) for a full load.
Water Temp Use For Hot 111°F (44°C) or above Whites and pastels Warm 90°-110°F (32°-43°C) Bright colors Cold 70°-90°F (21°-32°C) Colors that bleed or fade Heavy and greasy soils ■ To stop the washer at any time, push in the Cycle Control knob. ■ To restart the washer, close the lid (if open) and pull out the Cycle Control knob. Selecting a Cycle and Time Moderate to light soils Light soils NOTE: In wash water temperatures colder than 70ºF (21ºC), detergents do not dissolve well.
Delicate cycle The 6-minute Delicate cycle can be used to gently clean delicate items and washable knits. This cycle offers low agitation and spin speeds. To use this cycle 1. Turn the Cycle Control knob to Delicate/ Handwashables. 2. Set the HANDWASH selector to Off. Handwashables cycle Normal cycle The 6-minute Handwashables cycle features brief periods of low speed agitation and soak time. Low spin speed reduces wrinkling. Use this cycle for cleaning lightly soiled hand washables.
Handwash/Wool option Use this option to gently clean washable wool garments (refer to your garment’s care label). Rinse and Spin 1. Turn the FABRIC SELECT option to Handwash/Wool. When using extra detergent for heavily soiled clothes, or washing special-care items, you may find an extra rinse and spin is needed. 2. Set the TEMPERATURE selector to the SENSORSURE™ Cold/Cold setting. 1. Push in the Cycle Control knob and turn it clockwise to any of the Rinse settings. 3.
CARING FOR YOUR WASHER Cleaning Your Washer Cleaning the exterior Use a soft, damp cloth or sponge to wipe up any spills such as detergent or bleach. Occasionally wipe the outside of your washer to keep it looking new. Cleaning the interior Clean your washer interior by mixing 1 cup (250 mL) of chlorine bleach and 2 cups (500 mL) of detergent. Pour this into your washer and run it through a complete cycle using hot water. Repeat this process if necessary.
TROUBLESHOOTING First try the solutions suggested here and possibly avoid the cost of a service call... Washer won’t drain or spin ■ Is the drain hose clogged, or the end of the drain hose more than 72 inches (183 cm) above the floor? See the Installation Instructions for proper installation of drain hose. ■ Is the lid open? The lid must be closed during operation. ■ Is there excessive sudsing? Always measure detergent. Follow manufacturer’s directions.
Washer leaks ■ Check the following: Are the fill hoses tight? Are the fill hose washers properly seated? Is the drain hose clamp properly installed? See the Installation Instructions. ■ Is the sink or drain clogged? Sink and standpipe must be able to handle 17 gallons (64 L) of water per minute. ■ Is water deflecting off the tub ring or the load? Center the tub before starting the washer. The wash load should be balanced and not overloaded. The fill or spray rinses can deflect off the load.
Load is wrinkled ■ Did you unload the washer promptly? Unload the washer as soon as it stops. ■ Did you use the right cycle for the load being washed? Use the Permanent Press cycle or another cycle with low spin speeds (if available) to reduce wrinkling. ■ ■ ■ Did you overload the washer? The wash load must be balanced and not overloaded. Loads should move freely during washing.
ASSISTANCE OR SERVICE Before calling for assistance or service, please check “Troubleshooting.” It may save you the cost of a service call. If you still need help, follow the instructions below. When calling, please know the purchase date and the complete model and serial number of your appliance. This information will help us to better respond to your request. If you need replacement parts If you need to order replacement parts, we recommend that you only use factory specified parts.
KITCHENAID® WASHER WARRANTY TWO-YEAR FULL WARRANTY For two years from the date of purchase, when this washer is operated and maintained according to instructions attached to or furnished with the product, KITCHENAID will pay for replacement parts and repair labor to correct defects in materials or workmanship. Service must be provided by a KITCHENAID designated service company.