
Installation Instructions


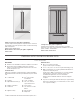
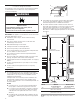
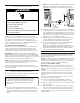
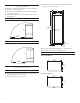

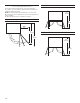
Table Of Contents
- REFRIGERATOR SAFETY
- MODELS
- INSTALLATION REQUIREMENTS
- Tools and Parts
- Location Requirements
- Electrical Requirements
- Water Supply Requirements
- Tipping Radius
- Product Dimensions
- Door Swing Dimensions
- Overlay Series Door Panel and Cabinetry Clearance
- Custom Overlay Panel Dimensions
- Overlay Series Custom Panels
- Stainless Steel and Overlay Series Both 36" and 42" models have the same cabinet side trim
- INSTALLATION INSTRUCTIONS
- Unpack the Refrigerator
- Reduce Tipping Radius (if required)
- Move the Refrigerator into House
- Install Anti-Tip Boards
- Connect the Water Supply
- Plug in Refrigerator
- Move Refrigerator to Final Location
- Level and Align Refrigerator
- Install Overlay Custom Panels
- Adjust Door(s)
- Install Side Panel
- Install Base Grille
- Complete Installation
- SÉCURITÉ DU RÉFRIGÉRATEUR
- MODÈLES
- EXIGENCES D’INSTALLATION
- Outils et pièces
- Exigences d’emplacement
- Spécifications électriques
- Spécifications de l’alimentation en eau
- Rayon de basculement
- Dimensions du produit
- Dimensions pour l’ouverture des portes
- Dégagement des panneaux de porte de série Overlay et des armoires
- Panneaux personnalisés de série Overlay
- Dimensions des panneaux personnalisés
- Les modèles de série Overlay et en acier inoxydable de 36" et 42" sont dotés de la même garniture latérale de caisse
- INSTRUCTIONS D’INSTALLATION
- Déballage du réfrigérateur
- Réduire le rayon de basculement (le cas échéant)
- Déplacement du réfrigérateur dans le domicile
- Installation de planches antibasculement
- Raccordement à la canalisation d’eau
- Brancher le réfrigérateur
- Déplacement du réfrigérateur à son emplacement définitif
- Réglage de l’aplomb et alignement du réfrigérateur
- Installation des panneaux personnalisés Overlay
- Ajustement des portes
- Installation du panneau latéral
- Installation de la grille de la base
- Terminer l’installation

7
Electrical Requirements
Before you move your refrigerator into its nal location, it is
important to make sure you have the proper electrical connection.
If the supply cord is damaged, it must be replaced by the
manufacturer or its service agent or a similar qualied person. Do
not use a cord that shows cracks or abrasion damage along its
length or at either the plug or connection end.
Recommended Grounding Method
A 115 V, 60 Hz, AC only, 15 A or 20 A fused, grounded electrical
supply is required. It is recommended that a separate circuit
serving only your refrigerator be provided. Use an outlet that
cannot be turned off by a switch. Do not use an extension cord.
IMPORTANT: If this product is connected to a GFCI (Ground
Fault Circuit Interrupter) protected outlet, nuisance tripping of the
power supply may occur, resulting in loss of cooling. Food quality
and avor may be affected. If nuisance tripping has occurred, and
if the condition of the food appears poor, dispose of it.
NOTE: Before performing any type of installation or cleaning,
remove the top grille and turn the master power switch to OFF or
disconnect power at the circuit breaker box.
When you are nished, turn ON the master power switch or
reconnect power at the circuit breaker box. Then reset the control
to the desired setting.
Water Supply Requirements
■ All installations must meet local plumbing code requirements.
■ Connect to potable water supply only.
■ The water shutoff should be located in the base cabinet on
either side of the refrigerator or some other easily accessible
area. The right-hand side is recommended. The access hole
through the cabinet must be within 1/2" (1.3 cm) of the rear
wall.
NOTE: If the water shutoff valve is in the back wall behind the
refrigerator, it must be at an angle so that the tube is not
kinked when the refrigerator is pushed into its nal location.
■ If the water shutoff valve is not in the cabinets, the plumbing
for the water line can come through the oor. A 1/2" (1.27 cm)
hole for plumbing should be drilled at least 6" (15.2 cm) from
the right-hand or left-hand side cabinet or panel. On the oor,
the hole should be no more than 1" (2.54 cm) away from the
back wall. See “Connect the Water Supply.”
■ If additional tubing is needed, use copper tubing and check
for leaks. Install the copper tubing only in areas where the
household temperatures will remain above freezing.
■ Do not use a piercing-type or 3/16" (0.48 cm) saddle valve
which reduces water ow and clogs more easily.
NOTE: Your refrigerator dealer has a kit available with a
1/4" (0.64 cm) saddle-type shutoff valve, a union, and copper
tubing. Before purchasing, make sure a saddle-type valve
complies with your local plumbing codes.
Water Pressure
A cold water supply with water pressure between 30 psi and
120 psi (207 kPa and 827 kPa) is required to operate the water
dispenser and ice maker.
NOTE: If the water pressure is less than what is required, the ow
of water from the water dispenser could decrease or ice cubes
could be hollow or irregular shaped. If you have questions about
your water pressure, call a licensed, qualied plumber.
Reverse Osmosis Water Supply
IMPORTANT: The pressure of the water supply coming out of
a reverse osmosis system going to the water inlet valve of the
refrigerator needs to be between 30 psi and 120 psi (207 kPa and
827 kPa).
If a reverse osmosis water ltration system is connected to your
cold water supply, the water pressure to the reverse osmosis
system needs to be a minimum of 40 psi to 60 psi (276 kPa to
414 kPa).
If the water pressure to the reverse osmosis system is less than
40 psi to 60 psi (276 kPa to 414 kPa):
■ Check to see whether the sediment lter in the reverse
osmosis system is blocked. Replace the lter if necessary.
■ Allow the storage tank on the reverse osmosis system to rell
after heavy usage.
■ If your refrigerator has a water lter cartridge, it may further
reduce the water pressure when used in conjunction with a
reverse osmosis system. Remove the water lter cartridge.
If you have questions about your water pressure, call a licensed,
qualied plumber.
Electrical Shock Hazard
Plug into a grounded 3 prong outlet.
Do not remove ground prong.
Do not use an adapter.
Do not use an extension cord.
Failure to follow these instructions can result in death,
fire, or electrical shock.
WARNING
Do not use with water that is microbiologically unsafe or
of unknown quality without adequate disinfection before
or after the system. Systems certified for cyst reduction
may be used on disinfected waters that may contain
filterable cysts.
6"
(15.2 cm)
6"
(15.2 cm)
24"
(60.96 cm) min
1"
(2.54 cm)
6"
(15.2 cm)