KJtchen kid ® REFRIGERATOR For questions about features, operation/performance, In Canada, call for assistance 1-800-461-5681, parts, accessories www.kitchenaid.com P or service, call: 1-800-422-1230 for installation and service, call: 1-800-807-6777 or visit our website at... or www.KitchenAid.ca P REFRIGERATEUR Au Canada, pour assistance composez le 1-800-481-5881, pour installation ou service composez le 1-800-807-8777 ou visitez notre site web &.. www.KitchenAid.
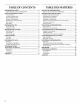
TABLE OF CONTENTS REFRIGERATOR SAFETY ............................................................. Proper Disposal of Your Old Refrigerator .................................... INSTALLATION INSTRUCTIONS .................................................. Tools and Parts ............................................................................ TABLE DES MATIERES 3 3 4 4 Location Requirements ................................................................ Electrical Requirements ........................
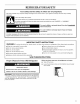
REFRIGERATOR SAFETY Your safety and the safety of others are very important. We have provided many important safety messages in this manual and on your appliance. Always read and obey all safety messages. This is the safety alert symbol. This symbol alerts you to potential hazards that can kill or hurt you and others. All safety messages will follow the safety alert symbol and either the word "DANGER" or "WARNING.
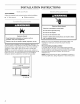
INSTALLATION INSTRUCTIONS TOOLS NEEDED: Gather the required tools and parts before starting installation. • 7/04" Allen wrench • Phillips screwdriver Electrical Plug into a grounded Do not remove ground Shock Hazard 3 prong outlet. prong. Do not use an adapter. Do not use an extension cord. Explosion Hazard Failure to follow these instructions fire, or electrical shock. Keep flammable materials and vapors, such as gasoline, away from refrigerator.
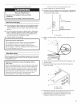
& 1= Unplug refrigerator or disconnect 2. Remove three screw plugs (at top and bottom of refrigerator) from the new hinge locations on the refrigerator cabinet. Do not discard the screw plugs. Excessive Weight Hazard power. Use two or more people to move and install refrigerator. Failure to do so can result in back or other injury. Remove the Packaging Remove tape and glue residue from surfaces before turning on the refrigerator.
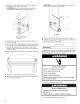
8. Remove thedoorclosers fromtheoldbottomhingeand installthemonthenewbottomhinge IMPORTANT: Besuretoproperly alignthedoorcloserbottombosses withtheholesinthebottomhinge. IMPORTANT: Besuretoproperly alignthedoorcloser-top bosses withtheholesinthehingeplate. I I I B A. Pivot plate B. Boss A. Door closer (top) B. Door closer (bottom) C. Bosses 9. 15. Align the door with the top hinge and install the hinge pin. Remove the three screws from the old bottom hinge and remove the hinge. 16.
3. Turn the leveling legs to the right to lower the refrigerator or turn the leveling legs to the left to raise it. It may take several turns of the leveling legs to adjust the tilt of the refrigerator. REFRIGERATOR USE NOTE: Having someone push against the top of the refrigerator takes some weight off the leveling legs. This makes it easier to adjust the leveling legs. Your new refrigerator may make sounds that your old one didn't make.
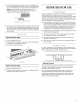
REFRIGERATOR FEATURES To Remove and Replace Wire Storage 1. Remove the bin by pulling it forward. important information to know about glass shelves and 2. Bin: Replace the bin by sliding it back into place. covers: "-¢ Do not clean glass shelves or covers with warm water when they are cold. Shelves and covers may break if exposed to sudden temperature changes or impact, such as bumping. For your protection, tempered glass is designed to shatter into many small, pebble-size pieces. This is normal.
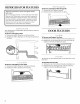
REFRIGERATOR CARE ....... _:.;_ _,-,_ ........._._ NOTE: Not all appliance bulbs will fit your refrigerator. Be sure to replace the bulb with one of the same size, shape, and wattage. To change the light bulb: 1. Unplug refrigerator or disconnect Explosion Use nonflammable Hazard power. 2. Slide the light shield towards the tab. 3. Press the tab down and lift the opposite end of the light shield up. 4. Replace the bulb, 5. Reinstall the light shield by inserting the tab end first.
TROUBLESHOOTING Try the solutions suggested here first in order to avoid the cost of an unnecessary service call. Your refrigerator Temperature is too warm will not operate • Is the power supply cord unplugged? Plug into a greunded 3 prong outlet. • Has a household fuse blown, or has a circuit breaker tripped? Replace the fuse or reset the circuit. • Is the Refrigerator Control turned to the OFF position? See "Using the Control.
ASSISTANCE OR SERVICE Before calling for assistance or service, please check "Troubleshooting." It may save you the cost of a service call. If you still need help, follow the instructions below. When calling, please know the purchase date and the complete model and serial number of your appliance. This information will help us to better respond to your request. If you need replacement parts If you need to order replacement parts, we recommend that you only use factory specified replacement parts.
KITCHENAID ®REFRIGERATOR WARILANTY ONE YEAR LIMITED WARRANTY For one year from the date of purchase, when this major appliance is operated and maintained according to instructions attached to or furnished with the product, KitchenAid or KitchenAid Canada (hereafter "KitchenAid') will pay for factory specified parts and repair labor to correct defects in materials or workmanship. Service must be provided by a KitchenAid designated service company.
P P P P SECURITE DU REFRIGERATEUR Votre s6curit6 et celle des autres est tres importante. Nous donnons de nombreux messages de securite importants dans ce manuel et sur votre appareil menager. Assurez-vous toujours lire tousles messages de securite et de vous y conformer. de Ce symbole d'alerte de securite vous signale les dangers potentiels de deces et de blessures graves & vous eta d'autres.
INSTRUCTIONS D'INSTALLATION OUTILLAGE REQUIS : Rassembler les outils et pieces necessaires avant de commencer I'installation. • Cle Allen de%4" • Tournevis Phillips Risque de choc _lectrique Brancher sur une prise a 3 alv_oles Ne pas enlever la broche de liaison reliee a la terre. a la terre. Ne pas utiliser un adaptateur.
Risque du poids excessif 1. Debrancher le refrigerateur ou deconnecter courant electrique. 2. Oter les trois bouchons a vis (partie superieure et partie inferieure du refrigerateur) se trouvant aux nouveaux emplacements de la charniere sur la caisse du refrigerateur. Ne pas jeter les bouchons a vis.. Utiliser deux ou plus de personnes pour d_placer et installer le refrigerateur. la source de Le non-respect de cette instruction peut causer une blessure au dos ou d'autre blessure.
6. Reinstaller I'axe de la charniere darts le trou de I'axe de la charniere et inverser le sens de la charniere de maniere ace que I'axe de la charniere soit oriente vers le haut. 7. Installer la charniere sur le c6te inf@ieur oppose du refrig@ateur en utilisant les trois vis de charniere. 8. Retirer les ferme-porte de I'ancienne charniere inf@ieure et les installer sur la nouvelle charniere inferieure.
2. Deplacer le refrigerateur a sa position finale. UTILISATION DU REFRIGERATEUR P Risque du poids exceseif P Utiliser deux ou plus de personnee pour d6placer et installer le r6frig6rateur. Le non=respect de cette instruction peut causer une bleesure au dos ou d'autre blessure. Tourner les pieds de nivellement vers la droite pour abaisser le refrigerateur ou tourner les pieds de nivellement vers la gauche pour le lever.
P CARA.CTERI.STIQUES DU REFRIGERATEUR Importante renseignements a savoir au sujet des tablettes et des couverclee en verre : Pour retirer et r4installer le compartiment de rangement m4tallique : 1. Enlever le compartiment en le tirant vers I'avant. 2. Reinstaller le compartiment en le reglissant en place. Ne pas nettoyer los tablettes ou couvercles en verre avec de I'eau tiede quand ils sont froids.
P P ENTRETIEN DU REFRIGERATEUR 7. Risque d'exploaion Utiliser un produit de nettoyage ininflammable. Le non-respect de cette instruction peut causer un deces, une explosion ou un incendie. • Employer un aspirateur avec un accessoire long pour nettoyer les serpentins du condenseur Iorsqu'ils sent sales ou poussiereux. • Reinstaller la grille de la base. Brancher le refrigerateur ou reconnecter la source de courant electrique.
4. Retirer toutes les pieces amovibles, bien les envelopper et les attacher ensemble a I'aide de ruban adhesif pour qu'elles ne bougent pas nine s'entrechoquent durant le demenagement, 5. Fermer les portes a I'aide de ruban adhesif et fixer le cordon d'alimentation a la partie arriere du refrig6rateur. Lorsque vous arriverez a votre nouvelle habitation, remettre tout en place et consulter la section "Instructions d'installation" pour les instructions de preparation.
Les 6tag_res sont-elles bien en place? Remettre les etageres a la bonne position. Voir "Utilisation du refrigerateur" pour plus de renseignements. La porte ne ferme pas compl_tement • Les aliments emballes emp6chent-ils la porte de fermer? Reorganiser les contenants de sorte qu'ils soient plus rapproches et prennent moins d'espace. Le joint colle-t-il? Nettoyer le joint et la surface avec laquelle il est en contact. Frotter en appliquant une fine couche de paraffine sur le joint apres le nettoyage.
P P GARANTIE DU REFRIGERATEUR KITCHENAID ® GARANTIE LIMITC:E DE UN AN Pendant un an & compter de la date d'achat, Iorsque ce gros appareil menager est utilise et entretenu conformement aux instructions jointes a ou fournies avec le produit, KitchenAid ou KitchenAid Canada (ci-apres designees "KitchenAid") paiera pour les pieces specifiees par I'usine et la main-d'oeuvre pour corriger les vices de materiaux ou de fabrication. Le service doit _tre fourni par une compagnie de service designee par KitchenAid.
2300260 @ 2005. All rights reserved, Tous droits r_serv_s. ® Registered Trademark/TM Trademark of KitchenAid, U.S.A. KitehenAid Canada licensee in Canada ® Marque depos_efTM Marque de commerce de KitchenAid, U.S.A., Emploi licencie par KitchenAid Canada au Canada 10/05 Printed in U,,S,A, Imprim6 aux E.-U.