®itchen_kid OUTDOOR For questions ® BUILT-IN DUAL SIDE BURNERS about features, operation/performance, parts, accessories or visit our website at www.kitchenaid.com or service, call: 1-800-422-1230 In Canada, call for assistance, installation and service, call: 1-800-807-6777 or visit our website at www, Kitchenaid,ca DEUX BRULEURS LATERAUX ENCASTRES P POUR USAGE EXTERIEUR Au Canada, pour assistance, installation ou service composez le 1-800-807-6777 ou visitez notre site Web a... www.Kitchenaid.
TABLE OF CONTENTS TABLE DES MATIERES OUTDOOR BUILT-IN SIDE BURNER SAFETY ............................ 3 INSTALLATION REQUIREMENTS ................................................ 5 Tools and Parts ............................................................................ 5 Location Requirements ................................................................ Product Dimensions ..................................................................... Cabinet Cutout Dimensions ................................
OUTDOOR BUILT-IN SIDE BURNER SAFETY Your safety and the safety of others are very important. We have provided many important safety messages in this manual and on your appliance. Always read and obey all safety messages. This is the safety alert symbol. This symbol alerts you to potential hazards that can kill or hurt you and others. All safety messages will follow the safety alert symbol and either the word "DANGER" or "WARNING.
IMPORTANT: This side burner is manufactured for outdoor use only. For side burners that are to be used at elevations above 2000 ft (609.6 m) orifice conversion is required. See "Gas Supply Requirements" section. It is the responsibility of the installer to comply with the minimum installation clearances specified on the model/serial rating plate. The model/serial rating plate can be found on the right-hand side panel.
INSTALLATION REQUIREMENTS _?' i_: _ _._1:_ Gather the required tools and parts before starting installation. Read and follow the instructions provided with any tools listed here.
Built-In Outdoor Side Burner Enclosure The enclosure for the built-in outdoor side burner is to be a minimum of 11" (28.0 cm) high x 23" (58.4 cm) deep x 14" (35.6 cm) wide for front to back model and 11" (28.0 cm) high x 17" (43.2 cm) deep x 25" (63.5 cm) wide for side by side model. Counter or support surfaces must be level. The installation of this grill must conform with local codes or, in the absence of local codes, with either the National Fuel Gas Code, ANSI Z223.
Minimum Spacing Requirement Between Cutouts - Dimension K Between 2 or more sets of Access Doors adjacent to each other: K = 14" (35.6 cm) when 2 adjacent doors are opened to 90 degrees K = 8" (20.3 cm) when 1 of the adjacent doors is opened to 90 degrees Between a set of Access Doors and a Trash Drawer, Utility Drawer, Warming Drawer, Refrigerator, or Ice Maker: K = 8" (20.
Cutout Dimensions - Built-in Access Doors Door Size Dimension F Dimension L* 18" (45.7 cm) 163/16"(41.1 cm) 11/2"(3.8 cm) 27" (68.6 cm) 251/8'' (63.8 cm) 11/2"(3.8 cm) 30" (76.2 cm) 281/8'' (71.4 cm) 11/2"(3.8 cm) 36" (91.4 cm) 341/8'' (86.7 cm) 11/2"(3.8 cm) 48" (121.9 cm) 461/8'' (117.2 cm) 11/2'' (3.8 cm) *Dimension L is the minimum mounting surface area around the opening for mounting the optional door or drawers. Dimension G Dimension H 24" (61.0 cm) 35W' (89.
National Fire Protection Association One Batterymarch Park Quincy, Massachusetts 02269 £:i',l@CI (;.a/_,.@;]! g ............................ Electrical Shock Hazard Plug into a grounded 3 prong outlet. A. 3 prong ground plug B. 3-prong polarized type outdoor GFI outlet C. Ground prong Do not remove ground prong. Do not use an adapter. Do not use an extension cord. "" _f ; _'_'_ /s /s ,/ _ .................. Failure to follow these instructions can result in death, fire, or electrical shock.
Natural Gas Gas Pressure Regulator The gas pressure regulator supplied with this side burner must be used. The inlet (supply) pressure to the regulator should be as follows for proper operation: LP Gas: Set pressure: 11" (27.9 cm) WCP Inlet (supply) pressure: 11" to 14" (27.9 cm to 35.5 cm) WCP Natural Gas: Set pressure: 4" (10.2 cm) WCP Inlet (supply) pressure: 7' to 14" (17.8 cm to 35.5 cm) WCP maximum. Side burners are equipped for use with Natural gas.
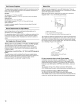
INSTALLATION (_:_td e_ __d_ INSTRUCTIONS _:__:_:_se:_ _:_:_st:a_la_:_o_ 3. Excessive Weight Hazard Use two or more people to move and install side burner. Using a wrench to tighten, connect the gas supply to the side burner. Use pipe-joint compound on all non-flared male threads. Do not kink or damage the flexible connector when moving the side burner. A Failure to do so can result in back or other injury. • Unpack side burner. Remove all packaging materials and remove side burner from carton.
Plug in Side Burner 1. This built-in outdoor side burner comes with 5,000 mAmp power transformer plug assembly for the igniter system. Plug in the single-prong plug in the receptacle on the lower lefthand side of the side burner. The burners are tested and factory-set for most efficient operation. However, variations in gas supply and other conditions may make minor adjustments to low flame setting necessary. It is recommended that adjustments be made by a qualified person.
USING YOUR OUTDOOR LI_II_I_ _!_ _Q_ SIDE BURNER _:_i_i_i_i_ ' 5. You will see the igniter glow. When burner is lit, release the knob. Turn knob to desired setting. 6. Repeat for each of the other burners as needed. IMPORTANT: If burner does not light immediately, turn the burner knob to OFF and wait 5 minutes before relighting. Manually Burn Hazard Do not let the burner flame extend beyond the edge of the pan. lighting the side burner 1. Remove the outdoor side burner cover. 2.
OUTDOOR SIDE BURNER CARE IMPORTANT: Before cleaning, make sure all controls are off and the side burner is cool. Always follow label instructions on cleaning products. INTERIOR For routine cleaning, wash with soap and water using a soft cloth or sponge. Rinse with clean water and dry at once with a soft, lint-free cloth to avoid spots and streaks. Do not use steel wool to clean the side burner, as it will scratch the surface.
TROUBLESHOOTING Try the solutions suggested here first in order to avoid the cost of an unnecessary service call. Call the KitchenAid Customer eXperience Center toll free: 1-800-422-1230. Our consultants provide assistance with: Features and specifications Nothing will operate • • on our full line of appliances. Installation information. Is the main or regulator gas shutoff valve in the off position? See the Installation Instructions. Use and maintenance procedures.
KITCHENAID ®OUTDOOR PRODUCT WARRANTY LIMITED WARRANTY For one year from the date of purchase, when this outdoor product is operated and maintained according to instructions attached to or furnished with the product, KitchenAid brand of Whirlpool Corporation or Whirlpool Canada LP (hereafter "KitchenAid") will pay for Factory Specified Parts and repair labor to correct defects in materials or workmanship. Service must be provided by a KitchenAid designated service company.
If outside the 50 United States and Canada, contact your authorized KitchenAid dealer to determine if another warranty applies. If you need service, first see the "Troubleshooting" section of the Use & Care Guide. After checking "Troubleshooting," you may find additional help by checking the "Assistance or Service" section or by calling KitchenAid. In the U.S.A., call 1-800-422-1230. In Canada, call 1-800-807-6777. 9/07 Keep this book and your sales slip together for future reference.
SI CURITI DU BRULEUR LATI RAL ENCASTRE D'EXTERIEUR p Votre securit6 p et celle des autres est tres importante. Nous donnons de nombreux messages de s6curit6 importants dans ce manuel et sur votre appareil m6nager. Assurez-vous toujours lire tous les messages de s6curit6 et de vous y conformer. de Ce symbole d'alerte de s6curit6 vous signale les dangers potentiels de d6c6s et de blessures graves & vous et & d'autres.
IMPORTANT utilises & des I'alimentation specifi6s sur : Ce brQleur lat6ral est congu pour un usage a I'ext6rieur uniquement. Pour les brQleurs lateraux destines & 6tre altitudes superieures & 2000 pi (609,6 m), il est necessaire de convertir le gicleur. Voir la section "Specifications de en gaz". C'est a I'installateur qu'incombe la responsabilite de respecter les degagements de separation minimums, la plaque signaletique de I'appareil. La plaque signaletique se trouve sur le c6te droit du brQleur lateral.
EXIGENCES D'INSTALLATION Rassembler les outils et pieces necessaires avant de commencer I'installation. Lire et suivre les instructions fournies avec les outils indiqu6s ici. Style I - Deux br0leurs encastr_s, configuration avant/arri_re Outillage n_cessaire • M_tre ruban • Petit tournevis & lame plate • Tournevis & lame plate • Tournevis Phillips n° 2 et n° 3 • Niveau • Cle ou pince • Cle & tuyauterie • Ciseaux ou pince coupante (pour couper les attaches) • Solution non-corrosive ® \ de
Enceinte du br_leur lateral encastr_ d'ext_rieur L'enceinte du brQleur lateral encastre d'exterieur doit comporter les dimensions minimales suivantes • 11" (28 cm) de hauteur x 23" (58,4 cm) de profondeur x 14" (35,6 cm) de largeur pour le modele a configuration avant/arriere et 11" (28 cm) de hauteur x 17" (43,2 cm) de profondeur x 25" (63,5 cm) de largeur pour le modele juxtaspose. ................... +...................................
Entre au moins 2 portes d'acc_s adjacentes : K = 14" (35,6 cm) Iorsque 2 portes adjacentes sont ouvertes a 90 degres K = 8" (20,3 cm) Iorsque I'une des portes adjacentes Entre un ensemble de portes d'acc_s machine a gla_ons : K = 8" (20,3 cm) Iorsque I'une des portes adjacentes Entre un tiroir a d_chets, un tiroir est ouverte & 90 degres et un tiroir a d_chets, utilitaire un tiroir utilitaire, un tiroir-r_chaud, r_frig_rateur ou est ouverte & 90 degres ou un tiroir-r_chaud : K = 3" (7,6 cm)
Taille de la porte Dimension F Dimension L* 18" (45,7 cm) 163/le'' (41,1 cm) 11/2"(3,8 cm) 27" (68,6 cm) 251/8'' (63,8 cm) 11/2"(3,8 cm) 30" (76,2 cm) 281/8'' (71,4 cm) 11/2"(3,8 cm) 36" (91,4 cm) 341/8'' (86,7 cm) 11/2"(3,8 cm) 48" (121,9 cm) 461/8'' (117,2 cm) 11/2'' (3,8 cm) *La dimension L represente la zone de surface de montage minimale autour de I'ouverture pour le montage de la porte ou des tiroirs facultatifs.
National Fire Protection Association One Batterymarch Park Quincy, Massachusetts 02269 g ............................ Risque de choc _lectrique Brancher sur une prise a 3 alv_oles A. Prise _ 3 broches reli_e _ la terre B. Prise murale polaris_e d'ext_rieur _ 3 alv_oles avec disjoncteur diff_rentiel C. Broche de liaison _ la terre reli_e a la terre. Ne pas enlever la broche de liaison a la terre. Ne pas utiliser un adaptateur. Ne pas utiliser un cable de rallonge. I i!III_I I .,I"I ,.
D_tendeur Gaz naturel Le detendeur fourni avec ce brQleur lateral doit _tre utilis& Pour un fonctionnement correct, la pression & I'entree (alimentation) du detendeur doit _tre comme suit : Gaz propane : Pression de service : 11" (27,9 cm) (colonne d'eau) Pression & I'entree (alimentation) : 11" & 14" (27,9 cm & 35,5 cm) (colonne d'eau) Gaz naturel • Pression de service : 4" (10,2 cm) (colonne d'eau) Pression de service (alimentation) : 7" & 14" (17,8 cm & 35,5 cm) (colonne d'eau) maximum.
INSTRUCTIONS D'INSTALLATION 3. Risque du poids excessif Utiliser deux ou plus de personnes installer le gril. pour d_placer et A I'aide d'une cle pour serrer, raccorder I'alimentation en gaz au brQleur lateral. Utiliser un compose d'etanch6it6 des tuyauteries sur tousles filets m&les non evas6s. Veiller & ne pas ecraser/d6former/endommager le conduit de raccordement flexible Iors d'un deplacement du brQleur lateral.
Les brQleurs ont et6 testes et regl6s & I'usine pour un fonctionnement efficace. Cependant de legeres modifications du debit thermique minimum peuvent etre necessaires du fait de variations de la pression de distribution du gaz disponible et d'autres conditions. II est recommande que ces reglages soient effectu6s par une personne qualifiee. Risque de choc _lectrique Brancher sur une prise a 3 alv_oles Pour contr61er et regler les flammes sur les brQleurs, on doit enlever la grille. reli_e a la terre.
UTILISATION DU BRULEUR _'_'_ _'_ ee_ % _' LATI RAL _' _ _' 6. 4. e ....... D'EXTI RIEUR ........... _ Ne passe pencher au-dessus du brQleur lateral. Enfoncer et tourner le bouton de commande & la position LITE/HI (allumage/elev6e); le maintenir enfonc& Risque de br01ures La flamme du br01eur ne doit pas d_passer du bord du r_cipient de cuisson. Le non-respect br01ures. i 5. On doit percevoir le crepitement gen6r6 par I'allumeur.
IMPORTANT : Si un brQleur ne s'allume pas immediatement, ramener le bouton du robinet & la position d'arr_t OFF et attendre 5 minutes avant une nouvelle tentative. Si un brQleur ne s'allume pas apres une tentative d'allumage manuel, contacter le centre pour I'eXperience de la clientele KitchenAid. Voir la section "Assistance ou service". • Le nettoyage doit toujours _tre suivi d'un rin£;age a I'eau tiede propre.
DEPANNAGE Essayer les solutions sugg_r_es ici d'abord afin d'_viter le coQt d'une visite de service non n_cessaire. Rien ne fonctionne • Le robinet principal d'arr_t ou de r_glage du gaz est-il a la position ferrule? Voir les Instructions d'installation. Le brQleur lateral est-il bien raccord_ a la canalisation de gaz? Contacter un technicien de reparation qualifie ou voir les Instructions d'installation.
GARANTIE DES PRODUITS POUR USAGE EXTERIEUR KITCHENAID ® GARANTIE LIMITI_E Pendant un an & compter de la date d'achat, Iorsque ce produit pour usage exterieur est utilise et entretenu conformement aux instructions jointes & ou fournies avec le produit, la marque KitchenAid de Whirlpool Corporation ou Whirlpool Canada LP (ci-apres designees "KitchenAid") paiera pour les pieces specifiees par I'usine et la main-d'ceuvre pour corriger les vices de materiaux ou de fabrication.
Si vous residez a I'exterieur du Canada et des 50 €:tats des €:tats-Unis, contactez votre marchand KitchenAid autorise pour determiner si une autre garantie s'applique. Si vous avez besoin de service, voir d'abord la section "Depannage" du Guide d'utilisation et d'entretien. Apres avoir verifi6 la section "Depannage", de I'aide supplementaire peut _tre trouvee en verifiant la section "Assistance ou service" ou en appelant KitchenAid. Aux E.-U., composer le 1-800-422-1230.