
Installation Instructions


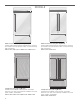


Table Of Contents
- REFRIGERATOR SAFETY
- MODELS
- INSTALLATION REQUIREMENTS
- Tools and Parts
- Location Requirements
- Electrical Requirements
- Water Supply Requirements
- Tipping Radius
- Product Dimensions
- Door Swing Dimensions
- Overlay Series Door Panel and Cabinetry Clearance
- Custom Overlay Panel Dimensions
- Overlay Series Custom Panels
- Stainless Steel and Overlay Series Both 36" and 42" models have the same cabinet side trim
- INSTALLATION INSTRUCTIONS
- Unpack the Refrigerator
- Reduce Tipping Radius (if required)
- Move the Refrigerator into House
- Install Anti-Tip Boards
- Connect the Water Supply
- Plug in Refrigerator
- Move Refrigerator to Final Location
- Level and Align Refrigerator
- Install Overlay Custom Panels
- Adjust Door(s)
- Install Side Panel
- Install Base Grille
- Complete Installation
- SÉCURITÉ DU RÉFRIGÉRATEUR
- MODÈLES
- EXIGENCES D’INSTALLATION
- Outils et pièces
- Exigences d’emplacement
- Spécifications électriques
- Spécifications de l’alimentation en eau
- Rayon de basculement
- Dimensions du produit
- Dimensions pour l’ouverture des portes
- Dégagement des panneaux de porte de série Overlay et des armoires
- Panneaux personnalisés de série Overlay
- Dimensions des panneaux personnalisés
- Les modèles de série Overlay et en acier inoxydable de 36" et 42" sont dotés de la même garniture latérale de caisse
- INSTRUCTIONS D’INSTALLATION
- Déballage du réfrigérateur
- Réduire le rayon de basculement (le cas échéant)
- Déplacement du réfrigérateur dans le domicile
- Installation de planches antibasculement
- Raccordement à la canalisation d’eau
- Brancher le réfrigérateur
- Déplacement du réfrigérateur à son emplacement définitif
- Réglage de l’aplomb et alignement du réfrigérateur
- Installation des panneaux personnalisés Overlay
- Ajustement des portes
- Installation du panneau latéral
- Installation de la grille de la base
- Terminer l’installation

5
Stainless Steel Series (42" [106.7 cm] Models)
Features wraparound styling that complements the contoured
door handles. This series provides a warm commercial-looking
built-in refrigerator.
KBFN402ESS, KBFN502ESS
Black Stainless Steel Series (42" [106.7 cm] Models)
KBFN502EBS
Overlay Series (42" [106.7 cm] Models)
Features factory-installed, overlay style trim, to provide a
“frameless” look. This series requires the installation of custom
panels, handles, and standoffs.
KBFN402EPA, KBFN502EPA
INSTALLATION REQUIREMENTS
Tools and Parts
IMPORTANT:
■ Installer: Leave Installation Instructions with the homeowner.
■ Homeowner: Keep Installation Instructions for future
reference. Save these Installation Instructions for the local
electrical inspector’s use.
Tools Needed
Gather the required tools and parts before starting installation.
Read and follow the instructions provided with any tools listed
here.
■ Cordless drill ■ Torx
†
T15 and T27
screwdrivers
■ Drill bits ■ 11/32" nut driver
■ Adjustable wrenches (2) ■ 3/8", 1/4", and 1/2"
open-end wrenches
■ Phillips screwdriver ■ 5/32" hex key
■ Small level ■ 1/4" and 5/16" socket
drivers
■ Appliance dolly ■ Tape measure
■ Utility knife
Parts Needed
■ #8 x 3" (7.6 cm) wood screws
(longer screws may be needed) (6)
■ 2" x 4" x 32" (5 cm x 10 cm x 81 cm) wood board(s) (1 or 2)
■ Make custom panels or consult a qualied cabinetmaker or
carpenter to make the panels.
Overlay Series: Make custom panels, or consult a qualied
cabinetmaker or carpenter to make the panels. See
“Installation Requirements” for more information.
Stainless Series and Black Stainless Series are shipped
complete.
■ If you are connecting the water line directly to copper tubing
and not to a shutoff valve, you need a ferrule, a union, and a
1/4" compression tting.
†
TORX is a trademark of Acument Intellectual Properties, LLC.