
Installation Instructions


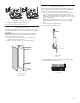


Table Of Contents
- REFRIGERATOR SAFETY
- MODELS
- INSTALLATION REQUIREMENTS
- Tools and Parts
- Location Requirements
- Electrical Requirements
- Water Supply Requirements
- Tipping Radius
- Product Dimensions
- Door Swing Dimensions
- Overlay Series Door Panel and Cabinetry Clearance
- Custom Overlay Panel Dimensions
- Overlay Series Custom Panels
- Stainless Steel and Overlay Series Both 36" and 42" models have the same cabinet side trim
- INSTALLATION INSTRUCTIONS
- Unpack the Refrigerator
- Reduce Tipping Radius (if required)
- Move the Refrigerator into House
- Install Anti-Tip Boards
- Connect the Water Supply
- Plug in Refrigerator
- Move Refrigerator to Final Location
- Level and Align Refrigerator
- Install Overlay Custom Panels
- Adjust Door(s)
- Install Side Panel
- Install Base Grille
- Complete Installation
- SÉCURITÉ DU RÉFRIGÉRATEUR
- MODÈLES
- EXIGENCES D’INSTALLATION
- Outils et pièces
- Exigences d’emplacement
- Spécifications électriques
- Spécifications de l’alimentation en eau
- Rayon de basculement
- Dimensions du produit
- Dimensions pour l’ouverture des portes
- Dégagement des panneaux de porte de série Overlay et des armoires
- Panneaux personnalisés de série Overlay
- Dimensions des panneaux personnalisés
- Les modèles de série Overlay et en acier inoxydable de 36" et 42" sont dotés de la même garniture latérale de caisse
- INSTRUCTIONS D’INSTALLATION
- Déballage du réfrigérateur
- Réduire le rayon de basculement (le cas échéant)
- Déplacement du réfrigérateur dans le domicile
- Installation de planches antibasculement
- Raccordement à la canalisation d’eau
- Brancher le réfrigérateur
- Déplacement du réfrigérateur à son emplacement définitif
- Réglage de l’aplomb et alignement du réfrigérateur
- Installation des panneaux personnalisés Overlay
- Ajustement des portes
- Installation du panneau latéral
- Installation de la grille de la base
- Terminer l’installation

21
Level and Align Refrigerator
IMPORTANT: All four leveling legs must contact the oor to
support and stabilize the full weight of refrigerator. Rollers are for
moving refrigerator and not for permanent support.
After moving the refrigerator to its nal location:
1. Use a 5/16" (0.79 cm) socket driver to turn the leveling bolts
clockwise to extend the legs to the oor as shown. The rollers
should be off the oor.
2. Adjust the leveling legs to level and align the refrigerator from
left to right and front to back so that the refrigerator is level
and aligned with the cabinetry. The cabinetry surface must be
plumb for the ideal t of the refrigerator side trim.
3. Continue adjusting all of the leveling legs to raise the
refrigerator until the top is within at least 1" (2.54 cm) of the
top soft.
NOTE: If an anti-tip board has been used, adjust the leveling
legs until the top of the refrigerator is within 1/4" (0.64 cm) of
the bottom of the anti-tip board as shown. Do not crush the
compressor cover.
IMPORTANT: Adjust in small increments to keep from
damaging the cabinet trim and causing problems with the
door alignment or top grille t. To avoid damage to the cabinet
or leveling legs, do not apply more than 50 inch-pounds
(5.65 Nm) of torque to the leveling bolts. The leveling legs can
be extended to a maximum of 1¹⁄
4" (3.18 cm) below the rollers.
4. For Overlay models, additional adjustments may be needed
after the custom panels are installed.
Install Overlay Custom Panels
IMPORTANT:
■ Install the custom handles prior to installing the panels on
the refrigerator. For more information on KitchenAid custom
handle selection, refer to the KitchenAid Catalog, visit
www.kitchenaid.com, or call 1-800-422-1230. In Canada,
visit www.kitchenaid.ca, or call 1-800-807-6777.
■ Create custom door overlay panels according to the
specications in the “Overlay Series Custom Panels” section.
■ KitchenAid is not responsible for the removal or addition of
molding or decorative panels that would not allow access to
the refrigerator for service.
WARNING
Tip Over Hazard
Refrigerator is top heavy and tips easily when not
completely installed.
Keep doors taped closed until refrigerator is
completely installed.
Use two or more people to move and install
refrigerator.
Failure to do so can result in death or serious injury.
A B
A
B
A. Rear leveling bolt
B. Front leveling bolt
BA
C
D
A. Center board 1/4" (6 mm) max. above refrigerator
B. Two 2" x 4" x 32" (5 cm x 10 cm x 81 cm) boards
C. Attach to studs with six #8 x 3" (7.6 cm) screws
D. Compressor cover
1/4"
(6 mm)
max.
2"
(5 cm)