
Installation Instructions
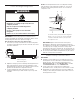
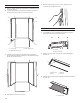
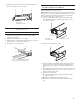
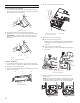
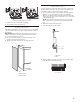
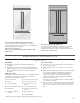
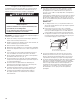
Table Of Contents
- REFRIGERATOR SAFETY
- MODELS
- INSTALLATION REQUIREMENTS
- Tools and Parts
- Location Requirements
- Electrical Requirements
- Water Supply Requirements
- Tipping Radius
- Product Dimensions
- Door Swing Dimensions
- Overlay Series Door Panel and Cabinetry Clearance
- Custom Overlay Panel Dimensions
- Overlay Series Custom Panels
- Stainless Steel and Overlay Series Both 36" and 42" models have the same cabinet side trim
- INSTALLATION INSTRUCTIONS
- Unpack the Refrigerator
- Reduce Tipping Radius (if required)
- Move the Refrigerator into House
- Install Anti-Tip Boards
- Connect the Water Supply
- Plug in Refrigerator
- Move Refrigerator to Final Location
- Level and Align Refrigerator
- Install Overlay Custom Panels
- Adjust Door(s)
- Install Side Panel
- Install Base Grille
- Complete Installation
- SÉCURITÉ DU RÉFRIGÉRATEUR
- MODÈLES
- EXIGENCES D’INSTALLATION
- Outils et pièces
- Exigences d’emplacement
- Spécifications électriques
- Spécifications de l’alimentation en eau
- Rayon de basculement
- Dimensions du produit
- Dimensions pour l’ouverture des portes
- Dégagement des panneaux de porte de série Overlay et des armoires
- Panneaux personnalisés de série Overlay
- Dimensions des panneaux personnalisés
- Les modèles de série Overlay et en acier inoxydable de 36" et 42" sont dotés de la même garniture latérale de caisse
- INSTRUCTIONS D’INSTALLATION
- Déballage du réfrigérateur
- Réduire le rayon de basculement (le cas échéant)
- Déplacement du réfrigérateur dans le domicile
- Installation de planches antibasculement
- Raccordement à la canalisation d’eau
- Brancher le réfrigérateur
- Déplacement du réfrigérateur à son emplacement définitif
- Réglage de l’aplomb et alignement du réfrigérateur
- Installation des panneaux personnalisés Overlay
- Ajustement des portes
- Installation du panneau latéral
- Installation de la grille de la base
- Terminer l’installation

24
Door Swing Adjustment
36" (91.4 cm) Single-Door Models
1. Check that the refrigerator door can open freely. If the door
opens too wide, remove the door stop screw from the bottom
hinge with a Torx
†
T15 screwdriver.
2. Hold the door open to a position that is less than 90°.
3. Replace the door stop screw in the bottom hinge and tighten.
IMPORTANT: Do not place the door stop screw in the 130°
position on Overlay Series models. See “Handle and Door
Clearances.”
42" (106.7 cm) Models
1. Check that the refrigerator door can open freely. If the door
opens too wide, you will have to adjust the door stop position.
2. Grasp both ends of the top grille.
3. Push the top grille straight up, then pull straight out. Lay the
grille on a soft surface.
4. The door stop is located on the top hinge.
5. Remove the two door stop screws.
■ To remove the outer screw (“A”):
With the door closed, rmly press the L-shaped bracket
toward the center of the refrigerator until the screw is
exposed.
■ To remove the inner screw (“B”):
Open the door 90° and the L-shaped bracket will expose
the screw.
6. Reverse or rotate the door stop to the desired position as
shown below.
NOTE: For Overlay Series models, rout the hinge side of the
custom door panels to a radius that is equal to at least half
the thickness of the panel if a 130° door swing is desired.
A
A. Door stop screw
AB C
A. 130°
B. 110° (Overlay series)screw
C. 90°
B BA
B BA
A. Top grille
B. Cabinet side trims
B
A
C
A. Door stop screw “A”
B. Door stop screw “B”
C. Door stop
A
B
A. Door stop screw “A”
B. Door stop screw “B”
°011°031