THANK YOU for purchasing this high-quality product. If you should experience a problem not covered in TROUBLESHOOTING, please visit our website at www.ldtchenaid.com for additional information. If you still need assistance, call us at 1-800-422-1230. In Canada, visit our website at www.kitchenaid.ca or call us at 1-800-807-6777. You will need your model and serial number located on the inside wall of the refrigerator compartment.
IMPORTANT WARNING:To SAFETY INSTRUCTIONS reducethe riskof fire, electricshock,or injuryto personswhen usingthe refrigerator,follow basic precautions, including the following: • Plug into a grounded 3 prong outlet. • Use nonflammable • Do not remove ground prong. • Do not use an adapter. • Do not use an extension cord. • Keep flammable materials and vapors, such as gasoline, away from refrigerator. cleaner. • Use two or more people to move and install refrigerator.
Location Requirements Electrical Electrical Shock Hazard Explosion Hazard Keep flammable materials and vapors, such as gasoline, away from refrigerator. Fallurs to do so can result In death, explosion, Requirements Plug into a grounded 3 prong outlet. Do not remove ground prong. or fire. To ensure proper ventilation for your refrigerator, allow for a 1/_,, (1.25 cm) space at the top and behind the refrigerator.
6. Water Pressure A cold water supply with water pressure of between 35 and 120 psi (241 and 827 kPa) is required to operate the water dispenser and ice maker. If you have questions about your water pressure, call a licensed, qualified plumber. Reverse Osmosis Water Supply IMPORTANT: The pressure of the water supply coming out of a reverse osmosis system going to the water inlet valve of the refrigerator needs to be between 35 and 120 psi (241 and 827 kPa).
Style 2 1. Create a service loop (minimum diameter of 2 ft [61 cm]) with the copper tubing. Avoid kinks when coiling the copper tubing. 2. Remove the plastic cap from water valve inlet port. Place a compression nut and sleeve on the copper tubing. 3. Insert the end of the copper tubing into the water valve inlet port. Shape tubing slightly so that the tubing feeds straight into the port to avoid kinks. 4. Slide the compression nut over the sleeve and screw into the water valve inlet port.
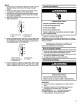
2. Keep the refrigerator doors closed until you are ready to lift them free from the cabinet. NOTE: Provide additional support for the refrigerator door while the hinges are being removed. Do not depend on the door gasket magnets to hold the door in place while you are working. 3. 4, 5, Starting with the right-hand side door, remove the parts for the top hinge as shown in Top Hinge graphic. Lift the refrigerator door from the bottom hinge pin.
TopHinges f A c A. HingeCoverScrew B. TopHinge Cover C.%6"Hex-HeadHingeScrews D, Top Hinge Bottom Hinges A. Shim (on some models) B. Bottom Hinge C. Hinge Screws \ Wiring Plug / A A. s/_ Set Screw A.
• To lower, turn the leveling screw counterclockwise. Adjust the Doors Depending on your model, your refrigerator may have four adjustable rollers (Style 1) or a leveling screw (Style 2) located at the base of the refrigerator. If your refrigerator seems unsteady or you want the door to close more easily, use the instructions below. 1. 0 Remove the base grille. Grasp the grille firmly and pull it toward you. A. Rear miler adjustment screw B. Leveling screw 2. Raise or lower the cabinet.
Using the Controls The control center is located at the top front of the refrigerator compartment. Temperature Controls For your convenience, your temperature controls are preset at the factory. When you first install your refrigerator, make sure the controls are still set to the recommended set points as shown.
Press the Tamp Alarm touch pad once to atop the audible alarm and alternating temperature displays. The Tamp Alarm light will continue to flash until the refrigerator returns to the set temperature. m Door Alarm The Door Alarm feature sounds a chime every few seconds when the refrigerator door has been left open for 5 continuous minutes. The chime will sound until the door is closed or Door Alarm is turned off. • Press the Door Alarm touch pad to turn this feature on or off.
Replacing the Water Filter Water Dispenser (on some models) IMPORTANT: • After connecting the refrigerator to a water source, flush the water system. Press the button on the dispenser for 5 seconds, then release it for 5 seconds. Repeat until water begins to flow. Once water begins to flow, continue depressing and releasing the dispenser button (5 seconds on, 5 seconds off) for an additional 2 minutes. This will flush air from the filter and water dispensing system.
4. There is no need for routine condenser cleaning in normal home operating environments. If the environment is particularly greasy or dusty, or there is significant pet traffic in the home, the condenser should be cleaned every 2 to 3 months to ensure maximum efficiency. 3. Replace burned-out than 40 watts. 4. Replace the light shield by inserting the tabs on the shield into the liner holes on each side of light assembly. Slide the shield toward the front until it locks into place.
Therefrigeratorseemsnoisy Refrigerator noise has been reduced over the years. Due to this reduction, you may hear intermittent noises from your new refrigerator that you did not notice from your old model. Below are listed some normal sounds with explanations.
Off-taste,odoror graycolorinthe ice Water from the dispenser is warm NOTE: Water from the dispenser is only chilled to 50°F (10°C). • New installation? Allow 24 hours after installation for the water supply to cool completely. • New plumbing connections? New plumbing connections can cause discolored or off-flavored ice. • Ice stored too long? Discard ice. Wash ice bin. Allow 24 hours for ice maker to make new ice. • • Odor transfer from food? Use airtight, moisture proof packaging to store food.
PRODUCT DATA SHEETS Interior Water Filtration Model 67003523-750 Capacity System 750 Gallons (2839 Liters) System tested and certified by NSF International against NSF/ANSI Standard 42 for the reduction of Chlorine Taste and Odor, Particulate Class I*; and against NSF/ANSI Standard 53 for the reduction of Lead, Mercury, A_-azine, Toxaphene, Cysts, Turbidity, Asbestos and Lindane. This system has been tested according to NSF/ANSI Standards 42 and 53 for the reduction of the substances listed below.
KITCHENAID ®REFRIGERATOR WARRANTY ONE YEAR LIMITED WARRANTY For one year from the date of purchase, when this major appliance is operated and maintained according to instructions attached to or furnished with the product, KitchenAid or KitchanAid Canada (hereafter "KitchenAid") will pay for factory specified parts and repair labor to correct defects in materials or workmanship. Service must be provided by a KitchenAid designated service company.
Notes 17
Nous vous REMERCIONS d'avoir achet6 ce produit de haute qualit6. Si vous rencontrez un probleme non mentionne dans la section DI_PANNAGE, veuinez visiter notre site Web www.kitchenaid.com pour des informations suppl6mentaires. Si vous avez toujours besoin d'assistance, veuiliez nous t_16phoner au 1-800-422-1230. Au Canada, visitez notre site Web www.kitchenaid.ca ou t616phonez-nous au 1-800-807-6777.
Mise au rebut de votre vieux r frig rateur Avant de jeter votre vieux rdfrigdrateur a Enlever les portes, a ou cong61ateur : Laieser les tablettes en place de sorte qua les enfacts ne puissant pas y p6n_trer facilement, IMPORTANT : Uemprisonnement et 1'6touffemant des enfants ne sont pes un pmbl6me du pass6. Les r6frig6rateurs jet6s ou abandonnL=ssont encore dangereux, m_me s'ils sont laies_.s abandonn_s pendant "quelques jours seulement".
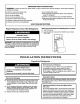
REMARQUE : II est mcommand6 de ne pss installer le r6frig6rateur pr_.sd'un four, d'un radiateur ou de toute autm soume de chaleu_ Ne pss installer le r6frig6rateur dans un endroit oQ la temp6rstum balssera au-dessous de 55°F (13°C). Specifications de l'alimentation en eau Rassembler lea outils et pi_cea n_cessairea avant de commencer I'installation. Lire et suivre lea instructions fourniss avec lea outils indiqu6s ici.
Raccordement de la canalisation Lire toutes les instructions avant de commencer. 8. IMPORTANT : $i on doit utiliser le refrigerateur avant qu'il soit mccord6 _ la canalisation d'eau, placer la commande de la machine _ glagons & la position OFF (arr_t). 2. 3. Debrancher le refrigerateur ou deconnecter la source de courant 61ectdque. FERMER le robinet principal d'arrivee d'eau. OUVRIR le robinst de puissge le plus proche pendant une periods suffisante pour que la canalisation d'eau se vide.
Style 2 1. Cr6er une boucle de service (diambtm minimum de 2 pi [61 cm]) avec le tube de cuivre. (:viter les d6formations en pliant le tube de cuivre. 2. Retimr le capuchon de plastique du robinet d'arriv6e d'eau. Placer un 6crou de compression etune bague sur le tube de cuivre. 3, 4. Achever I'installation Ins6rer i'extr6mit6 du tube de cuivre dens i'orifice d'ardv_e d'eau. Ajuster le tube de cuivre de fa(_onb ce qu'il s'adapte parfaitement _ I'oriflce d'arriv6e d'eau pour 6viter les d6formations.
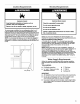
OUTILLAGE REQUIS : CI6s _ douille & lame hexagonale de %6", %" et 1_,,,tournevis Phillips n° 2 et tournevis _ t_te plate. 1. D6brancher le r6frig6rateur ou d6connecter la source de courant 61ectrique. 2. Laieser le r6fdg6rateur ferm6 jusqu'& ce vous soyez pr_t _ le soulever de la caiese. REMARQUE : Pr6voir un support additionnel des porters pendant la r_installation des charni_res. La rome d'attraction des aimants des portes ne suffit pse & les maintenir en place.
Charni6ressup_rieures t' A c A. Vis du couvercle de la chami#re B. Couvercle de/a chamiere sup_rieure C, Vis de charni_re _ t_te hexagonale de Sly6" D. Chamiere sup_rieure Charni&res inf_rieures A. Cale (sur certains mod_les) B. Chami_re inf_deure C. Vis de chami_re Fiche de branchement IA @ A A. Vis de retenue de _/_" 24 A.
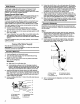
Ajustement Pour soulever, tourner la vis de r6glage de I'aplomb dans le sens horaim. des portes Pour abaieser, tourner la vis de r6glage de I'aplomb dans le sens antihoraire. Selon votre module, le r6frig6rateur peut comporter quatre roulettes r_=glables(Style 1) ou une vis de r6glage de I'aplomb (Style 2) situ6es _ la base du r6frig6rateur. Si votre r6frig6rateur semble instable ou si vous d6sirez que les portes se ferment plus facilement, suivre les instructions ci-dessous. 1.
Ufilisation des commandes Le centre de commande sat situ_ dens la partie sup_rieum avant du compartiment de r6frig6ration. Commandes de temp_wature REMARQUE : Ne pas ajuster Isa commandes de temperature de plus d'un cran & la fois, sauf Iors de la miss en marohe initials du r6fdg6rateur. Attendre 24 heursa entre Isa ajustements pour que la temp6rature puisae se stabiliser. OFF ]ndiQte6 Cooling is Off Pour votm commodit6, Isa commandes de temp6rature sont pr6r_gl6es & I'usine.
Temp Alarm (alarme de depassement de tempdrature) La caracteristique Temp Alarm (alarme de depaesement de temperature) fournit des renesignements sur la temperature en ces de panne de courant. Panne de courant : Au cours d'une panne de courant, si les temperatures dans les compartiments de refrigeration et de congelation exc_dent les temperatures de fonctionnement normales, la plus haute temperature atteinte sera affichee.
Machine Distributeur gla ons (sur certains modules) d'eau (sur certains modules) IMPORTANT : Mise en marohe/arr6t de la machine _ glagons • Pour mettre la machine & glagons en MARCHE, il sufflt d'abaieser le brae de commande en broche. Pour ARRE"-i'ER manuellement la machine &gla_ons, soulever le brae de commande en broche & la position OFF (61ev6e)et attendm le clic. REMAROUE : Votre machine & glagone a un arr_t automatique.
Syst me de filtration ENTRETIEN de l'eau Le filtre _ eause situe dans le coin sup_rieur droit du compartiment de r6frig6retion. P DU P REFRIGERATEUR Ne pas uUliser pour le fiitrage d'une eau microbiologiquement pollu(_e ou de qualit(_ inconnue en I'absence d'un dispositif de d_sinfection ad6quat avant ou apr_s le systems. Les syst_mes certifies pour la r(_ducUon de kyste peuvent Otre utilis_s pour I'eau d6sinfect_e qui peut contenir des kystes fiitrables.
Le condenseur n'a pas besoin d'etre nettoy_ souvent darts des conditions de fonctionnement normales. Si I'environnement est partieuli_rement graisseux, poussi6reux, ou s'il y a des animaux domestiques dans la maison, le condenseur devrait _tre nettoye tous lee deux ou trois mois pour assurer une efficacit6 maximum. Si vous avez besoin de nettoyer le condenseur : 4. 5. • Retirer la grille de la base.
DEPANNAGE Essayer d'abord les solutions sugg6r6es ici ou visiter notre site Internet et la FAQ (foire aux questions) pour 6viter le coot d'un appel de service. Aux E.-U., www.kitchenaid.com Au Canada, www.kitchenaid.ca Fonctionnement du r6frig6rateur Le r_frig6rateur ne fonctionne pas Le moteur semble trop tourner II se peut qua votre nouveau r6frig6rateur fonctionne plus Iongtemps qua I'ancien grace _ son compresseur _ haute efficacit6 et see ventilateurs.
Lesportessentdifficilesb ouwir Gla ons et eau La machine b gla(_ons ne produit pas ou pas suffisamment de glagons m Le r6frig6rateur est-il connect6 b I'alimentation en eau et le robinet d'arr&t d'eau est-il ouvert? Branchar le r_frig6rateur _ I'aliment_ion en eau et ouvrir le mbinet d'arr_t d'eau compl_emant.
MauvaisgoOt,odeuroucouleurgrisedesglagons Los raccords de plomberie sont-ils neufs? Des raccords de plomberie neufs peuvent causer une d_coloration at un mauvais go_t des gla(;ons.
FEUILLES P DE DONNEES SUR LE PRODUIT Syst6me de filtration d'eau int6rieur ModUle 67003523-750 / Capacit6 : 750 gallons (2839 litres) Syst_me test6 et certifl6 par NSF International en vertu de la norme NSF/ANSI 42 (r_duction du go0t et de I'odeur du chlore, et particules (classe I*)); et en vertu de la norme NSF/ANSI 53 (r6duction de plomb, mercure, atrazine, toxaph_ne, kystes, turbiditY, amiante, et lindane).
GARANTIE DU REFRIGERATEUR KITCHENAID ® GARANTIE LIMITEE DE UN AN Pendant un an & comptar de la date d'achat, Ioreque ce gres appareil manager est utilis6 et entrstenu conform6ment aux instructions jointes _tou fournies avec le produit, KitchenAid ou KitchenAid Canada (ci-apr_s d6sign6es "KitchenAid") paiera pour les pi_ces sp_cifl_es par I'usine et la main-d'csuvre pour corriger lee vices de mat_riaux ou de fabrication. Le service doit _tre fourni par une cornpagnie de service d6sign6e par KitchenAid.
Pour des informations suppl6mentaires sur le produit, aux I_.-U., visiter www.kitchenaid.com. Au Canada, visiter www.kitcheneid.ca. Si vous n'avez pas acc_s & Internet st que vous n6cessitez une assistance pendant I'utilisation du produit ou que vous souhaitez prendre un rendez-vous, vous pouvez contacter KitchenAid au num6ro ci-dessous. Ayez votre num6ro de module _ disposition. Vous pouvez trouver vos num6ros de module et de s6fie sur la plaque situ6e sur la paroi interne du compartiment de r6fitg6ration.