Installation Instructions and Use and Care Guide 27" (68.6 cm), 36" (91.4 cm), 39" (99.1 cm) and 48" (121.9 cm) Outdoor Grills (Portable and Built-in — non-combustible construction) 27" (68.6 cm) Portable without rotisserie shown 27" (68.
Before you start... Your safety and the safety of others are very important. We have provided many important safety messages in this manual and on your appliance. Always read and obey all safety messages. This is the safety alert symbol. This symbol alerts you to potential hazards that can kill or hurt you and others. All safety messages will follow the safety alert symbol and either the word “DANGER” or “WARNING”.
The California Safe Drinking Water and Toxic Enforcement Act requires the Governor of California to publish a list of substances known to the State of California to cause cancer, birth defects, or other reproductive harm, and requires businesses to warn of potential exposure to such substances. WARNING: This product contains a chemical known to the State of California to cause cancer, birth defects, or other reproductive harm.
Clearance to combustible construction for built-in (non-combustible construction) and portable grills: A minimum of 12" (30.5 cm) must be maintained between the grill hood, sides and back and any combustible construction. A 12" (30.5 cm) minimum clearance must also be maintained below the cooking surface and any combustible construction. Product Dimensions Portable and Built-in models 26" (66.0 cm) 25-1/2" (64.8 cm) 39" (99.1 cm) [27" (68.6 cm) grill with 23" (58.4 cm) 12" (30.
Gas supply requirements Observe all governing codes and ordinances. IMPORTANT: Grill must be connected to a regulated gas supply. • Input ratings shown on the model/serial rating plate are for elevations up to 2,000 feet (610 m). For elevations above 2,000 feet (610 m), ratings are reduced at a rate of 4% for each 1,000 feet (305 m) above sea level. Orifice conversion is required. Contact KitchenAid Assistance Center.
Rotisserie electrical requirements WARNING Recommended ground method A grounded 3-prong outdoor outlet grounded in accordance with the National Electrical Code ANSI/NFPA 70** or Canadian Electrical Code (C22.1*) — and local codes and ordinances. 3-prong polarized ground-type outdoor outlet Electrical Shock Hazard Plug into a grounded 3-prong outlet. Do not remove ground prong. Do not use an adapter. Do not use an extension cord.
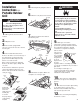
Installation Instructions — Portable Outdoor Grill 5. Carefully lift off grill grates and set 6. Remove sear plates and set aside. Securely tighten all gas connections. If connected to LP, have a qualified person make sure gas pressure does not exceed 11” (28 cm) water column. Examples of a qualified person include: licensed heating personnel, authorized gas company personnel, and authorized service personnel. Failure to do so can result in death, explosion, or fire.
If converted to Natural Gas Natural Gas Use This installation must conform with local codes and ordinances**. In the absence of local codes, installations must conform with either the National Fuel Gas Code ANSI Z223.1, or CAN/CGA-B149.1* Natural Gas and Propane installation code. 2. Open shutoff valve in the gas supply line. The valve is open when the handle is parallel to the gas pipe. Test all connections by brushing on an approved non-corrosive leak-detection solution. Bubbles will show a leak.
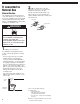
Installation Instructions — Built-In Outdoor Grill (non-combustible construction) 1. Place grill into outdoor enclosure, but leave enough room in back to connect to gas supply. valve open WARNING Explosion Hazard WARNING Fire Hazard Do not install this grill on or near combustible materials. Doing so can result in death or fire. IMPORTANT: If grill is to be installed in a combustible enclosure, return this unit and replace it with the model which is manufactured for use in a combustible enclosure.
8. Carefully lift grill grates off of grill area and set aside. 9. If converted to L.P. Gas WARNING Remove sear plates and set aside. sear plate Explosion Hazard 10. Remove tiedowns from burners and warming shelf. warming shelf remove tiedowns remove tiedowns Securely tighten all gas connections. If connected to LP, have a qualified person make sure gas pressure does not exceed 11” (28 cm) water column.
Checking and adjusting the burners The burners are tested and factory-set for most efficient operation. However, variations in gas supply and other conditions may make minor adjustments to air shutter or low flame setting necessary. Adjustments must be done by a qualified service technician. 5. Remove burner and loosen air shutter adjustment screw. a. If flame is yellow (not enough air), turn air shutter counter-clockwise. b.
Grill Use Turn the gas supply on: WARNING Explosion Hazard Do not store fuel tank in a garage or indoors. Do not store grill with fuel tank in a garage or indoors. Failure to follow these instructions can result in death, explosion, or fire. 1. For portable grills using an L.P./ propane gas cylinder: Slowly open the cylinder valve; do not “snap” open. NOTE: If flow limiting device does activate, your grill may not light. If your grill does light, the flames will be low and will not heat properly.
Manually lighting the burners knob away from “LITE” to “HI”. WARNING 1. Use a paper match to light the burners. 2. Push in and turn the burner knob to “LITE” for the burner closest to the lit match. The burner will light immediately. When burner is lit, turn knob away from “LITE” to desired setting IMPORTANT: If burner does not light immediately, turn the burner knob to “OFF” and wait 5 minutes before relighting.
Manually lighting smoker burner 1. Remove smoker tray. 2. Remove the manual lighting extension from inside the drip tray. 3. Attach a match to the clip. 4. Strike the match to light it. 5. Carefully guide the lit match into the smoker chamber area where the tray was removed. Grilling Tips WARNING Food Poisoning Hazard Do not let food sit for more than one hour before or after cooking. Doing so can result in food poisoning or sickness. Before Grilling • Thaw food items before grilling.
Indirect Cooking Burner Place food only on the grill grate over the OFF burners. 1 2 3 4 27" grill ON OFF — — 36" grill ON OFF ON — Grilling Chart • Knobs have High, Medium and Low setting for flame adjustment. • Heat settings indicated are approximate. • Grilling time based on heating two adjacent burners with food placed on grate between burners (Direct). • Timings are affected by weather conditions.
Cooking Method/ Burner Setting Time DIRECT Medium (170°F) 15-22 minutes total For even cooking, pound to 3/4 inch. DIRECT Med-Low to Medium breast (170°F) thigh (180°F) 18-25 minutes total Start bone side down. DIRECT Medium Med-Rare (145°F) to Medium (160°F) 10-20 minutes total DIRECT Medium Med-Rare (145°F) to Medium (160°F) 16-20 minutes total DIRECT Medium 4-6 minutes per each 1/2 inch thickness of fish Grill, turning once. Brush grill with oil to keep from sticking.
Rotisserie Cooking Tips WARNING Food Poisoning Hazard Do not let food sit for more than one hour before or after cooking. Doing so can result in food poisoning or sickness. (Rotisserie available on some models) Rotisserie cooking rotates food in front of the rotisserie burner, creating an intense heat for searing the outside and sealing in natural juices. • The rotisserie burner reaches cooking temperatures in about one minute. Do not preheat when using the rotisserie. • Select tender meat and poultry.
Cleaning General Cleaning IMPORTANT: Before cleaning, make sure all controls are off and the grill is cool. Always follow label instructions on cleaning products. For routine cleaning, wash with soap and water using a soft cloth or sponge. Rinse with clean water and dry at once with a soft, lint-free cloth to avoid spots and streaks. Never use steel wool to clean the grill, as it will scratch the surface. Use vinyl grill cover, available from your local dealer, to protect finish from weather.
Smoker box U-shaped burners * Clean the exterior of the burner with a wire brush. Accessories WARNING * Clear any clogged burner ports with a straightened paper clip. Never use a toothpick as it may break off and clog the port. * Use a flashlight to inspect into the burner through the burner inlet to ensure there is no blockage. If any obstruction is seen, use a metal coat hanger that has been straightened to clear them.
Warranty KitchenAid® Gas Grill Products Warranty LENGTH OF WARRANTY KitchenAid WILL PAY FOR: FULL ONE-YEAR WARRANTY From Date of Purchase Factory Specified Parts and Repair Labor to correct defects in materials OR workmanship. Service must be provided by a Service Company designated by KitchenAid.
Requesting Assistance or Service To avoid unnecessary service calls, please check the “Grill” section. It may save you the cost of a service call. If you still need help, follow the instructions below. If you need assistance or service in U.S.A. Call toll-free at 1-800-422-1230, our consultants are available to assist you. When calling: Please know the purchase date, and the complete model and serial number of your appliance This information will help us better respond to your request.
Requesting Assistance or Service Before calling for assistance or service, please check the “Grill” section. It may save you the cost of a service call. If you still need help, follow the instructions below. If you need assistance or service in Canada 1. If the problem is not due to one of the items listed in “Check Operation”✝... Contact the dealer from whom you purchased your appliance or call toll-free, 1-800-422-1230. 2. If you need service✝...
Notes 23
Notes Part No. 9758066 © 2003 KitchenAid. ® Registered Trademark/Trademark of KitchenAid U.S.A., KitchenAid Canada licensee in Canada ® Prepared by KitchenAid, Benton Harbor, Michigan 49022 Printed in U.S.A.
Instructions d’installation et Guide d’utilisation et d’entretien Grils pour extérieur – 68,6 cm (27 po), 91,4 cm (36 po), 99,1 cm (39 po) et 121,9 cm (48 po) (Appareil mobile ou stationnaire — matériaux non combustibles) 68,6 cm (27 po) Modèle mobile, sans rôtissoire illustrée 68,6 cm (27 po) Modèle stationnaire, avec rôtissoire illustrée Modèles KBGN274PSS KBGN364PSS KBGN292PSS Modèles KFGR270PSS KFGR274PSS KFGR292PSS KFGR364PSS KFGR382PSS Consultation rapide Table des matières : Pages 2 Avant de comm
Avant de commencer... Votre sécurité et celle des autres est très importante. Nous donnons de nombreux messages de sécurité importants dans ce manuel, et sur votre appareil ménager. Assurezvous de toujours lire tous les messages de sécurité et de vous y conformer. Voici le symbole d’alerte de sécurité. Ce symbole d’alerte de sécurité vous signale les dangers potentiels de décès et de blessures graves à vous et à d’autres.
AVERTISSEMENT : Si les instructions de ce manuel ne sont pas scrupuleusement respectées, il pourrait se produire un incendie qui susciterait des dommages corporels, ou mortels.
Outillage et pièces nécessaires pour l’installation du gril mobile • • • • • • • • niveau petit tournevis à lame plate tournevis à lame plate tournevis Phillips mètre-ruban ou règle pince multiprise/articulation mobile clé à molette ciseaux ou pince coupante (pour enlever les attaches) Matériaux nécessaires : • solution de détection des fuites, non corrosive Pièces fournies • tuyau de raccordement et détendeur réglé pour une pression de 11 po (col.
Dégagements de séparation des matières combustibles – gril mobile et gril stationnaire : On doit maintenir une distance d’au moins 30,5 cm (12 po) entre tout matériau combustible et le capot, les côtés et l’arrière du gril. On doit également maintenir une distance de séparation d’au moins 30,5 cm (12 po) au-dessus des matériaux combustibles situés sous la surface de cuisson.
Alimentation en gaz – Spécifications Respecter les prescriptions des codes et règlements en vigueur. IMPORTANT : Le gril doit être raccordé à une source de gaz sous pression régulée. • Les puissances thermiques indiquées sur la plaque signalétique ont été déterminées pour une altitude de 610 m (2000 pieds). À une altitude supérieure à 610 m (2000 pieds), la puissance thermique diminue à raison de 4 % pour chaque tranche de 305 m (1000 pieds) au-dessus du niveau de la mer.
Rôtissoire – Alimentation électrique – Spécifications AVERTISSEMENT Méthode recommandée de liaison à la terre Une prise de courant murale à 3 alvéoles, reliée à la terre conformément aux prescriptions du Code national des installations électriques ANSI/NFPA 70** ou de la norme C22.1* (Code canadien des installations électriques), et à toutes les prescriptions des codes et règlements locaux en vigueur.
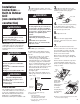
Instructions d’installation du gril mobile pour extérieur Installer la grille des brûleurs latéraux et le capot avec le prolongement vers la grille tel prolongement qu’illustré. du capot Mettre tous les matériaux d’emballage au rebut. grille des brûleurs AVERTISSEMENT Risque du poids excessif Utiliser deux ou plus de personnes pour déplacer et installer le gril. Le non-respect de cette instruction peut causer une blessure au dos ou d’autre blessure. 5.
10. Ouvrir l’arrivée de gaz. Attendre quelques instants la circulation du gaz à travers la canalisation. Si conversion au gaz naturel • Il faut utiliser des composés d’étanchéité des jointures résistant au propane. Ne pas utiliser de ruban de Teflon®. Alimentation du gaz naturel 11. Effectuer un test de recherche des fuites sur chaque connexion à l’aide d’une solution de détection des fuites, non corrosive. La formation de bulles identifie une fuite. Rectifier chaque connexion manifestant une fuite.
Instructions d’installation – gril stationnaire pour extérieur (matériaux non combustibles) AVERTISSEMENT Risque d’incendie Ne pas installer ce gril sur ou à proximité de matériaux combustibles. Le non-respect de cette instruction peut causer un décès ou un incendie.
5. 6. 10. Enlever les attaches des brûleurs et de la grille de réchauffage. Ouvrir le capot. Si conversion au gaz propane grille de réchauffage Pour un modèle équipé d’une rôtissoire, enlever la broche. AVERTISSEMENT 7. Pour les modèles avec brûleurs latéraux. enlever les attaches Enlever le capot du brûleur latéral du dessus du carton se trouvant sur la grille du gril. Enlever le film à bulles du capot du brûleur latéral et le conserver à part.
2. Ouvrir l’arrivée de gaz. Attendre quelques instants la circulation du gaz à travers la canalisation. 3. Effectuer un test de recherche des fuites sur chaque connexion à l’aide d’une solution de détection des fuites, non corrosive. La formation de bulles identifie une fuite. Rectifier chaque connexion manifestant une fuite. 4. Passer à la section “Contrôle et réglage des brûleurs”.
2. Ôter les grilles de brûleur et les plaques ondulées. 3. Allumer le gril selon les instructions de la section – “Allumage du gril”. 4. Placer le bouton de commande à la position correspondant à la puissance de chauffage minimale, et ôter le bouton. 5. Immobiliser la tige du robinet avec une pince, et insérer un tournevis à lame plate mince dans la tige creuse. 6. Observer les flammes; faire tourner lentement le tournevis dans le sens antihoraire. 7.
Allumage manuel des brûleurs du gril principal 1. Ôter la rallonge d’allumage manuel de l’intérieur du plateau de récupération. 2. Fixer une allumette à la pince. 3. Frotter l’allumette pour l’allumer. 4. Guider soigneusement l’allumette allumée entre la grille du gril et l’une des fentes dans la plaque de cuisson. du brûleur choisi jusqu’à la position du débit thermique minimum “LITE”. 2. On percevra le bruit de déclic du module d’étincelage.
Allumage du brûleur à rôtissoire 1. Enfoncer et faire tourner le bouton du brûleur de la rôtissoire “LITE”. Utilisation de la boîte du fumoir Allumage manuel du brûleur du fumoir AVERTISSEMENT 2. Enfoncer simultanément le bouton rouge. 3. Après l’allumage du brûleur à rôtissoire, maintenir la pression sur le bouton rouge pendant encore 5 à 10 secondes.
Conseils pour la cuisson au gril AVERTISSEMENT Risque d’empoisonnement alimentaire Ne pas laisser des aliments en attente sur le gril pendant plus d’une heure avant ou après la cuisson. Le non-respect de cette instruction peut causer un empoisonnement alimentaire ou une maladie. Avant la cuisson au gril • Décongeler chaque aliment avant la cuisson au gril. • Préchauffer le gril à la puissance maximale (utiliser tous les brûleurs de gril) pendant 7 à 10 minutes.
Tableau de cuisson au gril • Les boutons de réglage du débit de gaz comportent des repères pour divers niveaux de la puissance de chauffage : Maxi, Moyen et Mini. • Les puissances de chauffage indiquées sont approximatives.
Produit alimentaire Méthode de cuisson/ réglage du brûleur Agneau Côtes et steaks Filet, côtelette, surlonge Épaisseur 1 po Temps de cuisson Instructions spéciales DIRECTE Moyen Moyen/saignant (145°F) à Moyen (160°F) Total 10-20 minutes DIRECTE Moyen Moyen/saignant (145°F) à Moyen (160°F) Total 16-20 minutes DIRECTE Moyen 4-6 minutes pour chaque 1/2 po d’épaisseur du poisson Frire griller; retourner une fois. Badigeonner la grille avec de l’huile pour éviter l’adhésion.
La rôtissoire fait tourner la pièce de viande devant un brûleur à rôtissoire; le produit alimentaire est ainsi exposé à la chaleur intense qui saisit la surface et permet la rétention des jus naturels. Conseils pour la cuisson dans la rôtissoire AVERTISSEMENT Risque d’empoisonnement alimentaire Ne pas laisser des aliments en attente sur le gril pendant plus d’une heure avant ou après la cuisson. Le non-respect de cette instruction peut causer un empoisonnement alimentaire ou une maladie.
Nettoyage Conseils généraux IMPORTANT : Avant le nettoyage, vérifier que chaque robinet de gaz est en position de fermeture et que le gril a refroidi. Appliquer les instructions qui accompagnent les produits de nettoyage. Pour un nettoyage de routine, laver avec eau et savon – utiliser une éponge ou un linge doux. Rincer avec de l’eau propre puis sécher immédiatement avec un linge doux pour éviter de laisser des marques et des taches.
Brûleurs en U Boîte du fumoir * Nettoyer l’extérieur du brûleur avec une brosse métallique. * Utiliser une tige métallique (trombone redressé) pour éliminer tout résidu obstruant des orifices du brûleur. Ne jamais utiliser un cure-dents, qui pourrait se briser et obstruer l’entrée de gaz. * Utiliser une lampe de poche pour pouvoir examiner l’intérieur du brûleur à travers l’orifice d’entrée, pour vérifier l’absence de toute obstruction.
Garantie Garantie du gril à gaz KitchenAid® DURÉE DE LA GARANTIE KitchenAid PAIERA POUR : GARANTIE TOTALE D’UNE ANNÉE Pièces spécifiées par l’usine et main-d’œuvre d’intervention pour l’élimination des vices de matériaux OU de fabrication. Le travail doit être exécuté par une entreprise de service après-vente agréée par KitchenAid. À compter de la date d’achat Garantie limitée de cinq ans De la seconde à la cinquième année inclusivement à compter de la date d’achat.
Demande d'assistance ou de service Pour éviter des interventions de dépannage non nécessaires, veuillez consulter la section “Utilisation du gril”. Ceci pourrait vous éviter le coût d’une intervention de dépannage. Si une assistance demeure nécessaire, procéder selon les instructions ci-dessous. Si vous avez besoin d'assistance ou de service aux É.-U. Composez le numéro sans frais 1-800-422-1230. Nos consultants sont disponibles pour vous aider.
Demande d’assistance ou de service Avant de nous contacter pour de l’assistance ou un service, veuillez consulter la section “Utilisation du gril”. Ceci pourrait vous éviter le coût d’une intervention de dépannage. Si une assistance demeure nécessaire, procéder selon les instructions ci-dessous. Si vous avez besoin d'assistance ou de service au Canada 1. Si le problème n’est pas attribuable à l’une des causes indiquées dans “Dépannage / Contrôle du fonctionnement”✝...