
Product Guide
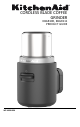
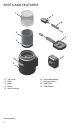
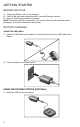
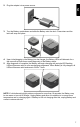
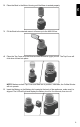
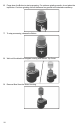
Table Of Contents
- PARTS AND FEATURES_BCG_PG_W11660649A
- PRODUCT SAFETY_BCG_PG_W11660649A
- GETTING STARTED_BCG_PG_W11660649A
- PRODUCT USAGE_BCG_PG_W11660649A
- CARE AND CLEANING_BCG_PG_W11660649A
- TROUBLESHOOTING GUIDE_BCG_PG_W11660649A
- Cordless_Warranty and Service_NAR_Common_One Year
- PIÈCES ET CARACTÉRISTIQUES_BCG_PG_W11660649A
- SÉCURITÉ DU PRODUIT_BCG_PG_W11660649A
- MISE EN PLACE_BCG_PG_W11660649A
- UTILISATION DU PRODUIT_BCG_PG_W11660649A
- ENTRETIEN ET NETTOYAGE_BCG_PG_W11660649A
- GUIDE DE DÉPANNAGE_BCG_PG_W11660649A
- Cordless_Warranty and Service_NAR_Common_One Year
- PARTS AND FEATURES_BCG_PG_W11660649A
- PRODUCT SAFETY_BCG_PG_W11660649A
- GETTING STARTED_BCG_PG_W11660649A
- PRODUCT USAGE_BCG_PG_W11660649A
- CARE AND CLEANING_BCG_PG_W11660649A
- TROUBLESHOOTING GUIDE_BCG_PG_W11660649A
- Cordless_Warranty and Service_NAR_Common_One Year

EN
7
2.
Plug the adapter into a power source.
3. Turn the Battery upside down and slide the Battery onto the dock. Press down and the
latch will snap into place.
4. Upon initial plugging in the Battery into the charger, the Battery LEDs will alternate for a
few seconds as it performs a self-diagnostic of the Battery status.
5. After diagnostic is complete, the Battery will begin charging with a single LED flashing.
LEDs will become solid in color as charging progresses. When Battery is fully charged, all
LEDs will become solid and remain ON for 1 hour.
NOTE: If initial alternating light pattern continues for more than 10 seconds, the Battery may
be too warm or too cold to charge. Unplug Battery and allow it to stabilize to a normal room
temperature and try charging again. If Battery is still not charging after this, unplug Battery and
contact customer service.