
Product Guide


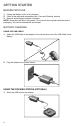
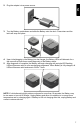
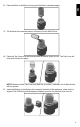
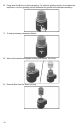
Table Of Contents
- PARTS AND FEATURES_BCG_PG_W11660649A
- PRODUCT SAFETY_BCG_PG_W11660649A
- GETTING STARTED_BCG_PG_W11660649A
- PRODUCT USAGE_BCG_PG_W11660649A
- CARE AND CLEANING_BCG_PG_W11660649A
- TROUBLESHOOTING GUIDE_BCG_PG_W11660649A
- Cordless_Warranty and Service_NAR_Common_One Year
- PIÈCES ET CARACTÉRISTIQUES_BCG_PG_W11660649A
- SÉCURITÉ DU PRODUIT_BCG_PG_W11660649A
- MISE EN PLACE_BCG_PG_W11660649A
- UTILISATION DU PRODUIT_BCG_PG_W11660649A
- ENTRETIEN ET NETTOYAGE_BCG_PG_W11660649A
- GUIDE DE DÉPANNAGE_BCG_PG_W11660649A
- Cordless_Warranty and Service_NAR_Common_One Year
- PARTS AND FEATURES_BCG_PG_W11660649A
- PRODUCT SAFETY_BCG_PG_W11660649A
- GETTING STARTED_BCG_PG_W11660649A
- PRODUCT USAGE_BCG_PG_W11660649A
- CARE AND CLEANING_BCG_PG_W11660649A
- TROUBLESHOOTING GUIDE_BCG_PG_W11660649A
- Cordless_Warranty and Service_NAR_Common_One Year

EN
9
2.
Place the Bowl in the Motor Housing until the Base is seated properly.
3. Fill the Bowl to the desired amount of beans up to the MAX fill line.
4. Place the Top Cover onto the Bowl and twist clockwise (right) to lock. The Top Cover will
click when locked into place.
NOTE: Make sure both Top Cover and Bowl are in position; otherwise, the Coffee Grinder
will not operate.
5. Insert the Battery on the Battery slot located at the back of the appliance, make sure it is
aligned. The LED will light and display the Battery level for five seconds, then turn off.