BUILT-IN HIGH SPEED MICROWAVE OVEN Use & Care Guide For questions about features, operation/performance, parts accessories or service, call: 1-800-422-1230 In Canada, call for assistance 1-800-461-5681, for installation and service, call: 1-800-807-6777 or visit our website at... www.kitchenaid.com or www.KitchenAid.ca Table of Contents............................................................................................................
TABLE OF CONTENTS MICROWAVE OVEN SAFETY .................................................... 3 Electrical Requirements ...............................................................5 PARTS AND FEATURES................................................................5 Grids .............................................................................................6 Crisper Pan and Handle...............................................................6 ELECTRONIC OVEN CONTROL.................................
MICROWAVE OVEN SAFETY Your safety and the safety of others are very important. We have provided many important safety messages in this manual and on your appliance. Always read and obey all safety messages. This is the safety alert symbol. This symbol alerts you to potential hazards that can kill or hurt you and others. All safety messages will follow the safety alert symbol and either the word “DANGER” or “WARNING.
IMPORTANT SAFETY INSTRUCTIONS ■ Do not store the microwave oven outdoors. Do not use this product near water - for example, near a kitchen sink, in a wet basement, or near a swimming pool, and the like. ■ See door surface cleaning instructions in the “Oven Care” section. ■ To reduce the risk of fire in the oven cavity: – Do not overcook food. Carefully attend the microwave oven if paper, plastic, or other combustible materials are placed inside the oven to facilitate cooking.
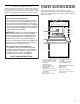
Electrical Requirements The microwave oven is connected to a 110-volt side of the 240volt circuit required for the lower oven. If the incoming voltage to the microwave oven is less than 110 volts cooking times may be longer. Have a qualified electrician check your electrical system. PARTS AND FEATURES This manual covers different models. The oven you have purchased may have some or all of the parts and features listed. The location and appearance of the features shown here may not match your model.
Grids ■ Grids will become hot. Always use oven mitts or pot holders when handling. ■ Never allow the grids to touch the inside cavity walls, ceiling or floor. ■ Always use the turntable. ■ Never use another metal object with the grids. ■ Two level cooking is not recommended. ■ See “Assistance or Service” section to reorder. Broiling Grid (long legs) The broiling grid places food close to the broil element, making it ideal for fast browning of small amounts of food. Use for Broiling only.
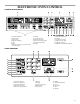
ELECTRONIC OVEN CONTROL COMBINATION OVEN MODELS 1. Lower Oven Display 2. Number Pads 3. Control Lock 4. Upper Oven Display 5. Clock 6. Timer 7. Lower Oven Selectors (see separate Use and Care Guide) 8. Quantity 9. Lower Oven Light 10. Microwave Popcorn 11. Microwave Cooking Power 12. Microwave Reheating 13. Broiling 14. Microwave Defrosting 15. Crisping 16. Convection Cooking 17. High Speed Cooking 18. Upper Oven Cancel 19. Upper Oven Start and Easy Minute SINGLE OVEN MODEL 1. Microwave Popcorn 2.
Display(s) When power is first supplied to the appliance, everything on the display(s) will light up for 5 seconds. Then, “PF id = 27” or “PF id = 30” will appear. Touch LOWER OVEN CANCEL, UPPER OVEN CANCEL or CANCEL OFF (on some models) to clear display(s). Any other time “PF id = 27” or “PF id = 30” appears, a power failure occurred. Touch LOWER OVEN CANCEL, UPPER OVEN CANCEL or CANCEL OFF (on some models) and reset the clock if needed.
Fahrenheit and Celsius Help Prompts (combination oven models only) Help prompts are visible messages that appear on the upper oven display on combination oven models or the display on single oven models. Only Crisping and Broiling help prompts can be turned off. Before turning help prompts on/off, the oven(s), Timer and, on combination oven models, the lower oven Timed Cooking must be off. To Turn Off/On: Touch and hold the number pad “2” for 5 seconds.
To Use: Before High Speed Cooking, put food in the oven and close the door. Preheating is not necessary. 1. Touch ULTIMA COOK. 2. Touch the number pads to enter the food code from the chart. If “WGT” or “QTY” appears on the display, touch the number pads to enter the quantity or weight from the chart or touch 0 QUANTITY to increase the weight in increments from the chart. 3. Touch EASY MINUTE START or wait 5 seconds for oven to turn on automatically. The display will countdown the cook time.
FOOD CODE QUANTITY OR WEIGHT/ INSTRUCTIONS FOOD CODE QUANTITY OR WEIGHT/ INSTRUCTIONS Onion Rings 57 4-16 oz (113-454 g) in 1 oz (28 g) increments Arrange on crisper pan. Place on turntable. Fruit Crisp 38 2 or 3 qts. (2 or 3 L) Place in baking dish. Place convection grid on turntable, then baking dish on grid. Pizza 40 6, 9 and 12 in. (15, 23 and 30 cm) diameter Arrange on crisper pan. Place on turntable. MEATS Beef Roast, Boneless 16 1.5-5 lbs (680-907 g) in .
FOOD CODE QUANTITY OR WEIGHT/ INSTRUCTIONS Pork Ham, Fully Cooked, Boneless 25 1-4.5 lbs (454 g-2 kg) in .1 lb (45 g) increments Shake 1 T (15 mL) of flour in oven bag. Put ham and ¹⁄₂ cup (125 mL) water in bag. Close with plastic tie and cut 6 small slits in top of bag. Place in baking dish. Place convection grid on turntable, then baking dish on grid. Pork Chops, Bone-in, ³⁄₄ in. (2 cm) thick 23 Pork Chops, Boneless, ³⁄₄ in. (2 cm) thick 24 .3-1.6 lbs (136 g-2 kg) in .
FOOD CODE QUANTITY OR WEIGHT/ INSTRUCTIONS FOOD CODE QUANTITY OR WEIGHT/ INSTRUCTIONS Fish Sticks, Breaded, Frozen 42 No quantity entry required. Use 4 to 18 pieces. Arrange on crisper pan. Place on turntable. Potato Wedges, Frozen 45 3-12 oz (85-340 g) in 1 oz (28 g) increments Arrange on crisper pan. Place on turntable. Shrimp, Raw, Shelled 52 .25-1 lbs (113-454 g) in .25 lb (113 g) increments Spray crisper pan with nonstick cooking spray.
MICROWAVE OVEN USE A magnetron in the oven produces microwaves which reflect off the metal floor, walls and ceiling and pass through the turntable and appropriate cookware to the food. Microwaves are attracted to and absorbed by fat, sugar and water molecules in the food, causing them to move, producing friction and heat which cooks the food. ■ Never lean on or allow children to swing on the oven door. ■ Do not operate microwave oven when it is empty.
Use the following chart as a general guide for the suggested cooking power of specific foods. MATERIAL RECOMMENDATIONS Paper Towels, Dinnerware, Napkins Use non-recycled and those approved by the manufacturer for microwave oven use. PERCENT/ NAME NUMBER USE Use those approved by the manufacturer for microwave oven use.
Cooking To Use: 1. Touch the number pads to set a length of time to cook. Touch MICRO •• COOK POWER or UPPER •• COOK POWER to set a cooking power other than 100%. Touch the number pad(s) using the Cooking Power chart. 2. Touch EASY MINUTE START. The display will count down the cook time. When the cycle ends, “End” will appear in the display, 4 endof-cycle tones will sound, and then reminder tones will sound every minute. 3.
Custom Reheat Times and cooking powers have been preset for reheating 8 food types. Use the following chart as a guide.
To use Custom Defrost: 1. Touch CUSTOM DEFROST. 2. Touch the number pad from the Custom Defrost chart to select food or Touch CUSTOM DEFROST repeatedly to scroll through foods. 3. Touch number pads from the Custom Defrost chart to select the weight or quantity or Touch QUANTITY (number pad “0”) repeatedly to select quantity. 4. Touch EASY MINUTE START or wait 5 seconds and the microwave oven will start automatically. The display will count down the defrost time.
To Keep Food Warm: 1. Touch number pads to set length of warm time. 2. Touch MICRO •• COOK POWER or UPPER •• COOK POWER. 3. Touch number pad “1” to set cook power at 10%. 4. Touch ADD MINUTE START. The upper oven display will count down the warm time.
Convection Cooking 1 When preheating is complete, one tone will sound, and the display will show the set cook time. 2 3 4 1. Broil element 2. Convection fan 3. Convection element (on some models) 4. Convection grid Convection Cooking uses the convection element (on some models) and the fan. Hot air is circulated throughout the oven cavity by the fan. The constantly moving air surrounds the food to heat the outer portion quickly.
MICROWAVE COOK CHART These times are approximate and may need to be adjusted to suit individual taste. FOOD COOK TIME COOK POWER Meats, Poultry, Fish, Seafood Bacon (per slice) 45 sec to 1 min 15 sec per slice 100% Ground Beef for Casseroles (1 lb [.45 kg]) 4 to 6 min 100% Ground Beef Patties (2) Ground Beef Patties (4) 1st side 2 min, 2nd side 1½ to 2½ min 1st side 2½ min, 2nd side 2 to 3 min 100% 100% Meat Loaf (1½ lbs [.
MICROWAVE REHEAT CHART These times are approximate and may need to be adjusted to suit individual taste. If using Broil to reheat, do not cover food. FOOD/STARTING TEMPERATURE COOK TIME Meat (Chicken pieces, chops, hamburgers, meat loaf slices) 1 serving/Refrigerated 2 servings/Refrigerated 1-2 min 2½-4½ min 70% 70% Meat Slices (Beef, ham, pork, turkey) 1 or more servings/Room Temp. 1 or more servings/Refrigerated 45 sec-1 min per serving 1-3 min per serving 50% 50% Cover with gravy or wax paper.
OVEN CARE General Cleaning IMPORTANT: Before cleaning, make sure all controls are off and the oven is cool. Always follow label instructions on cleaning products. Soap, water and a soft cloth or sponge are suggested first unless otherwise noted. OVEN CAVITY Do not use soap-filled scouring pads, abrasive cleaners, steelwool pads, gritty wash cloths or some paper towels. Damage may occur. On stainless steel models, rub in direction of grain to avoid damaging.
TROUBLESHOOTING Turntable rotates both directions ■ Try the solutions suggested here first in order to avoid the cost of an unnecessary service call. This is normal and depends on motor rotation at beginning of cycle. Display shows messages Nothing will operate ■ Has a household fuse been blown or has the circuit breaker been tripped? Replace the fuse or reset the circuit. ■ Is the appliance wired properly? See Installation Instructions.
For further assistance ASSISTANCE OR SERVICE Before calling for assistance or service, please check “Troubleshooting.” It may save you the cost of a service call. If you still need help, follow the instructions below. When calling, please know the purchase date and the complete model and serial number of your appliance. This information will help us to better respond to your request.
Notes 26
Notes 27
KITCHENAID® HIGH SPEED MICROWAVE OVEN WARRANTY ONE-YEAR FULL WARRANTY For one year from the date of purchase, when this appliance is operated and maintained according to instructions attached to or furnished with the product, KitchenAid will pay for factory specified parts and repair labor costs to correct defects in materials or workmanship. Service must be provided by a KitchenAid designated service company.