
Installation guide


INSTALLATION
REQUIREMENTS
IMPORTANT:
Observe all governing codes and ordinances.
Installer: Leave Installation Instructions with the homeowner.
Homeowner: Keep Installation Instructions for future
reference. Save these Installation Instructions for the local
electrical inspector's use.
• Keep cardboard shipping piece or plywood under refrigerator
until it is installed in the operating position.
• Comply with installation specifications and dimensions.
• Remove any moldings or decorative panels that prevent the
refrigerator from being serviced.
• Contact a qualified electrical installer.
• Order factory panels, make custom panels, or consult a
qualified cabinetmaker or carpenter to make panels.
Tools needed:
Make sure that you have the tools necessary for proper
installation:
• Hand drill or electric drill
(properly grounded)
• Drill bits
• Two adjustable wrenches
• Phillips screwdriver
Parts needed:
• 7A6in. and 1/2in. open-end
wrenches
• ¼in. nut driver
• %2 in. Allen wrench
• sA6in, socket wrench
Your refrigerator dealer has a kit available with a 1/4in. (6.35
mm) saddle-type shutoff valve, a union, and copper tubing.
• 1/4in. (6.35 mm) copper tubing with shutoff valve
• 1/4in. (6.35 mm) compression fitting
• 6 - #8 x 3 in. (7.6 cm) wood screws (longer screws may be
needed)
• lor2-2in, x4in. x 32in.(5cmx10cmx81cm)wood
board(s)
• Custom panels (provided by homeowner)
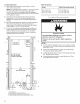
Side View (All models}
251/¢'
__ _ (64 cm)
231/2''
(60 cm) --_
T
24"
(61 cm)
31/2'' (9 cm)*
1, 25 _ in. (64 cm) dimension is to front of top grille
2. Power cord (24 in. [61 cm])
3, 5 ft, (!.5 m) waterline tubing taped to back
NOTE: (*) Dimensions shown are for the leg levelers extended 1/8
in. (3 mm) below the rollers. For levelers fully extended 11/4in. (32
mm) below rollers, add 11/8in. (29 mm) to this dimension.
Top View (All models}
A
T
25q8"
(64 cm)
Model Width A
36 in. (91 cm) 35 in. (89 cm)
42 in. (106 cm) 41 in. (104 cm)
48 in. (122 cm) 47 in. (119 cm)
4