
Owner's Manual


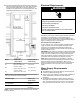

Table Of Contents
- REFRIGERATOR SAFETY
- Refrigerator Safety
- MODEL
- Models
- MAINTENANCE AND CARE
- Cleaning
- Changing LED Module_R_SXS_W11504344
- Refrigeration Shelves and Door Bins
- Sabbath and Vacation Care
- INSTALLATION REQUIREMENTS
- Tools and Parts
- Location Requirements
- Electrical Requirements
- Water Supply Requirements
- Tipping Radius
- Product Dimensions
- Door Swing Dimensions
- Overlay Series Door Panel and Cabinetry Clearance
- Overlay Series Custom Panels and Handle Kits
- Stainless Series Custom Side Panels
- INSTALLATION INSTRUCTIONS
- Unpack the Refrigerator
- Connect the Water Supply
- Plug in Refrigerator
- Move Refrigerator to Final Location
- Level and Align Refrigerator
- Install Overlay Series Custom Panels
- Adjust Doors
- Install Side Panel
- Install Base Grille
- Install Odor Absorber (on some models)
- Complete Installation
- Water System Preparation
- REFRIGERATOR FEATURES
- Water and Ice Dispensers
- Ice Maker and Storage Bin
- Setting Liters and Ounces
- Measured Fill
- Water Filtration System
- Freezer Shelves
- PERFORMANCE DATA SHEET
- Performance Data Sheet
- SECURITE DU REFRIGERATEUR
- Sécurité du réfrigérateur
- MODELE
- Modèles
- ENTRETIEN ET REPARATION
- Nettoyage
- Remplacer le module à DEL_R_SXS_W11504344
- Tablettes du réfrigérateur et balconnets de porte
- Mode Sabbat et entretien avant les vacances
- EXIGENCES D'INSTALLATION
- Outils et pièces
- Exigences d’emplacement
- Spécifications électriques
- Spécifications de l’alimentation en eau
- Rayon de basculement
- Dimensions du produit
- Dimensions pour l’ouverture des portes
- Dégagement des panneaux de porte de série Overlay et des armoires
- Panneaux personnalisés de série Overlay et ensembles de poignées
- Panneaux latéraux personnalisés Série Stainless
- INSTRUCTIONS D'INSTALLATION
- Déballage du réfrigérateur
- Raccordement à la canalisation d’eau
- Brancher le réfrigérateur
- Déplacement du réfrigérateur à son emplacement définitif
- Réglage de l’aplomb et alignement du réfrigérateur
- Installation des panneaux personnalisés de série Overlay
- Ajustement des portes
- Installation du panneau latéral
- Installation de la grille de la base
- Installer le filtre à odeurs (sur certains modèles)
- Achever l’installation
- Préparation du circuit d’eau
- CARACTERISTIQUES DU REFRIGERATEUR
- Distributeurs d’eau et de glaçons
- Machine à glaçons et bac d’entreposage
- Réglage en litres ou en onces
- Remplissage mesuré
- Système de filtration de l’eau
- Tablettes du congélateur
- FICHE DE DONNEES DE PERFORMANCE
- Fiche de données de performance
- Blank Page
- Blank Page
- Blank Page
- Blank Page
- Blank Page
- Blank Page
- Blank Page

6
1. Install the Small Items Bin in top spot of door and push down
to secure.
To remove and replace the small items bin:
1. Remove bin by lifting it up and pulling it out.
2. Replace bin by sliding it in above the desired support and
pushing down until it stops.
3. Install the Small Items Bin in the top spot of the door.
Shallow Door Bins
To remove and replace the shallow door bin:
1. Remove bin by lifting up and pulling out.
2. Replace bin by sliding in above the desired support and
pushing down until it stops.
Gallon Door Bin
NOTE: The bin can only be placed on the lower door support.
1. Install bin above lowest door support adjustment slot and push
down to secure.
To remove and replace the gallon door bin:
1. Remove the bin by lifting and pulling out.
2. Replace the bin by sliding in above the desired support and
pushing down until it stops.
Shelves and Shelf Frames
To remove and replace a shelf/frame:
1. Remove the shelf/frame by tilting it up at the front and lifting it
out of the shelf supports. Pull shelf straight out.
2. Replace the shelf/frame by guiding the rear shelf hooks in to
the shelf supports. Tilt the front of the shelf up until the rear
shelf hooks drop into the shelf supports.
3. Lower the front of the shelf and check that the shelf is in
position.
Pull Out Tray
Remove and Replace:
1. Remove food from tray.
2. Pull drawer out about 4" (10.16 cm).
3. Reach under the tray with both hands and lift gently upward
until front of shelf is free. Tilt the shelf at an angle and remove
the shelf from the refrigerator.
4. Tilt the shelf at an angle and position it above the support rails.
5. Place shelf gently on support rails on side wall.
Marinating Pan
To remove and replace Marinating Pan:
1. Remove the marinating pan by lifting it up off the brackets.
Press the right-hand side of the pan inward until it is free of its
bracket. Lower the right-hand side slightly and disengage the
left-hand side from its bracket.
2. Replace the marinating pan by inserting the left-hand side into
its bracket. Press inward on the right-hand side until it will
slide past the bracket edge and set it into its bracket.
NOTE: Remove everything that is below (pans/bucket) and above
the Marinating Pan before removing it.
For 36"
For 42"
For 48"
To purchase additional bakeware please visit:
https://www.kitchenaid.com/kitchenware/bakeware.html
Remove and Replace the Top Drawer Cover
1. Remove food from Top drawer cover. Pull drawer out about
4" (10.16 cm). Reach under the glass shelf with both hands
and lift gently upward until back of shelf is free. Tilt the shelf
at an angle and remove the shelf from the refrigerator. Be
sure not to bump the glass.
2. Replace the cover by holding the glass shelf firmly with both
hands, tilt the shelf at an angle and position it above the
support rails. Place shelf gently on support rails on side wall.