
Owner's Manual


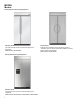


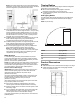
Table Of Contents
- REFRIGERATOR SAFETY
- Refrigerator Safety
- MODEL
- Models
- MAINTENANCE AND CARE
- Cleaning
- Changing LED Module_R_SXS_W11504344
- Refrigeration Shelves and Door Bins
- Sabbath and Vacation Care
- INSTALLATION REQUIREMENTS
- Tools and Parts
- Location Requirements
- Electrical Requirements
- Water Supply Requirements
- Tipping Radius
- Product Dimensions
- Door Swing Dimensions
- Overlay Series Door Panel and Cabinetry Clearance
- Overlay Series Custom Panels and Handle Kits
- Stainless Series Custom Side Panels
- INSTALLATION INSTRUCTIONS
- Unpack the Refrigerator
- Connect the Water Supply
- Plug in Refrigerator
- Move Refrigerator to Final Location
- Level and Align Refrigerator
- Install Overlay Series Custom Panels
- Adjust Doors
- Install Side Panel
- Install Base Grille
- Install Odor Absorber (on some models)
- Complete Installation
- Water System Preparation
- REFRIGERATOR FEATURES
- Water and Ice Dispensers
- Ice Maker and Storage Bin
- Setting Liters and Ounces
- Measured Fill
- Water Filtration System
- Freezer Shelves
- PERFORMANCE DATA SHEET
- Performance Data Sheet
- SECURITE DU REFRIGERATEUR
- Sécurité du réfrigérateur
- MODELE
- Modèles
- ENTRETIEN ET REPARATION
- Nettoyage
- Remplacer le module à DEL_R_SXS_W11504344
- Tablettes du réfrigérateur et balconnets de porte
- Mode Sabbat et entretien avant les vacances
- EXIGENCES D'INSTALLATION
- Outils et pièces
- Exigences d’emplacement
- Spécifications électriques
- Spécifications de l’alimentation en eau
- Rayon de basculement
- Dimensions du produit
- Dimensions pour l’ouverture des portes
- Dégagement des panneaux de porte de série Overlay et des armoires
- Panneaux personnalisés de série Overlay et ensembles de poignées
- Panneaux latéraux personnalisés Série Stainless
- INSTRUCTIONS D'INSTALLATION
- Déballage du réfrigérateur
- Raccordement à la canalisation d’eau
- Brancher le réfrigérateur
- Déplacement du réfrigérateur à son emplacement définitif
- Réglage de l’aplomb et alignement du réfrigérateur
- Installation des panneaux personnalisés de série Overlay
- Ajustement des portes
- Installation du panneau latéral
- Installation de la grille de la base
- Installer le filtre à odeurs (sur certains modèles)
- Achever l’installation
- Préparation du circuit d’eau
- CARACTERISTIQUES DU REFRIGERATEUR
- Distributeurs d’eau et de glaçons
- Machine à glaçons et bac d’entreposage
- Réglage en litres ou en onces
- Remplissage mesuré
- Système de filtration de l’eau
- Tablettes du congélateur
- FICHE DE DONNEES DE PERFORMANCE
- Fiche de données de performance
- Blank Page
- Blank Page
- Blank Page
- Blank Page
- Blank Page
- Blank Page
- Blank Page

10
NOTE: If the water shutoff valve is in the back wall behind the
refrigerator, it must be at an angle so that the tube is not kinked
when the refrigerator is pushed into its final location.
� If the water shutoff valve is not in the cabinets, the plumbing
for the water line can come through the floor. A 1/2" (12.7 mm)
hole for plumbing should be drilled at least 6" (15.2 cm) from
the right-hand or left-hand side cabinet or panel. On the floor,
the hole should be no more than 1" (2.54 cm) away from the
back wall. See “Connect the Water Supply.”
� If additional tubing is needed, use copper tubing and check for
leaks. Install the copper tubing only in areas where the
household temperatures will remain above freezing.
� If additional tubing is needed, use copper tubing and check for
leaks. Install the copper tubing only in areas where the
household temperatures will remain above freezing.
� Do not use a piercing-type or 3/16" (4.76 mm) saddle valve
which reduces water flow and also clogs more easily.
NOTE: Your refrigerator dealer has a kit available with a
1/4" (6.35 mm) saddle-type shutoff valve, a union, and copper
tubing. Before purchasing, make sure a saddle-type valve
complies with your local plumbing codes.
Water Pressure
A cold water supply with water pressure between 30 psi and
120 psi (207 kPa and 827 kPa) is required to operate the water
dispenser and ice maker. If you have questions about your water
pressure, call a licensed, qualified plumber.
NOTE: If the water pressure is less than what is required, the flow
of water from the water dispenser could decrease or ice cubes
could be hollow or irregular shaped. If you have questions about
your water pressure, call a licensed, qualified plumber.
Reverse Osmosis Water Supply
IMPORTANT: The pressure of the water supply coming out of a
reverse osmosis system going to the water inlet valve of the
refrigerator needs to be between 30 psi and 120 psi
(207 kPa and 827 kPa).
If a reverse osmosis water filtration system is connected to your
cold water supply, the water pressure to the reverse osmosis
system needs to be a minimum of 40 psi to 60 psi
(276 kPa to 414 kPa).
If the water pressure to the reverse osmosis system is less than
40 psi to 60 psi (276 kPa to 414 kPa):
� Check to see whether the sediment filter in the reverse
osmosis system is blocked. Replace the filter if necessary.
� Allow the storage tank on the reverse osmosis system to refill
after heavy usage.
� If your refrigerator has a water filter, it may further reduce the
water pressure when used in conjunction with a reverse
osmosis system. Remove the water filter cartridge.
If you have questions about your water pressure, call a licensed,
qualified plumber.
Tipping Radius
Be sure there is adequate ceiling height to stand the refrigerator
upright when it is moved into place.
� Be sure there is adequate ceiling height to stand the
refrigerator upright when it is moved into place.
� If needed, the tipping radius can be reduced. See “Reduce
Tipping Radius.”
Side Tipping Radius
The side tipping radius varies depending upon the width of the
model. Use the chart provided to determine the side tipping
radius.
NOTE: Tip on side only.
Model Tipping Radius
36
90
1
/
2
" (106 cm)
42
93" (236.2 cm)
48
96" (243.8 cm)
Product Dimensions
Front View
� Width dimensions were measured from trim edge to trim edge.
�
Height dimensions are shown with leveling legs extended
1/8" (3 mm) below the rollers.
N
O
A
B
C
D
A