OUTDOOR BUILT-IN DUAL SIDE BURNERS Installation Instructions and Use & Care Guide For questions about features, operation/performance, parts, accessories or service, call: 1-800-422-1230 or visit our website at www.kitchenaid.com In Canada, call for assistance, installation and service, call: 1-800-807-6777 or visit our website at www.KitchenAid.
TABLE OF CONTENTS TABLE DES MATIÈRES OUTDOOR BUILT-IN SIDE BURNER SAFETY ............................3 INSTALLATION REQUIREMENTS ................................................5 Tools and Parts ............................................................................5 Location Requirements ................................................................5 Product Dimensions.....................................................................5 Cabinet Dimensions .........................................
OUTDOOR BUILT-IN SIDE BURNER SAFETY Your safety and the safety of others are very important. We have provided many important safety messages in this manual and on your appliance. Always read and obey all safety messages. This is the safety alert symbol. This symbol alerts you to potential hazards that can kill or hurt you and others. All safety messages will follow the safety alert symbol and either the word “DANGER” or “WARNING.
IMPORTANT: This side burner is manufactured for outdoor use only. For side burners that are to be used at elevations above 2000 ft (609.6 m) orifice conversion is required. See “Gas Supply Requirements” section. It is the responsibility of the installer to comply with the minimum installation clearances specified on the model/serial rating plate. The model/serial rating plate can be found on the right-hand side panel.
INSTALLATION REQUIREMENTS Tools and Parts Gather the required tools and parts before starting installation. Read and follow the instructions provided with any tools listed here.
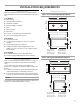
Built-In Outdoor Side Burner Enclosure The enclosure for the built-in outdoor side burner is to be a minimum of 11" (28.0 cm) high x 23" (58.4 cm) deep x 14" (35.6 cm) wide for front to back model and 11" (28.0 cm) high x 17" (43.2 cm) deep x 25" (63.5 cm) wide for side by side model.
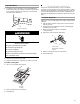
Recommended Ground Method The outdoor side burner, when installed, must be electrically grounded in accordance with local codes or, in the absence of local codes, with the National Electrical Code ANSI/NFPA 70, or Canadian Electrical Code, CSA C22.1. Copies of the standards listed above may be obtained from: CSA International 8501 East Pleasant Valley Rd. Cleveland, Ohio 44131-5575 National Fire Protection Association One Batterymarch Park Quincy, Massachusetts 02269 B A C A. 3 prong ground plug B.
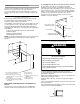
The supply line shall be equipped with an approved shutoff valve. This valve should be located in the same area as the burner and should be in a location that allows ease of opening and closing. Do not block access to the shutoff valve. The valve is for turning on or shutting off gas to the appliance. B LP gas conversion from a local LP gas supply: Conversion must be made by a qualified person.
Plug in Side Burner Check and Adjust the Burners 1. This built-in outdoor side burner comes with 5,000 mAmp power transformer plug assembly for the igniter system. Plug in the single-prong plug in the receptacle on the lower lefthand side of the side burner. The burners are tested and factory-set for most efficient operation. However, variations in gas supply and other conditions may make minor adjustments to low flame setting necessary. It is recommended that adjustments be made by a qualified person.
USING YOUR OUTDOOR SIDE BURNER Lighting the Side Burner WARNING 5. You will see the igniter glow. When burner is lit, release the knob. Turn knob to desired setting. 6. Repeat for each of the other burners as needed. IMPORTANT: If burner does not light immediately, turn the burner knob to OFF and wait 5 minutes before relighting. Manually lighting the side burner Burn Hazard Do not let the burner flame extend beyond the edge of the pan. 1. Remove the outdoor side burner cover. 2.
OUTDOOR SIDE BURNER CARE General Cleaning IMPORTANT: Before cleaning, make sure all controls are off and the side burner is cool. Always follow label instructions on cleaning products. For routine cleaning, wash with soap and water using a soft cloth or sponge. Rinse with clean water and dry at once with a soft, lint-free cloth to avoid spots and streaks. Do not use steel wool to clean the side burner, as it will scratch the surface. To avoid weather damage to finish, use stainless steel side burner cover.
ASSISTANCE OR SERVICE Before calling for assistance or service, please check “Troubleshooting.” It may save you the cost of a service call. If you still need help, follow the instructions below. When calling, please know the purchase date and the complete model and serial number of your appliance. This information will help us to better respond to your request. If you need replacement parts If you need to order replacement parts, we recommend that you use only factory specified parts.
LIFETIME LIMITED WARRANTY ON STAINLESS STEEL COMPONENTS ON GRILLS ONLY For the life of the product, when this grill is operated and maintained according to instructions attached to or furnished with the product, KitchenAid will pay for replacement of the stainless steel body housing due to defective materials or workmanship.
SÉCURITÉ DU BRÛLEUR LATÉRAL ENCASTRÉ D'EXTÉRIEUR Votre sécurité et celle des autres est très importante. Nous donnons de nombreux messages de sécurité importants dans ce manuel et sur votre appareil ménager. Assurez-vous de toujours lire tous les messages de sécurité et de vous y conformer. Voici le symbole d’alerte de sécurité. Ce symbole d’alerte de sécurité vous signale les dangers potentiels de décès et de blessures graves à vous et à d’autres.
IMPORTANTES INSTRUCTIONS DE SÉCURITÉ AVERTISSEMENT : Pour réduire le risque d’incendie, de choc électrique, de blessures corporelles ou de dommages lors de l’utilisation de l’appareil de cuisson à gaz d’extérieur, il convient d’observer certaines précautions fondamentales, notamment : ■ Ne pas installer les appareils de cuisson à gaz d’extérieur (portatifs ou encastrés) dans ou sur un véhicule récréatif, une remorque portative, un bateau ou toute autre installation mobile.
EXIGENCES D'INSTALLATION Outillage et pièces Dimensions du produit Rassembler les outils et pièces nécessaires avant de commencer l'installation. Lire et suivre les instructions fournies avec les outils indiqués ici.
Enceinte du brûleur latéral encastré d'extérieur L’enceinte du brûleur latéral encastré d’extérieur doit comporter les dimensions minimales suivantes : 11" (28 cm) de hauteur x 23" (58,4 cm) de profondeur x 14" (35,6 cm) de largeur pour le modèle à configuration avant/arrière et 11" (28 cm) de hauteur x 17" (43,2 cm) de profondeur x 25" (63,5 cm) de largeur pour le modèle juxtasposé.
Méthode recommandée de mise à la terre Le brûleur latéral d'extérieur, une fois installé, doit être correctement relié à la terre conformément aux codes locaux en vigueur ou, en l'absence de tels codes, au National Electrical Code, ANSI/NFPA 70 ou au Code canadien de l'électricité, CSA C22.1. On peut obtenir des exemplaires des normes mentionnées ci-dessus aux adresses suivantes : CSA International 8501 East Pleasant Valley Rd.
Gaz naturel Les brûleurs latéraux sont configurés pour l'alimentation au gaz naturel. Leur conception est homologuée par CSA International pour l'alimentation au gaz de pétrole liquéfié (propane ou butane), après conversion appropriée. Les brûleurs latéraux sont configurés pour l'alimentation au gaz naturel; ils comportent un détendeur avec un raccord à filetage femelle à ½" (1,3 cm). B A. Canalisation de gaz B. Robinet d'arrêt - position d'ouverture C.
3. À l'aide d'une clé pour serrer, raccorder l'alimentation en gaz au brûleur latéral. Utiliser un composé d'étanchéité des tuyauteries sur tous les filets mâles non évasés. Veiller à ne pas écraser/déformer/endommager le conduit de raccordement flexible lors d'un déplacement du brûleur latéral. AVERTISSEMENT A Risque de choc électrique Brancher sur une prise à 3 alvéoles reliée à la terre. Ne pas enlever la broche de liaison à la terre. B Ne pas utiliser un adaptateur.
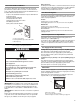
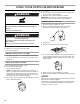
3. Observer les flammes sur le brûleur et faire tourner doucement le tournevis dans le sens antihoraire. 4. Régler pour obtenir des flammes stables de taille minimum. A B C A. Tige de réglage du robinet B. Tournevis à lame plate C. Pince 5. Réinstaller le bouton sur le robinet et éteindre le brûleur. 6. Réinstaller la grille.
5. Ne pas se pencher au-dessus du brûleur latéral. Pour le brûleur le plus proche de l'allumette, enfoncer et faire tourner le bouton du robinet jusqu'à la position LITE/HI. Le brûleur s'allume immédiatement. Lorsque le brûleur est allumé, tourner le bouton jusqu'au réglage désiré. 6. Répéter ces étapes pour chaque brûleur. 7. Retirer l'allumette; réinstaller le porte-allumette à l'intérieur de son support.
Si vous avez besoin de pièces de rechange ILLUSTRATIONS DU TABLEAU DE COMMANDE IMPORTANT : Ne pas utiliser de laine d'acier, de produits de nettoyage abrasifs ou de nettoyant pour four. Ne pas vaporiser le nettoyant directement sur le tableau. Méthode de nettoyage : ■ Nettoyer doucement autour des étiquettes des brûleurs; le frottement pourrait effacer les indications. ■ Détergent doux, chiffon doux et eau tiède. ■ Rincer et sécher.
GARANTIE LIMITÉE À VIE SUR LES COMPOSANTS EN ACIER INOXYDABLE POUR LES GRILS UNIQUEMENT Pour la durée de vie du produit, lorsque ce gril est utilisé et entretenu conformément aux instructions jointes à ou fournies avec le produit, KitchenAid remplacera la structure en acier inoxydable en cas de vices de matériaux ou de fabrication.