
Operation Manual


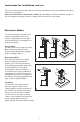


Fig. 6
• Attach the chimney flue support bracket G to
the wall next to the ceiling, using the chimney
support bracket as a template (the small slot
created on the bracket must coincide with the
line previously traced on the wall) mark the 2
holes with a pencil, drill the holes and insert the
2 plugs.
• Fit the chimney support bracket to the wall
with the 2 screws.
Only Vented mode version: fit the deflector to
the chimney support bracket using 4 screws.
Fig. 7
• Hook the hood onto the lower bracket.
• Fit the hood securely to the wall with screws
and washers
• Connect the venting pipe (vent pipe and straps
for fitting are not provided and must be
purchased separately) for the exhaust fumes to
the connection ring found above the motor
suction unit. The other end of the pipe should
be attached to the extractor hood. If you wish
to use the extraction hood in the recirculation
mode, then connect the other end of the pipe
to the connection ring on the deflector F.
• Connect the electrics.
• Attach the chimneys and fit them above using 2
screws to the chimney support bracket, G.
• Lower the lower part of the fully covered
chimney suction unit slide down until it fits into
the specific slot in the hood and attach it to the
hood using 2 screws.
Installation
chimney support bracket
chimney
support bracket
bottom fastener locations
lower support bracket
centre line
Recirculation mode only
upper
duct cover
9