
Installation Instructions


8
INSTALLATION INSTRUCTIONS
Prepare Cooktop
Decide on the nal location for the cooktop.
IMPORTANT: Do not cut top of product packaging. This may
damage the product.
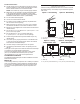
1. Open product as instructed on product packaging.
2. Remove all items from both sides of the foam and set aside.
Take out packaging foam and set aside to lay cooktop on.
IMPORTANT: Do not place packaging foam on knobs.
3. Using two or more people, remove cooktop and place the
cooktop upside down on the packaging foam, making sure
the knobs are not laid on the packaging foam.
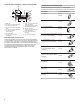
4. Remove plenum and plenum screw pack (in the package
containing literature).
5. Remove downdraft motor assembly.
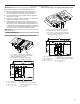
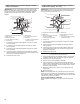
6. Place plenum on bottom of cooktop with round opening
to the motor wire harness.
NOTE: All holes are pre-drilled. If all six holes do not line up,
reverse plenum.
7. Using a 1/4" (6.4 mm) nut driver, screw in the six screws from
the package containing literature to attach plenum.
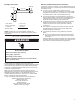
8. Remove access panel from plenum using a 1/4" (6.4 mm) nut
driver and set aside.
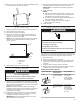
9. Remove four locking nuts and four washers from the package
containing literature.
NOTE: Remove the
four
protective caps from the motor
mounting posts.
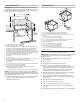
10. Place blower motor on plenum and rotate blower outlet
to where it matches the ductwork.
11. Install and nger-tighten the four washers and locking nuts
that were removed through the opening of the motor access
panel. Do not over-tighten to allow for motor to rotate.
12. Connect blower electrical connector to cooktop.
WARNING
Excessive Weight Hazard
Use two or more people to move and install cooktop.
Failure to do so can result in back or other injury.
A
B
C
A. Plenum
B. Cooktop
C. Motor wire harness
A
B
A. Access panel
B. Two screws
A
B
A. Blower motor
B. Plenum