
Installation Instruction


6
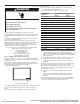
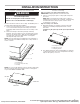
Installing Brackets Before Placing Cooktop in Cutout
1. Using 2 or more people, place the cooktop upside down
on a covered surface using the foam end posts from the
packaging. Make sure that the knobs are not resting on the
foam.
2. Remove the attachment screws for the bracket locations
from the bottom of the cooktop base.
3. Select bracket mounting holes that will allow the bracket to
extend far enough out from the cooktop for the installation of
2¹⁄
2
" (6.4 cm) clamping screws. See the “Attach Cooktop to
Countertop” section for illustration of clamping screw
installation.
4. Attach brackets to cooktop base bottom with bracket
attachment screws using the bracket mounting holes
selected in Step 3.
5. Rotate brackets so they do not extend beyond edge of
cooktop base.
6. Tighten attachment screws enough to hold brackets in place
when cooktop is placed in cutout.
7. Using 2 or more people, turn the cooktop right side up and
place in cutout.
NOTE: Make sure that the front edge of the cooktop is
parallel to the front edge of the countertop. If repositioning
is needed, lift entire cooktop up from cutout to avoid
scratching the countertop.
8. Loosen the screws and rotate the brackets so that they are
perpendicular to the edge of the cooktop base and extend
beyond its edge. Securely tighten screws.
Installing Brackets After Placing Cooktop in Cutout
1. Using 2 or more people, place cooktop right side up into the
cutout.
NOTE: Make sure that the front edge of the cooktop is
parallel to the front edge of the countertop. If repositioning
is needed, lift entire cooktop up from cutout to avoid
scratching the countertop.
2. Remove the attachment screws for the selected bracket
locations from the bottom of the cooktop base.
3. Select bracket mounting holes that will allow the bracket to
extend far enough out from the cooktop for the installation
of2¹⁄
2
" (6.4 cm) clamping screws.
4. Attach brackets to cooktop base bottom with bracket
attachment screws using the bracket mounting holes
selected in Step 3. Securely tighten screws.
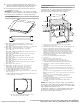
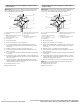
E
C
D
C
B
A
A. Edge of cooktop base bottom
B. Clamping bracket
C. Bracket mounting holes
D. Bracket clamping hole
E. Attachment screw
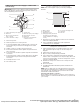
A
B
C
D
E
F
A. Cooktop
B. Cooktop base
C. Attachment screw
D. Clamping bracket (extends far enough beyond cooktop
base to allow installation of clamping screws)
E. 2¹⁄
2
" (6.4 cm) clamping screw (to be installed in “Attach
Cooktop to Countertop”)
F. Countertop
05-Sep-2019 13:08:04 EDT | RELEASED
In some European factories the letter "W" of the part code mentioned herein will be automatically
replaced by the number "4000" (e.g. "W12345678" becomes "400012345678")