KCM0802 INSTRUCTIONS INSTRUCTIONS INSTRUCCIONES W10661890A_EN_Final2.
P WELCOME TO THE WORLD OF KITCHENAID. We’re committed to helping you create a lifetime of delicious meals for family and friends. To help ensure the longevity and performance of your appliance, keep this guide handy. It will empower you with the best way to use and care for your product. Your satisfaction is our #1 goal. Remember to register your product online at www.kitchenaid.com, or by mail using the enclosed Product Registration Card. P Join us in the kitchen at www.kitchenaid.com. USA: 1.800.541.
English POUR OVER COFFEE BREWER INSTRUCTIONS TABLE OF CONTENTS COFFEE BREWER SAFETY Important safeguards..........................................................................................4 Electrical requirements......................................................................................5 PARTS AND FEATURES Parts and accessories..........................................................................................6 Display and control panel features................................
COFFEE BREWER SAFETY C IMPORTANT SAFEGUARDS When using electrical appliances, basic safety precautions should always be followed, including the following: 1. Read all instructions. 2. Do not touch hot surfaces. Use handles or knobs. 3. To protect against electrical shock, do not immerse cord, plugs, or Coffee Brewer in water or other liquid. 4. Close supervision is necessary when any appliance is used by or near children. 5. Unplug Coffee Brewer from outlet when not in use and before cleaning.
10. Do not place on or near a hot gas or electric burner, or in a heated oven. 11. Do not use appliance for other than intended use. 12. Do not use appliance without lid properly placed on container (carafe). 13. The container (carafe) is designed for use with this appliance. It must never be used on a range top or in a microwave oven. 14. Do not set a hot container (carafe) on a wet or cold surface. 15. Do not use a cracked container (carafe) or a container having a loose or weakened handle. 16.
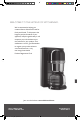
PARTS AND FEATURES P Parts and accessories #4 Paper filter (cone) in Filter basket Brew head Filter clip Water tank lid Water tank Cup/Water tank view Cord wrap (not shown) Programmable display Control panel Brew basket Glass carafe Warming plate 6 W10661890A_EN_Final2.
PARTS AND FEATURES Display and control panel features English Medium/Dark roast indicators Cup selection indicator Delay Start (Auto) indicator Clock display Warm indicator Clean indicator Heating indicator Steeping indicator Pouring indicator Brewing complete/ Enjoy indicator Brew button Menu button “- and +” toggle bar Set button How pour over coffee is different Traditional coffee brewing often doesn’t bring out the best flavor of your coffee beans.
ASSEMBLING THE COFFEE BREWER O Preparing the Coffee Brewer for use Before first use Before using your Coffee Brewer for the first time, wash the brew basket, filter clip, and carafe in hot, soapy water, then rinse with clean water and dry. Do not use abrasive cleaners or scouring pads. NOTE: These parts can also be washed in the top rack of the dishwasher. 1 Plug the Coffee Brewer into a 3-prong grounded outlet. If desired, wrap excess cord around the cord holder on the back of the Coffee Brewer.
English OPERATING THE COFFEE BREWER 3 The minute display will start to flash next. Use the “+” or “-” toggle bar to choose the correct minute setting, then press SET to make your selection. 4 The AM/PM display will flash last. Use the “+” or “-” toggle bar to choose the correct AM/PM setting, then press SET to go back to the programming menu. NOTE: To go directly to the clock display menu, when the Coffee Brewer is already on, press the MENU button four times, until the hour display begins to flash.
OPERATING THE COFFEE BREWER O Setting brew strength 1 To set the machine to brew a light or medium roasted coffee, press the MENU button until the MEDIUM roast indicator begins to flash on the display, then press SET. Medium roast is the default setting. 2 To choose a dark roasted coffee, use the “+” or “-” toggle bar to switch settings. When DARK roast begins to flash, push SET.
English OPERATING THE COFFEE BREWER 3 After pressing SET to choose AM or PM for your Delay start brew time, 2 beeps will sound and you will be returned to the programming menu. The Delay start program is ready to use. You can use the same Delay start brew time again by pressing the menu button twice, then pressing SET three times before brewing. To cancel the Delay start feature at any time, press the BREW button two times.
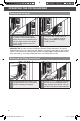
O C OPERATING THE COFFEE BREWER Filling the brew basket 1 Lift the filter clip and place a #4 paper coffee filter in the brew basket. Press the paper filter in to the sides of the brew basket and clip it into place with the filter clip. Should you prefer to brew without the filter clip, you can easily remove it by snapping it out of place. 2 Using the dosage recommendation on the filter clip (or the chart below), fill the paper filter with the desired amount of ground coffee.
OPERATING CMD + SHIFT THE CLICK COFFEE TO CHANGE BREWERCOPY English Brewing coffee 1 After selecting the number of cups you want to brew, and the strength of the coffee you want to brew, press the BREW button. 2 The Coffee Brewer will heat all the water needed to brew at the beginning of the cycle. You will see the Heating indicator light up during this segment of the cycle. This process takes approximately 6 minutes for 8 cups of coffee.
CARE AND CLEANING T Cleaning the Coffee Brewer Descaling the Coffee Brewer Calcium deposits (scale) from water will build up in the Coffee Brewer over time and impair brewing efficiency and coffee quality. If you notice that it takes longer than usual to brew, or that the Coffee Brewer is making unusual noises, then it is time to descale. The “Clean” indicator will flash when the Coffee Brewer needs to be cleaned.
1. If the display is not illuminated: • Check to see whether the Coffee Brewer is plugged into a grounded 3-prong outlet. If it is, check the fuse or circuit breaker on the electrical circuit the Coffee Brewer is connected to and make sure the circuit is closed. 2. I f only a portion of the water added to the Coffee Brewer actually brews: • The Coffee Brewer requires immediate descaling. Please refer to “Descaling the Coffee Brewer” in the “Care and cleaning” section. 3.
WARRANTY AND SERVICE W KitchenAid® Coffee Brewer Warranty for the 50 United States, the District of Columbia, Puerto Rico, and Canada This warranty extends to the purchaser and any succeeding owner for Coffee Brewers operated in the 50 United States, the District of Columbia, Puerto Rico, and Canada. Length of Warranty: One Year Full Warranty from date of purchase. KitchenAid Will Pay Hassle-Free Replacement of your Coffee Brewer.
WARRANTY AND SERVICE We’re so confident the quality of our products meets the exacting standards of KitchenAid that, if your Coffee Brewer should fail within the first year of ownership, KitchenAid will arrange to deliver an identical or comparable replacement to your door free of charge and arrange to have your original Coffee Brewer returned to us. Your replacement unit will also be covered by our one year limited warranty. Please follow these instructions to receive this quality service.
IC BIENVENUE DANS LE MONDE DE KITCHENAID. Nous nous engageons à vous aider à créer de délicieux repas pour votre famille et vos amis, et ce durant tout le cycle de vie de l’appareil. Pour contribuer à la durabilité et à une bonne performance de votre appareil, conserver ce guide à portée de main. Il vous permettra d’utiliser et d’entretenir votre produit de la meilleure manière qui soit. Votre satisfaction est notre objectif numéro 1. Ne pas oublier d’enregistrer votre produit en ligne sur www.kitchenaid.
CMD + SHIFT CLICK INSTRUCTIONS DE L’INFUSEUR TO CHANGE DECOPY CAFÉ À FILTRE TABLE DES MATIÈRES SÉCURITÉ DE L’INFUSEUR DE CAFÉ À FILTRE Consignes de sécurité importantes..................................................................20 Spécifications électriques..................................................................................21 Français PIÈCES ET CARACTÉRISTIQUES Pièces et accessoires........................................................................................
SÉCURITÉ CMD + SHIFT DE L’INFUSEUR CLICK TO CHANGE DE CAFÉ COPY À FILTRE C S CONSIGNES DE SÉCURITÉ IMPORTANTES Lors de l’utilisation d’appareils électriques, il faut toujours observer certaines précautions élémentaires de sécurité, y compris les suivantes : 1. Lire toutes les instructions. 2. Ne pas toucher de surface chaude. Utiliser les poignées ou les boutons. 3.
7. L’utilisation d’accessoires non recommandés par le fabricant de l’appareil peut causer des blessures. 8. Ne pas utiliser à l’extérieur. 9. Ne pas laisser le cordon pendre sur le côté d’une table ou d’un comptoir, ou toucher une surface chaude. 10. Ne pas placer sur ou près d’un brûleur électrique ou à gaz chaud, ou dans un four chaud. 11. Ne pas utiliser l’appareil pour un autre usage que celui pour lequel il est conçu. 12.
PIÈCES CMD +ETSHIFT CARACTÉRISTIQUES CLICK TO CHANGE COPY C P Pièces et accessoires Filtre à café en papier n°4 (conique) dans le panier à filtre Tête d’infusion Attache du filtre Couvercle du réservoir d’eau Réservoir d’eau Vue du réservoir d’eau et indicateur du nombre de tasses Range-cordon (non illustré) Affichage programmable Tableau de commande Panier à infusion Carafe en verre Plaque chauffante 22 W10661890A_FR.
CMD + ET PIÈCES SHIFT CARACTÉRISTIQUES CLICK TO CHANGE COPY Caractéristiques de l’affichage et du tableau de commande Témoins de torréfaction moyenne/foncée Témoin de mise en marche différée (Auto) Témoin de sélection du nombre de tasses Affichage de l’horloge Témoin de chaleur Témoin de nettoyage Témoin de chauffage Témoin d’écoulement Français Témoin de trempage Témoin d’infusion terminée/dégustez Bouton Infusion Bouton Menu Barrette à bascule “- et +” Bouton Réglage Particularité du café infusé av
ASSEMBLAGE CMD + SHIFTDE CLICK L’INFUSEUR TO CHANGE DE CAFÉ COPY À FILTRE FC Préparation de l’infuseur de café pour utilisation Avant la première utilisation Avant d’utiliser l’infuseur de café pour la première fois, laver le panier à infusion, l’attache du filtre et la carafe à l’eau chaude et savonneuse, puis rincer dans une eau propre et sécher. Ne pas utiliser de nettoyants abrasifs ou de tampons à récurer. REMARQUE : Ces pièces peuvent également être lavées dans le panier supérieur du lave-vaisselle.
FONCTIONNEMENT CMD + SHIFT CLICKDE TOL’INFUSEUR CHANGE COPY DE CAFÉ 1 Une fois l’infuseur de café branché, l’affichage de l’horloge commence à clignoter. 2 Lorsque l’affichage de l’heure clignote, utiliser la barrette à bascule “+” ou “-” pour sélectionner le réglage de l’heure correct. Appuyer ensuite sur SET (réglage) pour valider la sélection. 3 Lorsque l’affichage de l’heure clignote, utiliser la barrette à bascule “+” ou “-” pour sélectionner le réglage de l’heure correct.
FONCTIONNEMENT DE L’INFUSEUR DE CAFÉ FO C Sélection du nombre de tasses à infuser REMARQUE : Le réglage par défaut est de 8 tasses. 1 Depuis le menu principal, utiliser la barrette à bascule “+” ou “-” pour sélectionner le nombre souhaité de tasses à infuser, entre 2 et 8. Lorsque le nombre souhaité s’affiche, l’infusion est prête à démarrer.
FONCTIONNEMENT CMD + SHIFT CLICKDE TO L’INFUSEUR CHANGE COPY DE CAFÉ Utiliser la barrette à bascule “+” or “-” pour sélectionner l’heure à laquelle le démarrage de l’infusion par l’infuseur de café est souhaité, puis appuyer sur SET (réglage). Ensuite, répéter la procédure pour régler les minutes et AM/PM. 1 Pour régler la caractéristique de mise en marche différée, appuyer deux fois sur MENU (bouton du menu) jusqu’à ce que le témoin Auto (auto) clignote sur l’affichage.
FONCTIONNEMENT CMD + SHIFT CLICKDE TOL’INFUSEUR CHANGE COPY DE CAFÉ C FO Remplissage du réservoir d’eau La capacité du réservoir d’eau destinée à l’infusion est de 2 à 8 tasses (5 oz chacune). Étant donné qu’il est possible de sélectionner le nombre de tasses à infuser à chaque fois, il n’est pas nécessaire de remplir le réservoir d’eau avec la quantité d’eau exacte requise. L’infuseur de café à filtre utilise la quantité d’eau appropriée en fonction du nombre de tasses sélectionné.
CMD + SHIFT CLICKDE TOL’INFUSEUR CHANGE COPY FONCTIONNEMENT DE CAFÉ 1 Soulever l’attache du filtre et insérer un filtre à café en papier n°4 dans le panier à infusion. Appuyer le filtre en papier contre les parois du panier à infusion et le mettre en place à l’aide de l’attache du filtre. Si l’on souhaite infuser sans l’attache du filtre, il est facile de le retirer en le déboîtant.
FONCTIONNEMENT CMD + SHIFT CLICKDE TOL’INFUSEUR CHANGE COPY DE CAFÉ EN C Infusion du café 1 Après avoir sélectionné le nombre de tasses ainsi que le degré d’infusion du café à infuser, appuyer sur le bouton BREW (infusion). 2 L’infuseur de café chauffe toute la quantité d’eau nécessaire à l’infusion, au début du programme. Le témoin lumineux de chauffage s’allume durant cette partie du programme. La durée de ce processus est d’environ 6 minutes pour 8 tasses de café.
ENTRETIEN CMD + SHIFT ET CLICK NETTOYAGE TO CHANGE COPY Nettoyage de l’infuseur de café Détartrage de l’infuseur de café REMARQUE : L’infuseur de café peut être détartré à l’aide d’un agent de détartrage sous emballage qu’il est possible de trouver dans plusieurs magasins de détail ou en ligne. Suivre les instructions figurant sur l’emballage pour connaître les quantités d’agent de détartrage et d’eau recommandées.
DÉPANNAGE CMD + SHIFT CLICK TO CHANGE COPY GC 1. Si l’affichage n’est pas allumé : • Vérifier que l’infuseur de café est branché dans une prise à 3 alvéoles reliée à la terre. Si tel est le cas, inspecter le fusible ou coupe-circuit du circuit électrique auquel l’infuseur de café est raccordé et s’assurer que le circuit est fermé. 2. Si seule une partie de l’eau versée dans l’infuseur de café infuse : • L’infuseur de café nécessite un détartrage immédiat.
CMD + SHIFT CLICK TO CHANGE COPY GARANTIE ET DÉPANNAGE Garantie et dépannage de l’infusear de café KitchenAid® pour les 50 États des États-Unis, le district fédéral de Columbia, Porto Rico et le Canada Durée de la garantie : Garantie complète d’un an à compter de la date d’achat. KitchenAid prendra en charge les éléments suivants à votre choix : KitchenAid prendra en charge les éléments suivants à votre choix : Remplacement sans difficulté du l’infuseur de café.
GARANTIE CMD + SHIFT ET DÉPANNAGE CLICK TO CHANGE COPY Garantie de remplacement sans difficulté – pour les 50 États des États-Unis, le district fédéral de Columbia et Porto Rico Nous sommes tellement certains que la qualité de nos produits satisfait aux normes exigeantes de KitchenAid que si le l’infuseur de café cesse de fonctionner au cours de la première année suivant son acquisition, KitchenAid livrera gratuitement à votre porte un appareil de remplacement identique ou comparable et prendra les disposit
BIENVENIDO AL MUNDO DE KITCHENAID. Estamos comprometidos a ayudarle a crear deliciosas comidas para su familia y amistades por toda la vida. Para ayudar a asegurar la larga duración y el desempeño de su aparato, mantenga esta guía a la mano. Ésta le proveerá información sobre la mejor manera de usar y cuidar su producto. Su satisfacción es nuestra meta número 1. Recuerde registrar su producto en línea en www.kitchenaid.com, o bien por correo usando la Tarjeta de registro del producto adjunta.
INSTRUCCIONES CMD + SHIFT CLICK DE LA TOCAFETERA CHANGE COPY CON INFUSOR ÍNDICE SEGURIDAD DE LA CAFETERA CON INFUSOR Salvaguardias importantes................................................................................37 Requisitos eléctricos.........................................................................................38 PIEZAS Y CARACTERÍSTICAS Piezas y accesorios...........................................................................................
O Español SEGURIDAD CMD + SHIFT DECLICK LA CAFETERA TO CHANGE CONCOPY INFUSOR SALVAGUARDIAS IMPORTANTES Al utilizar aparatos eléctricos, se deben seguir las precauciones básicas de seguridad, entre las que se incluyen las siguientes: 1. Lea todas las instrucciones. 2. No toque las superficies calientes. Use las manijas o perillas. 3. Para protegerse contra choque eléctrico, no sumerja el cable, los enchufes ni la cafetera con infusor en agua ni en ningún otro líquido. 4.
SEGURIDAD CMD + SHIFT DE CLICK LA CAFETERA TO CHANGE CON COPY INFUSOR P C 7. El uso de accesorios de acoplamiento no recomendados por parte del fabricante del aparato puede ocasionar heridas. 8. No la use en espacios exteriores. 9. No deje que el cable cuelgue del borde de una mesa o mostrador ni que toque superficies calientes. 10. No lo coloque cerca ni sobre un quemador caliente eléctrico o a gas ni tampoco dentro de un horno caliente. 11.
PIEZAS CMD + Y SHIFT CARACTERÍSTICAS CLICK TO CHANGE COPY Piezas y accesorios Filtro de papel Nro. 4 (cono) en canasta de filtro Cabezal de elaboración Sujetador del filtro Tapa del tanque de agua Tanque de agua Vista del tanque de agua/tazas Almacenaje del cable (no se muestra) Panel de control Español Almacenaje del cable (no se muestra) Canasta de elaboración Jarra de vidrio Placa de calentamiento 39 W10661890A_SP.
PIEZAS CMD +YSHIFT CARACTERÍSTICAS CLICK TO CHANGE COPY AC Características de la pantalla y el panel de control Indicadores de tostado Medium/Dark (Medio/Oscuro) Indicador de selección de tazas Indicador de Delay Start (Inicio diferido - Automático) Pantalla del reloj Indicador de Warm (Tibio) Indicador de Clean (Limpiar) Indicador de Heating (Calentar) Indicador de Steeping (Remojar) Indicador de Pouring (Verter) Indicador de fin de elaboración/Enjoy (Disfrute) Botón Brew (Elaborar) Botón Menu (M
ARMADO CMD + SHIFT DE LACLICK CAFETERA TO CHANGE CON INFUSOR COPY Cómo preparar la cafetera con infusor para su uso Antes del primer uso Antes de usar la cafetera con infusor por primera vez, lave la canasta de elaboración, el sujetador de filtro y la jarra en agua caliente con jabón y, luego, enjuague con agua limpia y seque. No use limpiadores ni estropajos abrasivos. 1 Enchufe la cafetera con infusor en un contacto de pared de conexión a tierra de 3 terminales.
FUNCIONAMIENTO CMD + SHIFT CLICK DETO LACHANGE CAFETERA COPY CON INFUSOR Programación del reloj 1 Cuando la cafetera con infusor se enchufa, la pantalla del reloj comenzará a destellar. 2 Cuando la pantalla de la hora esté destellando, utilice la barra de ajuste “+” o “-” para elegir el ajuste de hora correcto. Luego, presione SET (Fijar) para seleccionar. 3 Después, comenzará a destellar la pantalla de minutos.
CMD + SHIFT CLICKDE FUNCIONAMIENTO TOLA CHANGE CAFETERA COPY CON INFUSOR Ajuste de la intensidad del café Para configurar la máquina para elaborar café de tostado claro o medio, presione el botón MENU (Menú) hasta que el indicador de tostado MEDIUM (Medio) comience a destellar en la pantalla y, luego, presione SET (Fijar). El ajuste por defecto es tostado medio. 2 Para elegir un café de tostado oscuro, utilice la barra de ajuste “+” o “-” para cambiar el ajuste.
FUNCIONAMIENTO CMD + SHIFT CLICKDE TOLA CHANGE CAFETERA COPY CON INFUSOR 3 Después de presionar SET (Fijar) para elegir AM o PM para la hora de elaboración de Delay Start (Inicio diferido), sonarán 2 pitidos y volverá al menú de programación. El programa de Delay Start (Inicio diferido) está listo para usar.
CMD + SHIFT CLICKDE TO COPY FUNCIONAMIENTO LACHANGE CAFETERA CON INFUSOR Cómo llenar la canasta de elaboración 1 Levante el sujetador de filtro y coloque un filtro de café de papel Nro. 4 en la canasta de elaboración. Presione el filtro de papel en los lados de la canasta de elaboración y sujételo en su lugar con el sujetador de filtro. Si prefiere elaborar el café sin el sujetador de filtro, podrá eliminarlo fácilmente al quitarlo de su lugar.
FUNCIONAMIENTO CMD + SHIFT CLICKDE TO LACHANGE CAFETERA COPY CON INFUSOR Elaboración de café 1 Después de seleccionar la cantidad de tazas que desea elaborar y la intensidad del café que desea elaborar, presione el botón de BREW (Elaborar). 2 La cafetera con infusor calentará toda el agua necesaria para elaborar al principio del ciclo. Verá el indicador de Heating (Calentar) encenderse durante este segmento del ciclo. Este proceso toma aproximadamente 6 minutos para 8 tazas de café.
CUIDADO CMD + SHIFT Y LIMPIEZA CLICK TO CHANGE COPY Limpieza de la cafetera con infusor Cómo quitarle el sarro a la cafetera con infusor Los depósitos de calcio (sarro) del agua se acumularán en la cafetera con infusor con el correr del tiempo y afectarán la eficacia de la elaboración y la calidad del café. Si nota que la elaboración lleva más tiempo que el normal, o si la cafetera con infusor hace ruidos raros, entonces es tiempo de quitarle el sarro.
SOLUCIÓN CMD + SHIFT DE PROBLEMAS CLICK TO CHANGE COPY G C 1. Si la pantalla no está iluminada: • Revise que la cafetera con infusor se haya enchufado en un contacto de pared de conexión a tierra de 3 terminales. Si lo está, revise el fusible o el cortacircuitos del circuito eléctrico al que está conectada la cafetera con infusor y asegúrese de que el circuito esté cerrado. 2.
GARANTÍA CMD + SHIFT Y SERVICIO CLICK TO CHANGE COPY Garantía del cafetera con infusor KitchenAid® para los 50 estados de Estados Unidos, el distrito de Columbia, Puerto Rico y Canadá Duración de la garantía: Un año de garantía completa a partir de la fecha de compra. KitchenAid pagará por lo siguiente, a su elección: Reemplazo sin dificultades de su cafetera con infusor.
GARANTÍA CMD + SHIFT Y SERVICIO CLICK TO CHANGE COPY Garantía de reemplazo sin dificultades – En los cincuenta estados de Estados Unidos, el Distrito de Columbia y Puerto Rico Confiamos tanto en que la calidad de nuestros productos cumple con las exigentes normas de KitchenAid que, si el cafetera con infusor presentara alguna falla durante el primer año de compra, KitchenAid hará arreglos para entregar un reemplazo idéntico o comparable a su domicilio sin cargo y arreglará la devolución de su cafetera con i
W10661890A_SP.
®/™ © 2014 KitchenAid. All rights reserved. Used under license in Canada. ®/™ © 2014 KitchenAid. Tous droits réservés. Utilisé sous licence au Canada. ®/™ © 2014 KitchenAid. Todos los derechos reservados. Usada en Canadá bajo licencia. W10661890A W10661890A_SP.