
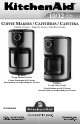
Coffeemaker User Manual


10
KITCHENAID
®
COFFEE MAKER USE
Brewing More Than 4 Cups of Coffee
NOTE: Brew one pot of fresh, cool water
and discard before brewing the first pot of
coffee (first time use only).
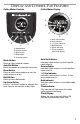
1. Remove the water tank and fill with
enough fresh, cool water to make the
desired amount of coffee. A graduated
scale on the tank measures the amount
of water needed. When replacing the
tank, make sure to align the holes on the
top of the tank with the tabs on the back
of the coffee maker housing.
For glass carafe models only, the right
side of the scale (Coffee) is a
measurement of coffee volume. The left
side of the scale (Water) indicates the
amount of water needed to produce a
given number of cups.
2. For glass carafe models only, lift the
tank lid and fill the water reservoir with
fresh, cool water. Water can also be
poured directly into the reservoir at the
back of the coffee maker.
3. After filling the reservoir, place the carafe
in the coffee maker. Make sure the lid is
securely in position and the bottom of
the carafe is fully seated. If the carafe is
not seated, the Pause and Pour feature
may not engage and may cause water
and coffee to overflow the brew basket.
4. Remove the brew basket from the top of
the coffee maker by grasping the locking
handle on the basket.
NOTE: The filter can be inserted and
coffee grounds added without removing
the brew basket from the coffee maker.
5. Insert a 10-12 cup flat bottom paper
filter or the Gold Tone permanent filter
into the brew basket. Do not use both
types of filters at the same time. Using
both filters might cause water and
coffee to overflow the brew basket.
6. Fill the filter with one rounded
tablespoon of ground coffee for each
cup desired. Use a medium grind
appropriate for automatic drip coffee
makers. Too fine a grind will produce
bitterness and may clog the coffee filter.
NOTE: Always place the filter and coffee
into the removable brew basket. Do not
operate the coffee maker without the
brew basket in place.
A. Locking handle
A