Հավաքման հրահանգներ
Անվտանգության կարևոր կանոններ 4 Երեխաների անվտանգություն 4 Սարքի տեխնիկական նկարագրությունը և տեղադրման պահանջները 5 Տեղադրման խորշի հատկությունները՝ ներկառուցված 6 Տեղադրման խորշի հատկությունները՝ ինտեգրված 7 Պատրաստվել տեղադրելու 8 Էլեկտրականության և ջրամատակարարման միացում 9 Հավասարեցում 10 Դեկորատիվ դռան և ներքևի դարակի ներկառուցված վահանակների դասավորությունը 11 Ներկառուցվող սառնարանի դեկորատիվ վահանակների պատրաստում 13 Ներկառուցվող ապակե դռնով սառնարանի դեկորատիվ վահանակների պատրաս
Անվտանգության կարևոր կանոններ Ուղեցույցի մեջ օգտագործվող նշանները Նշում՝ Խորհուրդներ՝ սարքը ճիշտ օգտագործելու մասին Կարևոր է՝ Խորհուրդներ՝ վնասնվածքներից խուսափելու մասին Զգուշացում՝ Խորհուրդներ՝ վնասվածքները կանխելու մասին Երեխաների անվտանգություն Եթե այս սարքավորումը փոխարինում է գոյություն ունեցող սարքավորմանը, որը պետք է հեռացվի կամ թափվի, համոզվե՛ք որ այն չի հանդիսանում վտանգավոր ծուղակ երեխաների համար՝ կտրելու հոսանքի մակատարարման լարը և շարժելու այն դարձնելով դռների փակումը անհնար։ Կիրառե՛ք նույն զգ
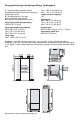
Սարքի տեխնիկական նկարագրությունը և տեղադրման պահանջները Ներկառուցված/ինտեգրված սարքի չափսերը 60սմ՝ I` 587 մմ (23 1/8 ձյույմ)/ ժ՝ 2050 մմ (80 3/4 ձյույմ)/ Վտ՝ 575 մմ (22 5/8 ձյույմ) 75սմ՝ I` 737 մմ (29 ձյույմ)/ ժ՝ 2050 մմ (80 3/4 ձյույմ)/ Վտ՝ 575 մմ (22 5/8 ձյույմ) 90սմ՝ I` 887 մմ (35 ձյույմ)/ ժ՝ 2050 մմ (80 3/4 ձյույմ)/ Վտ՝ 575 մմ (22 5/8 ձյույմ) Ներկառուցված/ինտեգրված սարքի չափսերը՝ ներառյալ փաթեթավորումը 60սմ՝ I` 650 մմ (25 5/8 ձյույմ) / ժ 2210 մմ (87 ձյույմ)/ Վտ՝ 800 մմ (31 1/2 ձյույմ) 75սմ՝ I` 800 մմ (3
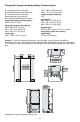
Տեղադրման խորշի հատկությունները՝ ներկառուցված A. հատվածը պետք է մնա բաց՝ հակակոնտակտային բրաների համար E. հատվածը պետք է մնա բաց՝ էներգասնուցման լարի համար W.
Տեղադրման խորշի հատկությունները՝ ինտեգրված A. Տարածքը պետք է թողնել մաքուր հակակոնտակտային նպատակով ամրացվող պետլիների համար E. հատվածը պետք է մնա բաց՝ էներգասնուցման լարի համար W.
Պատրաստվել տեղադրելու Տեղափոխում տեղադրման վայր և փաթեթավորման հեռացում Քանի որ սա մեծ և ծանր սարք է, նախքան այն տեղափոխելը, ստուգել վայրը՝ որտեղ այն պետք է տեղադրվի (դռան չափը, մանևրելու տարածքն աստիճանների վրա և այլն): Սարքը չորս հեղյուսներով ամրացվում է հիմքին (ծղոտե ներքնակ), որոնք կարելի հանել 17մմանոց (3/4 ձյույմ) մանեկաբանալիով: Խորհուրդ է տրվում սարքը տեղափոխել տեղադրման վայր՝ օգտագործելով ձեռքով տեղափոխման սարքավորում, և միայն այնտեղ պետք է հեռացնել փաթեթավորման հիմքը: Սարքը միշտ պետք տեղափոխվի ուղ
Էլեկտրականության և ջրամատակարարման միացում Էլեկտրականության միացումը պահանջում է Եվրոպական 16Ա Շուկո վարդակի և Միացյալ Թագավորության 13Ա վարդակի օգտագործում, որը վերահսկվում է դյուրամատչելի բազմաբևեռ անջատիչով: Ջրամատակարարման համակարգին միացնելու համար (այն սարքերի համար, որոնք ունեն սառույց պատրաստելու հնարավորություն) պետք է տեղադրվի ⁄դյույմանոց ծորակ, որը պետք է հեշտ հասանելի լինի սարքի տեղադրումից հետո: Սարքի հետ տրամադրում է ջրամատակարարման զանկապան և ամրացման հավաքածու, որը հարմար է ջրի բարձր ճնշմանը
Էլեկտրականության և ջրամատակարարման միացում Սարքի հետևի մասը Սարքի հետևի մասը Ջրի միացոմ Ընթացակարգը հետևյալն է՝ • Անջատել էլեկտրական մալուխը և այն ուղղակիորեն միացնել պատի վարդակից: • Համոզվեք, որ սարքը հանգստի ռեժիմում է և, որ բոլոր լույսերն անջատված են, եթե այդպես չէ, այն անջատելու համար սեղմեք անջատման կոճակը: • Ջրի զանկապանի մի ծայրը միացրեք սարքի հետնամասի 1-ին միակցիչին: • Ջրի զանկապանի մյուս ծայրը միացրեք ջրի ծորակին, օգտագործեք սեփականատիրոջ հավաքածու 2-ում տրամադրված միջադիրները: Հավասարեցում Սա
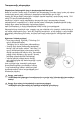
Դեկորատիվ դռան և ներքևի դարակի ներկառուցված վահանակների դասավորությունը Դեկորատիվ դռան և ներքևի դարակի ներկառուցված վահանակների դասավորությունը 18-21 էջերում Այնուամենայնիվ, սարքն ըստ պահանջների համապատասխանեցնելով այլ խոհանոցային կառուցվածքների հետ, դռան վահանակը կարող է լինել ավելի բարձր, քան սառնարանի դռան վերին եզրն է, և դարակի վահանակը կարող է լինել ավելի ցածր, քան դարակի եզրը: Վահանակները պետք է տեղադրվեն, օգտագործելով հատուկ հենարաններ, որոնք կցված կլինեն կարգավորելի սարքերին՝ դռան և դարակի վրա, հենա
Դեկորատիվ դռան և ներքևի դարակի ներկառուցված վահանակների դասավորությունը • 4-րդ՝ հենարանները տեղադրեք կատարված նշումների վրա՝ համոզվելու համար, որ համընկնում են, ապա 5-րդ՝ վահանակի վրա անցքեր արեք (ուշադրություն դարձրեք վահանակի հաստությանը): • 6-րդ՝ ամրացրեք հենարանները: Պահարանի վահանակ • 7-րդ՝ երբ պատրաստում եք դարակը, հետևեք նույն հրահանգներին, բայց համոզվեք, որ չափումները վերցվեն վերին եզրից: 8-րդ՝ պահող հենարանները շրջված են հակառակ ուղղությամբ (պատկերներ՝ 4 և 8): 12
Ներկառուցվող սառնարանի դեկորատիվ վահանակների պատրաստում 90սմ Ձախ առանցք 75սմ 60սմ Աջ առանցք Ձախ առանցք Աջ առանցք Ձախ առանցք Աջ առանցք 747 (29 3/8 ձյույմ) 597 (23 1⁄2 ձյույմ) 597 (23 1⁄2 ձյույմ) A 897 (35 1⁄4”) 897 (35 1⁄4”) 747 (29 3/8 ձյույմ) B 355,5 (14”) 261 (10 1⁄4”) 279 (11”) 187 (7 3⁄8”) 205 (8 1⁄8”) 111 (4 3⁄8”) C 261 (10 1⁄4”) 355,5 (14”) 187 (7 3⁄8”) 279 (11”) 111 (4 3⁄8”) 205 (8 1⁄8”) D 418 (16 1⁄2”) 386 (15 1⁄4”) 343 (13 1⁄2”) 311 (12 1⁄4”) 276,5 (10 7⁄8”) 236,5
Ներկառուցվող ապակե դռնով սառնարանի դեկորատիվ վահանակների պատրաստում 90սմ A D E F/G H I 60սմ Ձախ առանցք Աջ առանցք Ձախ առանցք Աջ առանցք 897 (35 3⁄8 ձյույմ) 418 (16 1⁄2 ձյույմ) 386 (15 1⁄4 ձյույմ) 354,5 (14 ձյույմ) 417 (16 3⁄8 ձյույմ) 384 (15 1⁄8 ձյույմ) 897 (35 3⁄8 ձյույմ) 386 (15 1⁄4 ձյույմ) 418 (16 1⁄2 ձյույմ) 354,5 (14 ձյույմ) 384 (15 1⁄8 ձյույմ) 417 (16 3⁄8 ձյույմ) 597 (23 1⁄2 ձյույմ) 276,5 (10 7⁄8 ձյույմ) 236,5 (9 3⁄8 ձյույմ) 203,5 (8 ձյույմ) 275 (10 7⁄8 ձյույմ) 235 (9 1⁄4 ձյույմ) 597 (23 1⁄2 ձ
Ներկառուցված վահանակների չափերը Սերիա Դռան/Պահարանի լայնությունը A Դռների պահպանակի լայնությունը B 90սմ 897 (35 1⁄4 ձյույմ) 627 (24 3⁄4 ձյույմ) 75սմ 747 (29 3/8 ձյույմ) 60սմ 597 (23 1⁄2 ձյույմ) 327 (12 7⁄8 ձյույմ) Հաշվարկման օրինակներ Խոհանոցում տեխադրելիս ընհանուր բարձրությունից կպահանջվի 2160 մմ (85 ձյույմ) և 150 մմ (6 ձյույմ) մետաղական թիթեղ։ (ՆՇՈՒՄ՝ Հաշվարկելիս, սարքավորման ոտքերի կարգավորումը ընդունվում է 0)։ Պահարանի հաշվարկը՝ մետաղական թիթեղ 187 - 150 = 37 մմ (1 1/2 ձյույմ) Վերին վահանակի
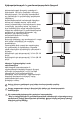
Ներկառուցվող՝ դռան և դարակի վրա վահանակների տեղակայում Պանելի վրա բոլոր բրաների ամրացումից հետո, կարող եք սկսել ներքևի դարակի տեղադրումը։ Ընթացակարգը հետևյալն է՝ • 1-ին՝ պտուտակով զգուշորեն ձգել մինչև ամրանալը: • Պահել դարակի վահանակը և սկսել ներքևից 2 ամրացնել: • Այժմ հնարավոր կլինի վահանակների բարձրությունը կարգավորել համապատասխան դարակների՝ օգտագործելով ստորին հենարանների հավասարությունը, 3-րդ՝ ձգեք կամ թուլացրեք պտուտակները՝ ինչպես պահանջվում է: Պտուտակի օգնությամբ թեթևակի ձգեք, շարժեք վահանակը՝ մյուս
Ներկառուցվող՝ դռան և դարակի վրա վահանակների տեղակայում • Կպցրեք վահանակը ամրացվող սարքերին՝ սկսած հավասարեցնող հենարաններ 6-ի վերևի հատվածից: • Այս էտապում, վահանակի և կարգավորող դարակների միջև հավասարությունը կարելի է կարգավորել օգտագործելով հավասարեցնող հենարանները և 7-րդ և 8-րդ փոքր հենարանները: • Ուղղահայաց հավասարեցում՝ ձգել կամ թուլացնել հենարանների պտուտակը՝ վահանակ 9-ը բարձրացնելու կամ իջեցնելու համար: • Խորության համապատասխանեցում՝ դռան ներսից աշխատելիս՝ մագնիսական կնիքը բարձրացնելուց հետո, օգտ
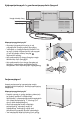
Տեղադրում Ներկառուցվող սարքի տեղադրում Ներկառուցման համար, սարքի և հարակից դարակների միջև անցքերը փակելու համար տրամադրվում են հատուկ պրոֆիլներ և ալյումինե ծածկող շրջանակներ: Ընթացակարգը հետևյալն է՝ • Սարքը հրեք տեղադրման խորշ 1: • Եթե սարքը պետք է տեղադրվի խորշի կամ կից կառուցվածքի ներսում, անհրաժեշտ է խորշի հետևի հատվածում նախագծել օդափոխության անցք՝ սարքի պատշաճ օդափոխությունն ապաովելու համար: 5 մմ-անոց անցք բավարար է գերտաքացումը կանխելու համար: Միշտ տեղադրեք առջևի վահանակները դռան կամ դարակի վրա՝ նախքա
Տեղադրում Երկու կամ ավելի սարքերի ներկառուցված տեղադրում Պահանջվող պարագաները պետք է առանձին պատվիրվեն` • Կենտրոնական միացման հավաքածու Հատուկ կողային պրոֆիլները և ալյումինե ծածկույթի շրջանակները նախատեսված են սարքի և հարակից պահարանների միջև բացերի փակման համար։ Ընթացակարգը հետևյալն է՝ • Սարքերը դրեք տեղադրման տարածքի առջև՝ բավարար տարածք թողնելով նրա հետևում աշխատելու համար` 1: 1 • Անցեք սարքերի հետնամաս՝ միացման հենարաններն ամրացնելու համար.
Տեղադրում • Վերը նշված քայլերն ավարտելուց հետո՝ հրեք սարքը իր վերջնական դիրքին՝ 6։ Եթե սարքը պետք է տեղադրվի խորշի կամ կից կառուցվածքի ներսում, անհրաժեշտ է խորշի հետևի հատվածում նախագծել օդափոխության անցք՝ սարքի պատշաճ օդափոխությունն ապահովելու համար: 5 մմ-անոց անցք բավարար է գերտաքացումը կանխելու համար: Միշտ տեղադրեք առջևի վահանակները դռան կամ դարակի վրա՝ նախքան սարքն իր վերջնական դիրքին բերելը՝ հրելով այն խորշի կամ կառուցվածքի մեջ: 6 • Ստուգե՛ք սարքավորման համահարթեցումը, կարգավորելով դրա ոտքերը և անիվն
Տեղադրում Երկու կամ ավելի ազատ կանգնած սարքերի տեղադրում Պահանջվող պարագաները պետք է առանձին պատվիրվեն` • Կենտրոնական միացման հավաքածու • Ազատ կանգնած հավաքածու Կարելի է օգտագործել ալյումինե պրոֆիլներ՝ սարքի և հարակից կառուցվածքների միջև տարածությունը փակելու համար: Ընթացակարգը հետևյալն է՝ • Սարքերը դրեք տեղադրման տարածքի առջև՝ բավարար տարածք թողնելով նրա հետևում աշխատելու համար: 1 • Հանեք ինքնասոսնձվող պաշտպանիչ ժապավենը, և սարք 1-ի կողքին առանձին վահանակ տեղադրեք: • Անցեք սարքերի հետնամաս՝ միացման հենա
Տեղադրում 7 • Կողքի վահանակները միացրեք սարքին՝ նախապես ամրացված կողքի պրոֆիլներին 7: • Կպցրեք ալյումինե ծածկը 8 պրոֆիլի յուրաքանչյուր կողմին՝ սեղմելով մինչև դրանք միասին «կտան»: 8 • Տեղադրեք վերին վահանակ 9-ը սարքի վերևում՝ օգտագործելով հավաքածուի հետ տրամադրված պտուտակները: • Կարգավորեք սարքի բարձրությունը՝ կարգավորման ոտքերի և հետևի անիվների օգնությամբ: 9 Կողային և կենտրոնական պրոֆիլների տեղակայում Սարք A Միացման տարր B Ալյումինե շրջանակ Սարք D Կենտրոնական միացում E Կենտրոնական ծածկման և միացմ
Հակակոնտակտային անվտանգության հավաքածու Սարքի շրջվելը կանխելու համար՝ կարելի է պատվիրել ավելի երկար հավաքածու, եթե սարքը պետք է տեղադրվի պատից հեռու, և պարտադիր է սարքի վերևի մասում երկու հենարաններ տեղադրել՝ այն պատին ապահով ամրացնելու համար: Ընթացակարգը հետևյալն է՝ • Հենարանները պետք է կիրառվեն ինչպես նկարագրված է՝ օգտագործելով տրամադրված պտուտակները և խրոցակները: Հենարանը տեղադրել սարքի վերևի հատվածում՝ ամրացման անցքերին համապատասխան և պատի մոտ՝ 1: 75 55 85 1 2 • Պատի վրա նշեք անցքերի տեղերը՝ 2: •
Օդափոխություն Օդի համակարգն օդափոխություն է ապահովում սարքի առջևի հատվածի ներքևում տեղադրված ցանցի միջոցով: Եթե խոհանոցի նախագիծը ներառում է մետաղական թիթեղ, վերջինս պետք է բաց լինի՝ բավարար օդի հոսք ապահովելու համար, ինչպես նկարագրված է գծագրում: Անցքերը կարող են լինել ցանկացած ձևի և չափի, քանի դեռ բաց տարածքի ընհանուր մասը հավասար է մետաղական թիթեղ տարածքի 50%-ին: Այս դեպքում, օդի հոսքը երաշխավորելու համար, խորհուրդ է տրվում հեռացնել սարքում ներառված առջևի ցանցը: Ցանցն ամրացված է սարքին մագնիսական վահանակ
Հետտեղադրման վերահսկում • Ստուգեք, որ առջևի համահարթեցման ոտքերը պատշաճ տեղադրված լինեն: • Ստուգեք, որ միացումը ջրի համակարգին չունենա որևէ արտահոսք, և որ ծորակը հեշտ հասանելի լինի: • Ստուգեք, որ էլեկտրական միացումները ճիշտ կատարված լինեն, և որ բազմաբևեռ անջատիչը և վարդակը հեշտ հասանելի լինեն: • Ստուգեք, որ սարքը կատարելապես հավասար լինի հարակից կառույցներին: • Ստուգեք, որ բոլոր ներքին և արտաքին աշտպանիչ սարքերն ու ինքնասոսնձվող ժապավենները հանվեն: • Ստուգեք, որ դռները կատարյալ փակվեն և դարակները հանգիստ սա
Printed in Italy r 09/16 400011025861 HY