
Use & Care Guide

2
KEY USAGE TIPS
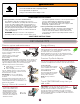
Filtration system and maintenance
Your dishwasher has the latest
technology in dishwasher ltration.
This ltration system minimizes
sound and optimizes water and
energy conservation while providing
superior cleaning.
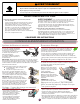
The lter system consists of two
parts, an upper lter assembly
and lower lter.
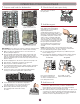
IMPORTANT: To avoid damage to dishwasher, do not operate your
dishwasher without lters properly installed. Be sure lower lter is
securely in place and upper lter assembly is locked into place. If
upper assembly turns freely, it is not locked into place.
The lters may need to be cleaned when:
■ Visible objects or soils are on upper
lter assembly.
■ Dishes feel gritty to the touch.
See the “Filtration System” section in the full
online User Instructions for complete removal
and maintenance schedule.
IMPORTANT: Do not use a wire brush,
scouring pad, etc., as they may damage
the lters.
Rinse lter under running water until soils are
removed. If you have hard to remove soils or
calcium deposits because of hard water, a soft
brush may be required.
P
U
S
H
D
O
W
N
&
T
U
R
N
L
O
C
K
U
N
L
O
C
K
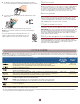
Drying – Rinse aid is essential
You must use a drying agent
such as a rinse aid for good
drying performance. Rinse
aid along with the Heat Dry,
Extended Heat Dry option
will provide best drying and
avoid excessive moisture in
dishwasher interior.
SLIDE
Energy efficiency
Energy efciency is gained by extending cycle time and
reducing the amount of wattage and water used during
your dishwasher’s cycle. For exceptional cleaning, cycles
are longer due to the soak and pauses.
Efcient dishwashers run longer to save water and energy,
just as driving a car slower saves on gas. Your rst cycle will
run longer to calibrate the optical water sensor.
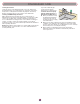
Premium Top Rack Adjuster
You can raise or lower the top rack to t tall items in either the top
or bottom rack. Adjusters are located on each side of the top rack.
To raise the rack:
Press both rack adjuster thumb
levers and lift the rack until it is
in the up position and level.
To lower the rack:
Press both rack adjuster thumb
levers and slide the rack to its
down position and level.
NOTE: The top rack must
be level.
Touch START/RESUME every time you
add a dish
IMPORTANT: If anyone opens the door (such as, for
adding a dish, even during the Delay option), Start/Resume
must be touched each time to resume the cycle.
Push the door rmly closed within 4 seconds of touching
Start/Resume. If the door is not closed within 4 seconds, the
Start keypad light will ash, an audible tone will be heard, and
the cycle will not start.
Upper lter
assembly
Lower lter
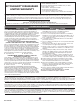
Tip Over Hazard
Do not use dishwasher until completely installed.
Do not push down on open door.
Doing so can result in serious injury or cuts.
WARNING
GROUNDING INSTRUCTIONS
SAVE THESE INSTRUCTIONS
■
For a grounded, cord-connected dishwasher:
The dishwasher must be grounded. In the event of a
malfunction or breakdown, grounding will reduce the risk of
electric shock by providing a path of least resistance for
electric current. The dishwasher is equipped with a cord
having an equipment-grounding conductor and a grounding
plug. The plug must be plugged into an appropriate outlet
that is installed and grounded in accordance with all local
codes and ordinances.
WARNING:
Improper connection of the equipment-
grounding conductor can result in a risk of electric shock.
Check with a qualified electrician or service representative if
you are in doubt whether the dishwasher is properly
grounded. Do not modify the plug provided with the
dishwasher; if it will not fit the outlet, have a proper outlet
installed by a qualified electrician.
■
For a permanently connected dishwasher:
The dishwasher must be connected to a grounded metal,
permanent wiring system, or an equipment-grounding
conductor must be run with the circuit conductors and
connected to the equipment-grounding terminal or lead on
the dishwasher.