Instructions for use
Precautions and general recommendations 4 Parts of the dishwasher 5 Technical information 6 Baskets 6 Control panel 8 Dispenser 8 Basic Course 9 Programs 10 Options 12 Special settings 14 Eco-dishwashing 14 Fragile dishes 15 Time remaining 15 Status light 15 Cleaning 16 Rinse aid 18 Salt 19 Fault indications 20 Troubleshooting 20 Performance information 22 Installation instructions 23 Installation and connection information 24 Service & guarantee 31 Quick Guide
Precautions and general recommendations 1. Packing The packaging materials are 100% recyclable and marked with the recycling symbol . - Be careful when the door is open: risk of tripping! - The open dishwasher door can only support the weight of the loaded rack when pulled out. Do not rest objects on the open door or sit or stand on it. - Sharp items that might cause injury (e.g. knives), must be placed in the cutlery basket (where present) with the sharp end facing downwards.
The symbol on the appliance, or on documentation enclosed with the appliance, indicates that this product must not be treated as household waste, but must be delivered to the nearest collection centre for the recycling of electrical and electronic appliances. Disposal must be carried out in accordance with local environmental regulations for waste disposal.
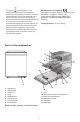
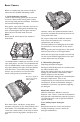
Technical information Height Width Depth Weight Capacity* Water pressure Connection Max 860-910 mm 596 mm 560 mm 53-56 kg 12 place settings 0.03-1.0 MPa (0.3–10 kp/cm2) 1-phase, 230 V, 50Hz 10/10A** 1600 W** * In accordance with standard, EN 50242 ** See type plate. Baskets 1. 2. 3. 4. 5. Wine glass shelf Knife stop Upper spray arm Locking handle for upper basket Catch Upper basket Raising/lowering the upper basket 1. Pull out the upper basket. 2.
Cutlery basket Cutlery basket cover Positioning the cutlery basket cover The cover for the cutlery basket can be removed and used, for example, as an extra cutlery basket in the upper basket (see illustrations below).
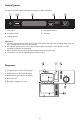
Control panel The panel has touch buttons with optional sounds to confirm selections. 1. Main switch 4. Navigations buttons 2. Program selector 5. Start/stop 3. Display window Important! 1. The touch buttons must be kept clean and free from grease. Use only a dry or slightly damp cloth and never cleaning fluid as this can cause scratches. 2. Use the main power switch to turn off the machine before cleaning the touch buttons to avoid activating any buttons unintentionally. 3.
Basic Course Below are step-by-step instructions to help you achieve the best possible dishwashing results. 1 - Load the baskets correctly! Thanks to Self Cleaning System, you do not need to rinse the dishes under running water. Simply remove large food particles and debris. Convenient and environmentally-friendly! Place glasses, cups, bowls, side plates, and saucers in the upper basket. Wine glasses should be hung from or leaned against the wine glass shelf and knives placed in the knife stand if present.
Changing program If you want to change program after having started the machine, press the Start/Stop button for three seconds. Then select a new program and press the Start/Stop button. Make sure there is detergent in the dispenser. Do you want to load more dishes? Carefully open the door; the machine will stops automatically, put in the dishes, close the door and the dishwasher will continue from where it left off.
Programview Programs Auto Daily Time Heavy Options – 60°C Selectable 30 to 180 min 55°C Prewashes with SCS* – 1 prewash Mainwash*** – 60°C Number of rinses last rinse 60°C Normal 65°C Combi Mix 55°C 2 prewashes 2 prewashes – Max. 65°C 55°C 65°C 55°C 2, last rinse 65°C Max. 65°C 3, last rinse 60°C 2, last rinse 70°C 2, last rinse 60°C Consumption values 1. Wash time (approx.hrs:min) hot water / min.** 98 - 145 80 90 170 130 160 Energy approx. kWh 0.5 - 0.8 0.8 0.8 0.
Options Select options To select an option, press one of the option buttons. Description Basket loaded All baskets This option lets you set all spray arms in function and by this option you can wash both the upper and lower baskets. Upper basket If you only have cups and glasses in the upper basket which require washing, you can use this program. Lower basket When you only want to wash plates and cutlery in the lower basket you can use the lower basket wash.
Description Normal If you desire a maximum drying result, press the Drying options button (Normal) and a symbol showing three wavy lines will light. (in all programs except Auto, Time, Rinse & Dry, Rinse & Hold, Plate heat). Drying Without If you want a program without Drying options, press the button again and the symbol will go out. Eco For save energy, select Economy dry. Tab Off Tab This option is available when using a combi detergent, such as a 3-in-1 type.
Special settings When you have selected the programme and any option, press the Menu button until 'Special settings' appears in the display. Description Special settings Yes SE EN RU DK NO Language Language on the LCD can be selected. NL To access the language menu directly press DE and simultaneously. FI ES IT FR Off Child lock Child lock can be set on or off. Default off. On Buzzer volume 1-4 This signal is set at the factory.
Fragile dishes A number of household goods are not suitable for machine washing. This can be due to a variety of reasons. Certain materials cannot withstand intense heat; others can be damaged by the dishwasher detergent. Silver Silver and stainless steel items should not come into contact with each other as the silver can discolor. Cutlery with glued handles Certain types of adhesive cannot withstand machine washing. In such cases the handles can come loose.
Cleaning The dishwasher tub is made of stainless steel and is kept clean through normal use.However, if you have hard water, limescale deposits may form in the machine. If this happens, run a normal wash program with two tablespoons of citric acid in the dishwasher detergent compartment. 3. Remove and clean the fine filter. 4. Replace in reverse order. Ensure that the edges are properly sealed when replacing the fine filter. Spray arm 5.
4. You can release and turn the pump blade by inserting your finger into the hole and release anything blocking it. 5. Reinstall the fitted piece and filters. 6. Plug the plug into the wall socket. Spray arm Middle basket Cleaning the middle basket: 1. Pull out the basket. 2. Check the holes in the spray unit. 3. Clean with a pin or similar item. If the machine still does not start and a buzzing sound is heard, the overflow guard has been activated. • Shut off the water.
Rinse aid Select dosage The dispenser is usually set at 1= soft water. However, depending on the water hardness, you may need to change the dosage. Adding rinse aid In some cases, drying can be made more efficient by using rinse aid. Machines with indicator on the panel When the rinse aid has run out and more is needed, the rinse aid symbol on the panel lights up*. Open the rinse aid cover. Here you will find the dispenser's adjustment dial. Settings 1-6: the harder the water, the higher the dosage.
Salt Add salt Before using a dishwasher with a water softening filter, you must fill the salt compartment with salt. Use coarse salt or special salt for dishwashers. It is best to fill with salt when you are about to do a wash, as the dishwasher needs to be rinsed out immediately after filling. reached through the green arm located under the cover of the salt compartment. 1. Move the float arm up and down to loosen it. 2. Once the float has been loosened, press it down again.
Fault indications Display Type of fault Action Overfilling Too much water in the machine Phone for service Water inlet fault Fault in the water inlet Check that the tap is open Inlet valve Inlet valve leakage Shut off the tap and phone for leakage service Drainage fault Blocked drain See 'Possible causes' in chapter Troubleshooting Blocked filter Clogged filter Clean filters, see chapter Cleaning To remove the fault indications from the display, turn off the main switch and then turn it ba
Problems Possible causes Action Stains on stainless steel or silver • Certain food remnants such as mustard, mayonnaise, lemon, • Rinse off food residue of this type if vinegar, salt, and dressings can you do not intend to start the cause stains on stainless steel if dishwasher immediately allowed to remain for any length of • Seperate your cutlery into various time. All stainless steel can mark compartments in the basket.
Problems Possible causes Action Door will not close • The baskets are not correctly placed 1 minute appears in the display • The program is taking longer than estimated The touch buttons do not react when pressed • You have pressed the touch buttons • Wait a moment then try again too soon after opening the door • Wipe clean with a dry or slightly • Dirt or grease on the touch buttons damp cloth • Make sure the baskets are in a horizontal position.
Installation instructions FULLY INTEGRATED MODELS BEFORE STARTING THE INSTALLATION: 1. Connection to water supply: • There must be a shut off valve on the water supply pipe. The shut off valve should be installed in a location that is easily accessible so that the water may be shut off in the event that the dishwasher needs to be moved. 2. Installation advice: • Cable holes for wires/cables need not be larger than 40 mm. • Affix the light shielding film (see Fitting the dishwasher in place).
Installation and connection information CABLE/HOSE Drainage hose: Supply hose: Power cable: DISHWASHER CAVITY MEASUREMENTS Cable hole Make sure the edges of the cable hole are even so as not to damage the drainage and supply hoses and the electric cable. LENGTHS 1930 mm 1670 mm 1770 mm TOOLS 1) Flathead screwdriver 2) Open-ended spanner 16 mm 3) Tape measure 4) Spirit level Step 1. Fitting the dishwasher in place 1.
6. Push the dishwasher into the cavity. At the same time, pull the electric cable and drainage and supply hoses through the cable hole. 3. Screw in the back foot completely by turning the adjustment screw at the front anticlockwise. Use a flat-bladed screwdriver or an Allen screwdriver. 4. Push the plastic feet into place on all three steel feet (included in document bag). Note: Do not attach the plastic feet if the installation space is of minimum height. 7.
9. Adjust the back foot by turning the adjustment screw at the front clockwise. MEASUREMENTS OVERVIEW – WOODEN DOOR FULLY INTEGRATED MODELS Width: 596 mm Height: 700 mm to 800 mm 10. Place the spirit level on the dishwasher door to check that the machine is level and adjust if necessary. The door must be fully closed! Note: The dishwasher must be level! An unlevel machine can affect the amount of water taken in, the door can be difficult to close, and the baskets difficult to place securely. Step 3.
n sio ase g rin ten sp re Inc n sio ten es uc d Re ng pri Reduce spring tension Increase spring tension 2. Loosen the spring from the rear mount by turning it outwards. 4. Replace the back end of the spring by holding the spring at a right angle to the side of the dishwasher and pushing the end of the spring into the hole, then turning the spring in towards the dishwasher. 5. Reattach the front end of the spring by pulling it up and forward to fasten it in the mount. 4 3.
3. Connect the electric plug Ensure that the power socket is within the range of the power cable. Do not use an extension cord! The dishwasher must be connected to a grounded outlet. who sold you the dishwasher. Step 4. Connecting electricity, water and drain 1. Connect drain hose The drain hose runs to an inlet plug on the ink unit's water trap. Connection pipe Clamp Grounded outlet Water connection Step 5. Checking dishwasher function and fit Test the dishwasher with the rinse program.
Securing to worktop Securing to side cabinets 7. Tighten the lock nuts on the front feet with 6mm open-ended wrench. 5. Cover the screw holes on the sides with the supplied plastic plugs. Push in the plugs diagonally to fit them in place. 6. Check that the dishwasher's two front steel feet are solidly placed on the floor, that is, the dishwasher is not hanging in the air. Otherwise turn the front feet to lower them. Step 7.
6. Check that the toe kick is in line with the surrounding kitchen toe kick, that is, at the same depth. Loosen and adjust the holders as necessary until satisfied. Adjust the height of the insulation material 1. Attach the supplied sound insulation material to the back of the kickboard (certain models only). If you use the low kickboard, adjust the height of the insulation material by removing the thin strip. 2. Loosen the holders for the kickboard by moving the grey catches to the side. 3.
Service & guarantee Service Before calling for service, check to see whether the faults is due to something that you can rectify yourself. See Troubleshooting. Guarantee For guarantee details, see the guarantee card. Quick Guide 1. Load the baskets correctly! Thanks to the Self Cleaning System you don't need to rinse the dishes, simply scrape large food particles and debris. 2. Dispensing dishwasher detergent The detergent compartment has a small compartment for pre-wash and one for main wash. 3.
Printed in Italy 06/11 5019 709 02011/A n GB