
Installation guide


TipOverHazard
A childor aduJtcantip the range
andbekiiJed.
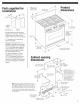
Connectanti-fipbracketto wa!I
behindrange.
Reconnectthe anti-tip bracket, if
the range is moved.
Failure to follow these instructions
can result in death or serious
burns to children and aduJts.
line I
I
aHti-tip --_._ I _;
bracket _ _
I
I
__f_ wall stud
I
I
I
_ mounting
screws
I
I
I
I
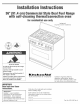
Position top of anti-tip bracket at
line marked in step 5 and mark holes.
Drill two 1/8" (3 mm) holes. Use screws
provided to fasten anti-tip bracket to wall.
NOTE: Anti-tip bracket must be mounted
securely to stud in wall behind the range.
Depending on thickness of the wall
covering, longer screws may be required.
m Make electrical connection.
If your house has aluminum wiring, see
"Electrical requirements" page 5.
Electrical Shock Hazard
Disconnect power before servicing.
Use 8 gauge copper wire.
Electrically ground range.
Failure to follow these instructions
can result in death, fire, or
eJectricaJ shock.
This range must be connected to a
grounded, metallic permanent wiring
system or a ground connector should be
connected to the ground terminal or wire
lead on the range.
This range is manufactured with a frame-
connected, green or bare ground wire
factory-crimped to the neutral (white)
wire. Connect the range cable to the
junction box through the U.L- or CSA=
listed conduit connector. Complete
electrical connection according to local
codes and ordinances.
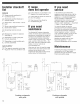
Am Where local codes Do Not
permit connecting the frame-ground
conductor to the neutral (white) junction
box wire (also used for Canadian
installations):
4-wire cable from power supply
red wires ,._,j [ ./junction box
lite wires
J iY'_'X /_t_'_._ J ".twist-on
connector
bare_ greel__ / black wires
wires _d] \ U.L- oz CSA- listed
/ conduit connector
4-wire cable from range
Ungrounded neutral
Figure 1
1. Disconnect power supply.
2. Connect the flexibJe, armored cable
from the range to the junction box
using a U.L- or CSAqisted conduit
connector. Tighten screws on conduit
connector.
3oConnect the two black wires
together; and the two red wires
together using twist-on connectors.
(See Figure 1.)
4. Separate the factory-crimped bare
and white range cable wires.
5oConnect the two white wires together
using twist=on connector.
6oConnect the bare ground wire from
the range cable to the grounded wire
in the junction box or other grounded
connector using twist-on connector.
(See Figure 1.) Do not connect bare
ground wire to neutral (white) wire in
junction box.
B. Where local codes permit
connecting the frame-ground conductor to
the neutral (white) junction box wire (not
used for Canadian installations):
junction
box
red
3-wire cable from
power supply
black
wires
white
wire
white and bare
oven cable wires --
factory crimped
4-wire cable from range
U.L.- or CSA- listed
conduit connector
Grounded neutral
Figure 2
1. Disconnect power supply.
2. Connect the flexible, armored cable
from the range to the junction box
using a U.L.- or CSAqisted conduit
connector. Tighten screws on conduit
connector.
3. Connect the two black wires together;
the two red wires together; and the
factory-crimped bare and white
cooktop cable wires to the white
(neutral) wire in the junction box using
twist-on connectors. (See Figure 2.)