
Installation Guide


12
INSTALLATION INSTRUCTIONS
WARNING
Excessive Weight Hazard
Use two or more people to move and install range.
Failure to do so can result in back or other injury.
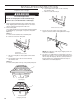
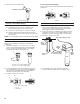
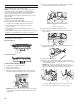
1. Remove shipping materials, tape, and film from range.
Keep shipping pallet under range. Remove oven racks,
grates, and parts package from inside oven.
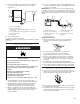
2. Remove kick plate.
Your range will either have the kick plate already installed
(follow Option 1) or packaged on top of the unit (follow
Option 2).
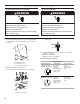
A. Kick plate
B. Remove these screws.
A
B
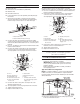
c. Lift up on kick plate to release plate from shoulder
screws.
d. Lay kick plate to the side to avoid scratching
the stainless steel.
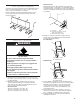
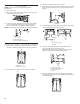
Option 2
a. Remove kick plate from top of range and grate pack.
NOTE: This support is used only for shipping and is not
needed for installation.
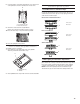
4. Lay a piece of cardboard from side packing on the floor
behind range. Using 2 or more people, firmly grasp each
side of range. Lift range up about 3" (8.0 cm) and move
it back until range is off shipping pallet. Set range on
cardboard to avoid damaging floor.
Unpack the Range
In packaging
Packaging removed
A
A. Kick plate
A
A. Kick plate
b. Lay kick plate to the side to avoid scratching
the stainless steel.
c. Remove screws from range.
A. Remove these screws.
Option 1
a. Remove foam between door and kick plate.
b. Remove screws from kick plate.
3. For 48" (121.9 cm) models only, rotate center
support counterclockwise off the pallet until it stops.