
Installation Instruction


19
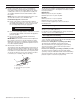
A
B
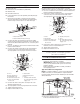
A. Front tabs and slots
B. Rear tabs and slots
Electronic Ignition System
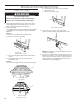
Install Burner Bases and Burner Caps
Install the burner base, making sure the igniter electrode
is properly aligned with the base. Place burner caps on top
of burner bases. If burner caps are not properly positioned,
surface burners will not light.
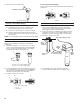
A. Incorrect
B. Correct
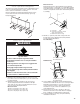
Ultra Power™ Dual-Flame Burner
A
B
A. Incorrect
B. Correct
Professional Burner
A. Incorrect
B. Correct
Simmer/Melt Burner
A
B
A
B
Initial Lighting and Gas Flame Adjustments
Cooktop burners use electronic igniters in place of standing
pilots. When the cooktop control knob is turned to any position,
the system creates a spark to light the burner. This sparking
continues until the flame is lit or the knob is turned to OFF.
NOTE: The first time igniting the burners will take longer.
This allows the gas to reach the burners during the first use.
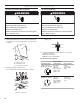
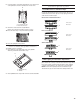
A. Griddle drip tray
B. Griddle
A
B
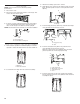
8. Insert front tabs of the flame spreader into slots at the front
of the grill basin, then the rear tabs into the rear slots.
9. Check the surface burner and grill flames.
Refer to the “Electronic Ignition System” section.
10. Place the wave tray on top of the flame spreader.
11. Place the grill grate into position.
Install Griddle (on griddle models)
The griddle is factory installed.
1. Place drip tray in the well at the front of the griddle.
Slide tray toward the back until it stops.
2. Clean griddle before using. Refer to the Use and Care Guide.