Instructions for use
Installation 4 Product description 6 First time use 7 Programs table 9 Options and functions 11 Loading the racks 12 Daily use 14 Tips 14 Care and maintenance 15 Troubleshooting 17 After-sales service 19
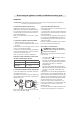
Before using the appliance carefully read Health and Safety guide. Installation ATTENTION: If the appliance must be moved at any time, keep it in an upright position; if absolutely necessary, it may be tilted onto its back. CONNECTING THE WATER SUPPLY ANTI-FLOODING PROTECTION Adaptation of the water supply for installation should only be performed by a qualified technician. The water inlet and outlet hoses may be positioned towards the right or the left in order to achieve the best possible installation.
POSITIONING AND LEVELLING DIMENSIONS, CAPACITY AND STANDBY CONSUMPTION: 1. Position the dishwasher on a level sturdy floor. If the floor is uneven, the front feet of the appliance may be adjusted until it reaches a horizontal position. If the appliance is levelled correctly, it will be more stable and much less likely to move or cause vibrations and noise while it is operating. 2.
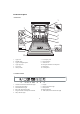
Product description APPLIANCE 1 2 7 8 3 9 4 5 6 Service: 10 11 0000 000 00000 12 1. 2. 3. 4. 5. 6. Upper rack Foldable flaps Upper rack height adjuster Upper spray arm Lower rack Cutlery basket 7. 8. 9. 10. 11. 12. Lower spray arm Filter Assembly Salt reservoir Detergent and Rinse Aid dispensers Rating plate Control panel 7. 8. 9. 10. 11. Display Half Load indicator light Delay button Half Load button Tablet (Tab) button with indicator light CONTROL PANEL 1 1. 2. 3. 4. 5. 6.
First time use ADVICE REGARDING THE FIRST TIME USE 1. Remove the lower rack and unscrew the reservoir cap (anticlockwise). 2. Only the first time you do this: fill the salt reservoir with water. 3. Position the funnel (see figure) and fill the salt reservoir right up to its edge (approximately 1 kg); it is not unusual for a little water to leak out. 4. Remove the funnel and wipe any salt residue away from the opening.
FILLING THE RINSE AID DISPENSER To achieve the best washing and drying results, the combined use of detergent, rinse aid liquid and refined salt is required. We recommend using detergents that do not contain phosphates or chlorine, as these products are harmful to the environment. Good washing results also depend on the correct amount of detergent being used. Exceeding the stated amount does not result in a more effective wash and increases environmental pollution.
Program 1. Eco 50° 2. Intensive 65° 3. Normal 55° 4. Glass 45° 5. Fast 30’ 50° 6. Sanitizing 65° 7. Pre-Wash - 8. Self-Clean 65° Auto Door Opening Drying phase Programs table Available options *) Detergent container Duration Water Energy of wash consump- consumpprogram tion tion Tub B (h:min)**) (litres/cycle) (kWh/cycle) 2:45 12.0 0.93 - 2:30 15.0 1.50 - 2:00 15.0 1.35 - - 1:40 11.5 1.10 - - 0:30 8.5 0.50 - - 1:40 11.5 1.30 - - - 0:10 4.5 0.
PROGRAMS DESCRIPTION Instructions on wash cycle selection. ECO Normally soiled crockery. Standard program, the most efficient in terms of its combined energy and water consumption. SANITIZING Normally or heavily soiled crockery, with additional antibacterial wash. PRE-WASH Crockery to be washed later. No detergent to be used with this program. INTENSIVE Program recommended for heavily soiled crockery, especially suitable for pans and saucepans (not to be used for delicate items).
Options and functions OPTIONS can be selected directly by pressing the corresponding button (see CONTROL PANEL). If an option is not compatible with the selected program (see PROGRAMS TABLE), the corresponding LED flashes rapidly 3 times and beeps will sound. The option will not be enabled. DELAY The start time of the program may be delayed for a period of time between 1 and 12 hours. 1.
Loading the racks Before loading the baskets, remove all food residues from the crockery and empty the glasses. You do not need to rinse beforehand under running water. Arrange the crockery so that it is held in place firmly and does not tip over; and arrange the containers with the openings facing downwards and the concave/convex parts placed obliquely, thus allowing the water to reach every surface and flow freely.
LOWER RACK For pots, lids, plates, salad bowls, cutlery etc. Large plates and lids should ideally be placed at the sides to avoid interferences with the spray arm. (loading example for the lower rack) The lower rack has tip-up supports which can be used in a vertical position when arranging plates or in a horizontal position (lower) to load pans and salad bowls easily. CUTLERY BASKET The modular basket can slide to optimise the space inside the lower rack.
Daily use 1. CHECK WATER CONNECTION Check that the dishwasher is connected to the water supply and that the tap is open. 2. SWITCH ON THE DISHWASHER Open the door and press the ON/OFF button. 3. LOAD THE RACKS (see LOADING THE RACKS) 4. FILLING THE DETERGENT DISPENSER (see PROGRAMS TABLE). 5. CHOOSE THE PROGRAM AND CUSTOMISE THE CYCLE Select the most appropriate program in accordance with the type of crockery and its soiling level (see PROGRAMS DESCRIPTION) by pressing the P button.
Care and maintenance ATTENTION: Always unplug the appliance when cleaning it and when performing maintenance work. Do not use flammable liquids to clean the machine. CLEANING THE DISHWASHER CHEKING THE WATER SUPPLY HOSE Any marks on the inside of the appliance may be removed using a cloth dampened with water and a little vinegar. The external surfaces of the machine and the control panel can be cleaned using a non-abrasive cloth which has been dampened with water. Do not use solvents or abrasive products.
CLEANING THE SPRAY ARMS On occasions, food residue may become encrusted onto the spray arms and block the holes used to spray the water. It is therefore recommended that you check the arms from time to time and clean them with a small non-metallic brush. To remove the upper spray arm, turn the plastic locking ring in an anti-clockwise direction. The upper spray arm should be replaced so that the side with the greater number of holes is facing upwards.
Troubleshooting Your dishwasher may not work properly. Before contacting the Service Centre check if the problem can be solved by going through the following list. PROBLEMS POSSIBLE CAUSES SOLUTIONS The appliance has not been plugged in properly. Insert the plug into the socket. The dishwasher won’t Power outage. start or does not respond to The dishwasher door is not closed. commands. It does not respond to commands. The door doesn’t lock. The dishwasher won’t drain.
PROBLEMS POSSIBLE CAUSES SOLUTIONS The crockery has not been arranged properly. Arrange the crockery correctly (see LOADING THE RACKS). The spray arms cannot rotate freely, being hindered by the dishes. Arrange the crockery correctly (see LOADING THE RACKS). The wash cycle is too gentle and/or detergent efficiency is low. Select an appropriate wash cycle (see PROGRAMS TABLE). An excessive amount of foam has been The dishes are produced.(see AFTER-SALES SERnot clean.
After-sales service CONTACTING AFTER-SALES SERVICE TECHNICAL DATASHEET When you contact the After-Sales Service, you must provide the codes shown on the rating plate attached to the left or right side inside the door of the dishwasher. The phone number is listed in the warranty booklet or on the website: www.kitchenaid.eu The technical data containing the energy consumption data can be downloaded from the website docs.kitchenaid.
Printed in Italy 12/18 400011331733 EN