DISHWASHER USER INSTRUCTIONS THANK YOU for purchasing this high-quality product. Register your new dishwasher at www.kitchenaid.com/customer-service/ register-products/. In Canada, register your dishwasher at www.kitchenaid.ca in the Service and Support section. For future reference, please make a note of your product model and serial numbers. These can be located on the label located near the door on the right-hand or left-hand side of the dishwasher interior.
GROUNDING INSTRUCTIONS ■ For a grounded, cord-connected dishwasher: The dishwasher must be grounded. In the event of a malfunction or breakdown, grounding will reduce the risk of electric shock by providing a path of least resistance for electric current. The dishwasher is equipped with a cord having an equipment-grounding conductor and a grounding plug. The plug must be plugged into an appropriate outlet that is installed and grounded in accordance with all local codes and ordinances.
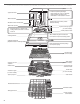
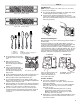
Parts and Features KDTE104E, KDTE204E, KDFE204E, KDTE254E ProScrub ® powerful jets target water toward pots, pans, or casserole dishes loaded in the back of the dishwasher to clean stubborn messes. (on some models) Upper level wash Water feed tube Pressurized spray nozzles provide effective cleaning. Model and serial number label Water inlet opening Lower spray arm Heating element Overfill protection float Rinse aid dispenser reduces spotting and improves drying.
Parts and Features KDTM354E, KDTM384E, KDTM404E, KDTM504E, KDTM704E, KDTM804E Interior lights (on some models) ProScrub ® powerful jets target water toward pots, pans, or casserole dishes loaded in the back of the dishwasher to clean stubborn messes. Upper level wash Water feed tube Pressurized spray nozzles provide effective cleaning. Model and serial number label Water inlet opening Dynamic lower spray arm (on some models) Advanced ProDry™ System uses heating element and a fan to remove moist air.
Start-Up/Quick Reference Drying - Rinse Aid is essential. ProScrub® Option to clean baked-on food You must use a drying agent such as a rinse aid for good drying performance (sample included). Rinse aid along with the ProDry™ option will provide best drying and avoid excessive moisture in the dishwasher interior. When the ProScrub® option is selected, it provides a concentrated wash on the back of the lower dish rack for hard-to-clean dishes.
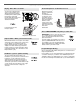
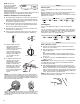
Quick Steps 1 Prepare and load dishwasher. 3 Select a cycle and option. 2 Add detergent for cleaning and rinse aid for drying. 4 Start dishwasher. SLIDE NOTE: If the Start/Resume button is located on the top of the door, ensure the light beside the button is lit and firmly push the door closed within 3 seconds of pressing START/RESUME. SLIDE Dispensers vary by model.
STEP 2 4 4 4 5 5 5 4 2 5 5 2 2 2 1 3 1 5 3 3 3 4 5 6 3 2 1 1 5 5 1 2 2 1 4 1 2 2 1 4 5 1 1 2 4 4 3 3 3 3 4 10 place load - silverware basket Add Detergent NOTE: If you do not plan to run a wash cycle soon, run a rinse cycle. Do not use detergent. ■ Use automatic dishwasher detergent only. Add powder, liquid or tablet detergent just before starting a cycle.
NOTE: Fill amounts Hard Water shown are for standard Hard Water powdered detergent. Soft Water Soft Water Follow instructions on the package when using gel Main Wash Pre-Wash dishwasher detergents. Premeasured forms are suitable for all hardness and soil levels. Always place premeasured detergents in the main compartment and close the lid. Add Rinse Aid (Dispenser varies by model) ■ Your dishwasher is designed to use rinse aid for good drying performance.
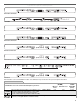
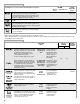
Cycle and Option Descriptions KDTM704E, KDTM804E KDTM504E KDTM404E KDTM354E, KDTM384E KDTE204E, KDTE254E KDTE204E Custom door model KDFE204E KDTE104E This information covers several different models. Your dishwasher may not have all of the cycles and options described. CYCLE SELECTIONS CYCLES Dishwasher senses the soil amount and adjusts cycle times. The most advanced and versatile cycle.
CYCLE SELECTIONS CYCLES Dishwasher senses the soil amount and adjusts cycle times. SOIL LEVEL ESTIMATED TIME* (HH:MM) Min Soil Level** Max Soil Level WATER USAGE GALLONS (Liters) This cycle, with only the Heat Dry option selected, and without other options selected, is recommended to completely wash and dry a full load of normally soiled dishes. The energy usage label is based on this cycle and option combination. Includes Heat Dry. Light to Heavy 2:22 3:27 2.7 - 4.2 (10.2- 15.
OPTION SELECTIONS OPTIONS CAN BE SELECTED WITH WHAT IT DOES MIN MAX ProWash™ Tough Normal Top Rack Only Increases the main wash temperature from 105°F to 140°F (41°C to 60°C) and the final rinse from 140°F to 155°F (60°C to 68°C). :10 :50 0 - 1.5 (0 - 5.7) (on some models) For added convenience, use for washing a small load of dishes in the top rack to help keep the kitchen continuously clean.
CONTROLS AND CYCLE STATUS CONTROL PURPOSE COMMENTS To reset any cycle or options during selection or to cancel a wash cycle after it's started. Press and hold CANCEL/DRAIN to reset any control selections made. See the “Canceling A Cycle After Dishwasher Is Started” and “Changing A Cycle After Dishwasher Is Started” sections. To turn the audible tones on or off. Press and hold the HI TEMP WASH button for 3 seconds to turn the audible tones on or off.
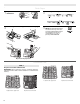
Dishwasher Features Your KitchenAid dishwasher may have some or all of these features. ProScrub® Option Wash Area The ProScrub® option wash area is located at the back of the lower level rack and the front corners of the upper level rack. To remove, fully extend rack until it stops. Then, open the track stops on each side and lift to remove. Low profile items such as serving utensils and silverware may be loaded on the third level rack. A SURE-HOLD® Cup and Stemware Holder A.
Sliding Bowl Tines (on some models) Sliding lower-rack tines that move left or right to fit your dishes. You can use this feature to fit larger items like cereal bowls or other odd shaped items. To replace the rack: Pull the tracks forward about halfway out of the tub. Along the sides of the racks are round attachment tabs. Align the rack's back end attachment tabs with the cutout in the track. Push down into place.
Dishwasher Care Cleaning Cleaning The Exterior In most cases, regular use of a soft, damp cloth or sponge and a mild detergent is all that is necessary to keep the outside of your dishwasher looking nice and clean. If your dishwasher has a stainless steel exterior, a stainless steel cleaner is recommended, such as affresh®† Stainless Steel Cleaner. Cleaning The Interior Hard water minerals can cause a white film to build up on the inside surfaces, especially just beneath the door area.
Drain Air Gap Some state or local plumbing codes require the addition of a drain air gap between a built-in dishwasher and the home drain system. Check the drain air gap when your dishwasher is not draining well. The drain air gap is usually located on top of the sink or countertop near the dishwasher. NOTE: The drain air gap is an external plumbing device that is not part of your dishwasher.
Troubleshooting First try the solutions suggested here. If you need further assistance or more recommendations that may help you avoid a service call, refer to the warranty page in this manual and scan the code with your mobile device, or visit http://kitchenaid.custhelp.com. In Canada, visit www.kitchenaid.ca (website may not be compatible with some mobile devices). Contact us by mail with any questions or concerns at the address below: In the U.S.A.
PROBLEM SOLUTION HARD WATER (WHITE RESIDUE ON DISHWASHER INTERIOR OR GLASSWARE) NOTE: Extremely hard water mineral deposits can cause damage to your dishwasher and make it difficult to achieve good cleaning. A water softener is strongly recommended if your hardness is 15 grains or more.
PROBLEM SOLUTION CLOUDY OR SPOTTED DISHWARE (AND HARD WATER SOLUTION) NOTES: ■ Liquid rinse aid is necessary for drying and to reduce spotting. Use the correct amount of detergent. Confirm that the cloudiness is removable by soaking the item in white vinegar for 5 minutes. If the cloudiness disappears, it is due to hard water. Adjust the amount of detergent and rinse aid. See “Hard Water (White Residue On Dishwasher Interior Or Glassware)” in the “Troubleshooting” section.
KITCHENAID® DISHWASHER LIMITED WARRANTY ATTACH YOUR RECEIPT HERE. PROOF OF PURCHASE IS REQUIRED TO OBTAIN WARRANTY SERVICE. Please have the following information available when you call the Customer eXperience Center: ■ Name, address and telephone number ■ Model number and serial number ■ A clear, detailed description of the problem ■ Proof of purchase including dealer or retailer name and address IF YOU NEED SERVICE: 1.
INSTRUCCIONES PARA EL USUARIO DE LA LAVAVAJILLAS LE AGRADECEMOS la compra de este producto de alta calidad. Registre su nueva lavavajillas en www.kitchenaid.com/customer-service/ register-products/. En Canadá, registre su lavavajillas en www.kitchenaid.ca en la sección de Servicio y Soporte. Para referencia futura, tome nota del número de modelo y de serie del producto.
INSTRUCCIONES DE CONEXIÓN A TIERRA ■ Para una lavavajillas con cable eléctrico y conexión a tierra: La lavavajillas debe estar conectada a tierra. En caso de funcionamiento defectuoso o avería, la conexión a tierra reduce el riesgo de choque eléctrico al establecer una ruta de menor resistencia para la corriente eléctrica. La lavavajillas viene equipada con un cable eléctrico que tiene un conductor para conexión a tierra y un enchufe con conexión a tierra.
Piezas y características KDTE104E, KDTE204E, KDFE204E, KDTE254E Los poderosos surtidores ProScrub® dirigen el agua hacia las ollas, las sartenes o fuentes que se han cargado en la parte posterior de la lavavajillas, para limpiar la suciedad rebelde. (en algunos modelos) Lavado del nivel superior Tubo de alimentación de agua Las boquillas de rociado a presión y el motor de velocidad variable proveen una limpieza eficaz.
Piezas y características KDTM354E, KDTM384E, KDTM404E, KDTM504E, KDTM704E, KDTM804E Las luces interiores (en algunos modelos) Los poderosos surtidores ProScrub® dirigen el agua hacia las ollas, las sartenes o fuentes que se han cargado en la parte posterior de la lavavajillas, para limpiar la suciedad rebelde. Lavado del nivel superior Tubo de alimentación de agua Las boquillas de rociado a presión y el motor de velocidad variable proveen una limpieza eficaz.
Puesta en marcha/Referencia rápida Secado: el agente de enjuague es fundamental. Deberá usar un agente de secado, como puede ser un agente de enjuague, para un buen rendimiento de secado (se incluye una muestra). El agente de enjuague junto con la opción de ProDry™ le proporcionarán el mejor secado y evitarán que se forme humedad excesiva en el interior de la lavavajillas.
Pasos rápidos 1 Prepare y cargue la lavavajillas. 3 Seleccione un ciclo y una opción. 2 Agregue detergente para la limpieza y agente de enjuague para el secado. 4 Ponga la lavavajillas en marcha. NOTA: Si el botón Start/Resume (Inicio/Reanudar) está ubicado sobre la puerta, empuje la misma firmemente para cerrarla en menos de 3 segundos después de haber presionado START/RESUME (Inicio/ Reanudar). SLIDE SLIDE Los depósitos varían según modelo.
PASO 2 2 4 4 4 3 3 5 2 1 2 1 4 1 1 2 3 3 1 4 1 1 2 3 3 1 4 1 1 3 1 4 1 3 2 2 1 1 1 2 1 3 3 4 4 1 1 1 2 1 4 1 1 2 1 5 4 2 2 1 Agregue detergente 4 3 3 6 NOTA: Si no va a hacer funcionar un ciclo de lavado de inmediato, ponga un ciclo de enjuague. No use detergente. ■ Use únicamente detergentes para lavavajillas automáticas. Agregue detergente en polvo, líquido o en pastilla justo antes de comenzar un ciclo.
NOTA: Para casi todos los tipos de agua, la selección de fábrica dará buenos resultados. Si tiene agua dura o nota que hay aros o manchas, pruebe con un ajuste más alto. Gire el regulador de flecha que se encuentra dentro del depósito usando sus dedos o insertando un destornillador de hoja plana en el centro de la flecha y haciéndola girar. -- - 654 1 m 2 ax 3 ll fi - - -- - - - Números mayores brindan más agente de enjuague.
■ Si el botón Start/Resume (Inicio/Reanudar) está ubicado en la parte superior de la puerta, presione START/RESUME. Asegúrese de que la luz al lado del botón esté encendida y el temporizador de cuenta regresiva (en algunos modelos) esté contando hacia atrás mientras empuja firmemente la puerta cerrada. La puerta debiera estar cerrada a los 3 segundos de presionar START/RESUME o escuchará una serie de pitidos y el ciclo no se iniciará.
Esta información cubre varios modelos diferentes. Puede ser que su lavavajillas no cuente con todos los ciclos y opciones descritos. SELECCIONES DE CICLO CICLOS La lavavajillas detecta la cantidad de suciedad y ajusta los tiempos de los ciclos. SOIL LEVEL (NIVEL DE SUCIEDAD) TIEMPO ESTIMADO* (HH:MM) Nivel de suciedad mín.** Nivel de suciedad máximo USO DE AGUA EN GALONES (Litros) El ciclo más avanzado y versátil.
SELECCIONES DE OPCIONES OPTIONS (Opciones) y (en algunos modelos) PUEDE SELECCIONARSE CON LO QUE HACE TIEMPO AGREGADO AL CICLO*** (HH:MM) MÍN MÁX. AGUA AGREGA DA EN GALONES (LITROS) Los surtidores inferiores rocían, desde la parte posterior de la canasta inferior, para limpiar las sartenes, las cacerolas, etc. con suciedad rebelde, para eliminar la necesidad de remojar y refregar los platos sucios y con comida quemada adherida.
SELECCIONES DE OPCIONES OPTIONS (Opciones) PUEDE SELECCIONARSE CON Hace funcionar la lavavajillas a una hora posterior o durante las horas que sean de menor consumo de energía. Seleccione un ciclo y opciones de lavado. Presione el o (en algunos botón Delay (Retraso). Presione START/ modelos) RESUME (Inicio/Reanudar). Cierre la puerta con firmeza.
Sección de información provista por la lavavajillas CONTROLES Y ESTADO DE LOS CICLOS CONTROL PROPÓSITO A COMENTARIOS La luz indicadora de estado del ciclo se usa para seguir el progreso del ciclo de la lavavajillas. Está ubicada en la parte superior de la puerta. La luz indicadora en a parte frontal del panel de la puerta (A) permanecerá azul durante lavado/enjuague, roja durante secado, y blanca cuando termine.
Características de la lavavajillas Su modelo de lavavajillas KitchenAid podrá contar con algunas o todas estas características. Área de lavado con la opción ProScrub® El área de lavado con la opción ProScrub® está ubicada en la parte posterior de la canasta inferior y en las esquinas frontales de la canasta del nivel superior. A A. Parte posterior de la lavavajillas NOTA: Debe seleccionar ProScrub® o ProScrub® Upper (ProScrub superior) (en algunos modelos) para usar estas funciones.
Canasta superior regulable de calidad superior de 2 posicione. Usted puede subir o bajar la canasta superior para acomodar artículos más altos tanto en la canasta superior como en la inferior. Los ajustadores se encuentran a cada lado de la canasta superior. Cada ajustador tiene 2 posiciones ya determinadas. Para elevar la canasta, presione ambos ajustadores de la canasta y levántela hasta que quede en la posición alta; nivélela.
A. El agua fluye por estos orificios cuando la boquilla está volteada hacia abajo. B. El agua fluye por estos orificios cuando la boquilla está volteada hacia arriba. Cuando no necesita lavar botellas, voltee las boquillas hacia abajo hasta que se detengan. Iluminación interior (en algunos modelos) En modelos con una ventana, la iluminación interior se encenderá automáticamente durante 10 minutos cuando el ciclo termine.
Canastas de limpieza avanzada (en algunos modelos Si desea lavar películas de agua endurecida u otras acumulaciones de suciedad desde superficies interiores de la lavavajillas, recomendamos el uso de un producto de mantenimiento mensual como el limpiador de lavavajillas affresh®. Si desea limpieza de rutina; use un paño suave humedecido.
Solución de problemas Pruebe primero las soluciones sugeridas aquí. Si necesita asistencia adicional o más recomendaciones que pueden ayudarle a evitar una llamada de servicio técnico, consulte la página de la garantía de este manual y escanee el código con su dispositivo móvil o visite http:// kitchenaid.custhelp.com. En Canadá, visite www.kitchenaid.ca. (El sitio web no será compatible con algunos dispositivos inalámbricos.
PROBLEMA SOLUCIÓN QUEDA AGUA EN LA TINA/NO DESAGUA Asegúrese de que se haya terminado el ciclo [la luz de Clean (Limpio) está encendida]. Si no se ha terminado, deberá reanudar el ciclo cerrando la puerta y presionando START/RESUME (Inicio/Reanudar) ; o puede presionar CANCEL/DRAIN (Cancelar/Desaguar) para cancelar el ciclo actual. Si la lavavajillas está conectada a un recipiente de desechos alimenticios, asegúrese de haber quitado la tapa ciega de la entrada del recipiente de desechos.
PROBLEMA SOLUCIÓN LUCES DESTELLANDO Los LED destellarán cuando haya una pausa en el ciclo o cuando se haya interrumpido el mismo abriendo la puerta. En este caso, el LED del botón de Start/Resume (Inicio/Reanudar), el (los) LED del indicador de estado de ciclo y las barras de la cuenta regresiva en la pantalla de estado del ciclo destellarán todos juntos para indicar que se necesita prestar atención. Vea “Inicio o reanudación de un ciclo” en la sección “Uso de la lavavajillas”.
GARANTÍA LIMITADA DE LA LAVAVAJILLAS KITCHENAID® ADJUNTE SU RECIBO AQUÍ. SE REQUIERE LA PRUEBA DE COMPRA PARA OBTENER SERVICIO BAJO LA GARANTÍA. Tenga a mano la siguiente información cuando llame al Centro para la eXperiencia del cliente: ■ Nombre, dirección y número de teléfono ■ Número de modelo y de serie ■ Una descripción clara y detallada del problema ■ Prueba de compra incluido el nombre y la dirección del distribuidor o vendedor SI NECESITA SERVICIO TÉCNICO: 1.
EXCLUSIÓN DE GARANTÍAS IMPLÍCITAS LAS GARANTÍAS IMPLÍCITAS, INCLUYENDO CUALQUIER GARANTÍA IMPLÍCITA DE COMERCIABILIDAD O GARANTÍA IMPLÍCITA DE CAPACIDAD PARA UN PROPÓSITO PARTICULAR, SERÁN LIMITADAS A UN AÑO O AL PERÍODO MÁS CORTO PERMITIDO POR LEY. Algunos estados y provincias no permiten la limitación de la duración de las garantías implícitas de comerciabilidad o capacidad, de modo que la limitación arriba indicada quizá no le corresponda.
INSTRUCTIONS D'UTILISATION DU LAVE-VAISSELLE Nous vous REMERCIONS d'avoir acheté ce produit de haute qualité. Enregistrez votre lave-vaisselle sur www.kitchenaid.com/customerservice/register-products/. Au Canada, enregistrer votre lave-vaisselle www.kitchenaid.ca dans la section Service et Support. Pour référence ultérieure, consignez par écrit les numéros de modèle et de série de votre produit. Vous les trouverez près de la porte sur le côté droit ou gauche de l'intérieur du lave-vaisselle.
INSTRUCTIONS DE MISE À LA TERRE ■ Pour un lave-vaisselle relié à la terre, branché avec un cordon : Le lave-vaisselle doit être relié à la terre. En cas d'un mauvais fonctionnement ou d'une panne, la mise à terre réduira le risque d'un choc électrique en fournissant le moins de résistance pour le courant électrique. Le lave-vaisselle est équipé d'un cordon avec un conducteur pour relier les appareils à la terre et d'une fiche de mise à la terre.
Pièces et caractéristiques KDTE104E, KDTE204E, KDFE204E, KDTE254E Les jets puissants ProScrub® dirigent l’eau vers les plats, poêles ou casseroles placés à l’arrière du lave-vaisselle pour décoller la saleté tenace. (sur certains modèles) Lavage au niveau supérieur Tube d’alimentation en eau Les orifices d’aspersion sous pression assurent un nettoyage efficace.
Pièces et caractéristiques KDTM354E, KDTM384E, KDTM404E, KDTM504E, KDTM704E, KDTM804E Lampes de l'intérieur (sur certains modèles) Les jets puissants ProScrub® dirigent l’eau vers les plats, poêles ou casseroles placés à l’arrière du lave-vaisselle pour décoller la saleté tenace. Lavage au niveau supérieur Tube d’alimentation en eau Plaque signalétique des numéros de modèle et de série Les orifices d’aspersion sous pression assurent un nettoyage efficace.
Démarrage/guide rapide Séchage - L'emploi d'un agent de rinçage est essentiel. Chargement ProScrub® pour le nettoyage des aliments ayant adhéré au plat durant la cuisson Il faut utiliser un agent de séchage (tel un agent de rinçage) pour obtenir un bon séchage (échantillon fourni). Un agent de rinçage combiné à l'option ProDry™ (séchage pro) offrira une performance de séchage idéale et permettra d'éviter une humidité excessive à l'intérieur du lavevaisselle.
Étapes rapides 1 Préparer et charger le lavevaisselle. 3 Choisir un programme et une option. 2 Verser le détergent pour le nettoyage et l’agent de rinçage pour le séchage. 4 Mettre en marche le lavevaisselle. REMARQUE : Si le bouton START/RESUME (mise en marche/reprise) se trouve sur le dessus de la porte, bien fermer la porte dans les 3 secondes qui suivent l’appui sur la touche START/RESUME (mise en marche/ reprise). SLIDE SLIDE Les distributeurs varient selon le modèle.
3 5 2 4 4 3 2 4 1 2 1 4 3 1 4 1 1 2 3 1 1 1 1 3 2 3 3 1 4 1 4 1 3 2 4 2 1 1 1 2 1 3 3 4 1 1 1 2 1 4 1 1 2 1 2 4 3 2 1 ■ Utiliser uniquement du détergent pour lave-vaisselle automatique. Verser le détergent en poudre, liquide ou en pastille juste avant de démarrer un programme. ■ Pour de meilleurs résultats de lavage, il est recommandé d'utiliser un détergent à lave-vaisselle automatique frais. Conserver le récipient du détergent bien fermé dans un lieu sec et frais.
Selon la dureté de l'eau, remplir la section de lavage principal du distributeur tel qu'illustré. Remplir la section de prélavage jusqu'au niveau indiqué, si nécessaire. REMARQUE : Les Hard Water quantités indiquées Hard Water Soft Water correspondent à l'emploi Soft Water d'un détergent en poudre Lavage principal Prélavage standard. Lors de l'utilisation d'un autre type de détergent, procéder conformément aux instructions indiquées sur l'emballage.
Description des programmes et options KDTM704E, KDTM804E KDTM504E KDTM404E KDTM354E, KDTM384E KDTE204E, KDTE254E KDTE204E Custom door model KDFE204E KDTE104E Ces informations concernent plusieurs modèles. Votre lave-vaisselle peut ne pas comporter tous les programmes et options indiqués. SÉLECTION DE PROGRAMMES PROGRAMMES Le lave-vaisselle détecte la quantité de saleté et règle le temps de programme en conséquence. Programme le plus avancé et le plus polyvalent.
SÉLECTION DE PROGRAMMES PROGRAMMES Le lave-vaisselle détecte la quantité de saleté et règle le temps de programme en conséquence. NIVEAU DE SALETÉ DURÉE ESTIMÉE (HH:MM) Niveau de saleté min.** Niveau de saleté max. CONSOMM ATION D'EAU EN GALLONS (Litres) Utiliser ce programme pour les casseroles, les poêles, les cocottes et la vaisselle ordinaire difficiles à nettoyer et très sales. Comprend le séchage avec chaleur.
SÉLECTION D'OPTIONS OPTIONS et (sur certains modèles) PEUT ÊTRE SÉLECTIONNÉ AVEC DESCRIPTION AJOUTER DU TEMPS AU PROGRAMME*** (HH:MM) GALLONS D’EAU SUPPLÉM ENTAIRES (LITRES) MIN MAX Active les jets ProScrub® pour un pouvoir nettoyant renforcé sur les articles placés dans des zones de lavage spécifiques.
SÉLECTION D'OPTIONS OPTIONS ou (sur certains modèles) PEUT ÊTRE SÉLECTIONNÉ AVEC Diffère le fonctionnement du lavevaisselle ou le fait démarrer pendant les heures creuses. Choisir un programme de lavage et des options. Appuyer sur le bouton de mise en marche différée. Appuyer sur START/RESUME (mise en marche/reprise). Bien fermer la porte.
Section commentaires sur l'utilisation du lave-vaisselle STATUT DES COMMANDES ET PROGRAMMES COMMANDE FONCTION A COMMENTAIRES Le témoin lumineux de l'état d'avancement du programme indique la progression du programme du lavevaisselle. Il est situé au sommet de la porte. Le témoin lumineux unique situé à l’avant du panneau de porte (A) devient bleu lors du lavage et du rinçage, rouge lors du séchage et vert une fois le programme terminé.
Caractéristiques du lave-vaisselle Votre lave-vaisselle KitchenAid peut comporter toutes ces caractéristiques ou seulement certaines d'entre elles. Option Zone de lavage ProScrub® La zone de lavage avec l’option ProScrub® se situe à l'arrière du panier inférieur et sur les coins avant du panier supérieur. A A. Arrière du lave-vaisselle REMARQUE : Les options ProScrub® ou ProScrub® Upper (sur certains modèles) doivent être sélectionnées pour utiliser ces fonctions.
Panier supérieur de luxe réglable à 2 positions Panier supérieur amovible Il est possible d’élever ou d’abaisser le panier supérieur pour charger de grands articles dans le panier supérieur ou inférieur. Des régleurs sont situés de chaque côté du panier supérieur. Chaque réglage comporte 2 positions préréglées. Pour soulever le panier, appuyer sur les deux régleurs du panier et soulever le panier jusqu’à ce qu’il soit en position haute et d’aplomb.
S'il n'y a pas de bouteilles à laver, abaisser les becs jusqu'à ce qu'ils s'arrêtent. Éclairage intérieur (sur certains modèles) Sur les modèles équipés d'une fenêtre, l'éclairage intérieur s'allume automatiquement pendant 10 minutes lorsque le programme s'achève. Pour tous les modèles avec éclairage, les lampes s'allument lorsque la porte est ouverte et s'éteignent lorsque la porte est fermée ou après 10 minutes d'inactivité.
Nettoyage en profondeur des paniers (sur certains modèles). Pour éliminer la formation de pellicule d'eau dure ou autre résidu de saleté des surfaces internes du lave-vaisselle, nous recommandons d'utiliser un produit d'entretien mensuel tel que le nettoyant pour lave-vaisselle affresh®. Pour le nettoyage de routine, utiliser un chiffon doux humide.
Dépannage Essayez d'abord les solutions suggérées ici. Pour obtenir de l'aide ou des conseils qui permettront peut-être d'éviter une intervention de dépannage, consultez la page de garantie de ce manuel et balayez le code QR avec votre appareil intelligent, ou consultez le site internet www.kitchenaid.ca (le site Web ne sera peut-être pas compatible avec certains appareils sans fil.
PROBLÈME SOLUTION IL RESTE DE L'EAU DANS LA CUVE/PAS DE VIDANGE Vérifier que le programme est terminé (le témoin Clean [nettoyage] est allumé). Si le programme n'est pas terminé, il faut le faire reprendre en fermant la porte et en appuyant sur START/RESUME. Si le lave-vaisselle est relié à un broyeur de déchets, vérifier que le bouchon d'obturation a été retiré de l'orifice du broyeur. Vérifier l'absence de déformation sur le tuyau de vidange.
PROBLÈME SOLUTION DOMMAGES À LA VAISSELLE Un chargement incorrect peut écailler ou endommager la vaisselle. Voir les instructions spécifiques de chargement dans ce guide. TÉMOINS LUMINEUX CLIGNOTANTS Si le programme est suspendu ou s'il est interrompu par l'ouverture de la porte, la DEL clignote.
GARANTIE LIMITÉE DES LAVE-VAISSELLE KITCHENAID® ATTACHEZ ICI VOTRE REÇU DE VENTE. UNE PREUVE D’ACHAT EST OBLIGATOIRE POUR OBTENIR L'APPLICATION DE LA GARANTIE.
CLAUSE D'EXONÉRATION DE RESPONSABILITÉ AU TITRE DES GARANTIES IMPLICITES LES GARANTIES IMPLICITES, Y COMPRIS LES GARANTIES APPLICABLES DE QUALITÉ MARCHANDE OU D'APTITUDE À UN USAGE PARTICULIER, SONT LIMITÉES À UN AN OU À LA PLUS COURTE PÉRIODE AUTORISÉE PAR LA LOI. Certains États et provinces ne permettent pas de limitation sur la durée des garanties implicites de qualité marchande ou d'aptitude à un usage particulier, de sorte que la limitation ci-dessus peut ne pas être applicable dans votre cas.