DISHWASHER USER INSTRUCTIONS Thank you for choosing KitchenAid® Appliances. We hold our company to the highest quality standards and it is important to us that you have a positive experience owning a KitchenAid® product. For your convenience, we have provided an easy to follow User Instruction Book. These instructions include a “Troubleshooting” section to help you through any problems you may encounter.
Dishwasher Safety Your safety and the safety of others are very important. We have provided many important safety messages in this manual and on your appliance. Always read and obey all safety messages. This is the safety alert symbol. This symbol alerts you to potential hazards that can kill or hurt you and others. All safety messages will follow the safety alert symbol and either the word “DANGER” or “WARNING.
GROUNDING INSTRUCTIONS ■ For a grounded, cord-connected dishwasher: The dishwasher must be grounded. In the event of a malfunction or breakdown, grounding will reduce the risk of electric shock by providing a path of least resistance for electric current. The dishwasher is equipped with a cord having an equipment-grounding conductor and a grounding plug. The plug must be plugged into an appropriate outlet that is installed and grounded in accordance with all local codes and ordinances.
Parts and Features ProScrub ® Trio (on some models) powerful jets target water toward pots, pans, or casserole dishes loaded in the back of the dishwasher to clean stubborn messes. Upper level wash Water feed tube Model and serial number label Pressurized spray nozzles and variable speed motor provide effective cleaning. Water inlet opening Lower spray arm Heating element Overfill protection float Rinse aid dispenser reduces spotting and improves drying.
Start-Up / Quick Reference (varies by model) Clean EQ Wash System removable filters to maintain peak performance. Cleaning the filters periodically helps keep the dishwasher working at peak performance. The filters can be found at the bottom center of your dishwasher. See the “Filtration System” section for information on removing and maintaining the filters. ProWash™ cycle for optimal cleaning The most advanced and versatile cycle.
Quick Steps 1 3 Prepare and load dishwasher. Select a cycle and option. or 2 4 Add detergent for cleaning and rinse aid for drying. Start dishwasher. NOTE: If the Start/Resume button is located on the top of door, push door firmly closed within 3 seconds of pressing START/ RESUME. Dishwasher Use STEP 1 4 4 Prepare and Load the Dishwasher 5 1 5 5 5 4 3 4 4 5 IMPORTANT: Remove leftover food, bones, toothpicks and other hard items from the dishes.
The amount of detergent to use depends on: How much soil remains on the items - Heavily soiled loads require more detergent. The hardness of the water - If you use too little in hard water, dishes won't be clean. If you use too much in soft water, glassware will etch. Soft to Medium Water (0-6 grains per U.S. gallon) [typical water softener water and some city water] Medium to Hard Water (7-12 grains per U.S.
STEP 4 STEP 3 Select a Cycle (cycles vary by model) Start or Resume a Cycle See “Cycle and Option Descriptions” charts in the following section. Efficient dishwashers run longer to save water and energy, just as driving a car slower saves on gas. Typical cycle time is approximately 2¹⁄₂ hours, but can take less or more time to complete depending on selections. ■ Select Options (options vary by model) See “Cycle and Option Descriptions” charts in the following section.
CYCLE SELECTIONS CYCLES SOIL LEVEL WASH TIME* (MINS.) W/O OPTIONS Typical** Max WATER USAGE GALLONS (Liters) When you need fast results, the Express Wash will clean dishes using slightly more water and energy. Select the Heat Dry or ProDry™ option to speed drying times. All soil levels 58 64 6.2 (23.5) Use for rinsing dishes, glasses, and silverware that will not be washed right away. Do not use detergent. All soil levels 17 20 2.4 (9.
OPTION SELECTIONS OPTIONS or or CAN BE SELECTED WITH WHAT IT DOES ADDED TIME TO CYCLE TYPICAL MAX ADDED WATER GALLONS (LITERS) Dries dishes with heat and a fan. This option with the use of rinse aid will provide the best drying performance. Plastic items are less likely to deform when loaded in the top rack. Turn ProDry™ option off for an air dry.
CONTROLS AND CYCLE STATUS CONTROL PURPOSE COMMENTS To reset any cycle or options during selection. To cancel a wash cycle after it's started. Press and hold CANCEL/DRAIN to reset any control selections made. To turn the audible tones on or off. Press and hold the Hi-Temp Scrub button for 3 seconds to turn the audible tones on or off. Only audible tones for confirming button presses can be turned on/off. Important audible tones, such as indicating a cycle has been interrupted, cannot be deactivated.
Dishwasher Features Your KitchenAid dishwasher may have some or all of these features. ProScrub® Option Wash Area ® The ProScrub option wash area is located at the back of the lower level rack and the front corners of the upper level rack. A CULINARY CADDY® Utensil Basket Use the utensil basket to hold specialty cooking utensils (serving spoons, spatulas, and similar items), or overflow silverware items. The basket hangs on the bottom rack in the right-hand corner.
Premium Adjustable 2-Position Top Rack Removable Top Rack (for SatinGlide® Max rails) After removing the culinary tool rack, you can raise or lower the top rack to fit tall items in either the top or bottom rack. Adjusters are located on each side of the top rack. Each adjuster has 2 preset positions. To raise the rack, press both rack adjusters and lift the rack until it is in the Up position and level. To lower the rack, press both rack adjusters and slide the rack to its Down position and level.
IMPORTANT: When you are using the culinary tool baskets in the down position, the top rack must also be in the lowest position. Culinary Tool Rack (3rd level rack) The culinary tool rack is designed with 2 movable baskets to hold extra silverware, knives and cooking utensils. Install the baskets in this up position when you have extra silverware and flatware to wash.
It is very easy to remove and maintain the filters. The chart below shows the recommended cleaning frequency.
Cleaning the interior Hard water minerals can cause a white film to build up on the inside surfaces, especially just beneath the door area. Do not clean the dishwasher interior until it has cooled. You may want to wear rubber gloves. Do not use any type of cleanser other than dishwasher detergent because it may cause foaming or sudsing. To clean interior Make a paste with powdered dishwasher detergent on a damp sponge and clean. OR Use liquid automatic dishwasher detergent and clean with a damp sponge.
Troubleshooting First try the solutions suggested here. If you need further assistance or more recommendations that may help you avoid a service call, refer to the warranty page in this manual and scan the code with your mobile device, or visit http://kitchenaid.custhelp.com. In Canada, visit www.kitchenaid.ca (website may not be compatible with some mobile devices). Contact us by mail with any questions or concerns at the address below: In the U.S.A.
PROBLEM SOLUTION HARD WATER (WHITE RESIDUE ON DISHWASHER INTERIOR OR GLASSWARE) NOTE: Extremely hard water mineral deposits can cause damage to your dishwasher and make it difficult to achieve good cleaning. A water softener is strongly recommended if your hardness is 15 grains or more. If a water softener is not installed, the following steps may help: Use a commercial cleaner designed for dishwashers once per month. Clean the upper and lower filters at least once per month.
PROBLEM SOLUTION CLOUDY OR SPOTTED DISHWARE (AND HARD WATER SOLUTION) NOTES: ■ Liquid rinse aid is necessary for drying and to reduce spotting. Use the correct amount of detergent. Confirm that the cloudiness is removable by soaking the item in white vinegar for 5 minutes. If the cloudiness disappears, it is due to hard water. Adjust the amount of detergent and rinse aid. See “Hard Water (White Residue On Dishwasher Interior Or Glassware)” in the “Troubleshooting” section.
KITCHENAID® DISHWASHER LIMITED WARRANTY ATTACH YOUR RECEIPT HERE. PROOF OF PURCHASE IS REQUIRED TO OBTAIN WARRANTY SERVICE. Please have the following information available when you call the Customer eXperience Center: ■ Name, address and telephone number ■ Model number and serial number ■ A clear, detailed description of the problem ■ Proof of purchase including dealer or retailer name and address IF YOU NEED SERVICE: 1.
W10579121B ® /™ ©2014. Used under license in Canada. All rights reserved. 8/14 Printed in U.S.A.
INSTRUCCIONES PARA EL USUARIO DE LA LAVAVAJILLAS Le agradecemos su elección de los electrodomésticos KitchenAid®. Nuestra compañía mantiene las reglas más estrictas de calidad, y para nosotros es importante que usted tenga una experiencia positiva como propietario de un producto KitchenAid®. Hemos provisto para su conveniencia un Manual de instrucciones para el usuario fácil de seguir.
Seguridad de la lavavajillas Su seguridad y la seguridad de los demás es muy importante. Hemos incluido muchos mensajes importantes de seguridad en este manual y en su electrodoméstico. Lea y obedezca siempre todos los mensajes de seguridad. Este es el símbolo de advertencia de seguridad. Este símbolo le llama la atención sobre peligros potenciales que pueden ocasionar la muerte o una lesión a usted y a los demás.
INSTRUCCIONES DE CONEXIÓN A TIERRA ■ Para una lavavajillas con cable eléctrico y conexión a tierra: La lavavajillas debe estar conectada a tierra. En caso de funcionamiento defectuoso o avería, la conexión a tierra reduce el riesgo de choque eléctrico al establecer una ruta de menor resistencia para la corriente eléctrica. La lavavajillas viene equipada con un cable eléctrico que tiene un conductor para conexión a tierra y un enchufe con conexión a tierra.
Piezas y características Los poderosos surtidores ProScrub ® Trio (en algunos modelos) dirigen el agua hacia las ollas, las sartenes o fuentes que se han cargado en la parte posterior de la lavavajillas, para limpiar la suciedad rebelde. Lavado del nivel superior Tubo de alimentación de agua Etiqueta de número del modelo y de la serie Las boquillas de rociado a presión y el motor de velocidad variable proveen una limpieza eficaz.
Puesta en marcha/Referencia rápida (varía según el modelo) Limpie los filtros removibles del sistema de lavado EQ para mantener un rendimiento óptimo. El limpiar los filtros periódicamente permite que la lavavajillas funcione con un rendimiento óptimo. Los filtros se encuentran en la parte central inferior de la lavavajillas. Vea la sección de “Sistema de filtración” para obtener información acerca de la remoción y el mantenimiento de los filtros.
Pasos rápidos 1 3 Prepare y cargue la lavavajillas. Seleccione un ciclo y una opción. o 2 4 Agregue detergente para la limpieza y agente de enjuague para el secado. Ponga la lavavajillas en marcha. NOTA: Si el botón de Start/Resume (Inicio/Reanudar) está ubicado sobre la puerta, empuje la misma firmemente para cerrarla en menos de 3 segundos después de haber presionado START/RESUME (Inicio/ Reanudar).
■ Asegúrese de que nada impida que el (los) brazo(s) rociador(es) gire(n) libremente. Es importante que el rociado de agua alcance todas las superficies sucias. ■ Asegúrese de que cuando esté cerrada la puerta de la lavavajillas, no haya artículos bloqueando el depósito de detergente. ■ Los artículos deberán cargarse con las superficies sucias mirando hacia abajo y hacia adentro, hacia el rociador, como se muestra. Esto mejorará los resultados de limpieza y de secado.
PASO 3 PASO 4 Seleccione un ciclo (los ciclos varían según el modelo) Inicio o reanudación de un ciclo Vea las tablas de “Descripciones de ciclos y opciones” en la sección siguiente. Las lavavajillas eficaces funcionan por más tiempo para ahorrar agua y energía, de la misma manera que se ahorra gasolina cuando se conduce un automóvil más despacio. La duración común es de aproximadamente 2¹⁄₂ horas, pero puede tomar más o menos tiempo en completarse según las selecciones que haga.
SELECCIONES DE CICLO CICLOS SOIL LEVEL (NIVEL DE SUCIEDAD) TIEMPO DE LAVADO* (MIN.) SIN OPCIONES USO DE AGUA EN GALONES (Litros) Típico** Máx. Ligera 110 150 2,8 (10,5) Media 110 150 4,0 (15,0) Intensa 125 190 7,9 (30,0) Ligera a media 105 145 4,2 (15,2) Intensa/ Endurecida por el horneado 120 185 7,7 (29,0) Cuando necesite resultados rápidos, el Express Wash (Lavado expreso) limpiará la vajilla usando un poco más de agua y energía.
SELECCIONES DE OPCIONES OPTIONS (Opciones) PUEDE SELECCIONARSE CON LO QUE HACE TIEMPO AGREGADO AL CICLO TÍPICO MÁX. AGUA AGREGADA EN GALONES (LITROS) Higieniza sus platos y su cristalería según el Estándar 184 de NSF International NSF/ANSI para lavavajillas domésticas. Las lavavajillas domésticas certificadas no han sido diseñadas para los establecimientos con licencia para alimentos.
SELECCIONES DE OPCIONES OPTIONS (Opciones) o bien o bien Hace funcionar la lavavajillas a una hora posterior o durante las horas que sean de menor consumo de energía. Seleccione un ciclo y opciones de lavado. Presione el botón Delay (Retraso). Presione START/RESUME (Inicio/ Reanudar). Cierre la puerta con firmeza.
CONTROLES Y ESTADO DE LOS CICLOS CONTROL PROPÓSITO COMENTARIOS Para encender o apagar los tonos audibles. Presione y sostenga por 3 segundos el botón de Hi Temp Scrub (Restregado a temperatura alta) para encender o apagar los tonos audibles. Sólo se pueden encender o apagar los tonos audibles que confirman cuando se presiona un botón. Los tonos audibles importantes, tales como los que indican cuando se ha interrumpido un ciclo, no pueden desactivarse.
Características de la lavavajillas Su modelo de lavavajillas KitchenAid podrá contar con algunas o todas estas características. Canastilla para utensilios CULINARY CADDY® Área de lavado con la opción ProScrub® ® La opción de área de lavado ProScrub está ubicada en la parte posterior de la canasta inferior y en la esquina frontal de la canasta del nivel superior.
Canasta superior regulable de calidad superior de 2 posiciones Canasta superior removible (para los rieles SatinGlide® Max) Después de haber sacado la canasta para utensilios de cocina, puede levantar o bajar la canasta superior para que quepan los artículos altos en la canasta superior o la inferior. Los ajustadores se encuentran a cada lado de la canasta superior. Cada ajustador tiene 2 posiciones ya determinadas.
Para volver a colocar la canasta: 1. Jale suavemente los rieles de la canasta hacia delante en la lavavajillas, hasta que se detengan y hagan un chasquido en su lugar. 2. Para abrir los topes de la guía, dé vuelta el tope hacia la parte de afuera de la guía. 3. Coloque los rodillos posteriores de la canasta a cada lado de la misma en la ranura de la guía, y vuelva a deslizar la canasta dentro de las guías. 4. Inserte los rodillos frontales de la canasta sobre cada lado de la misma, en las ranuras. 5.
Es muy fácil quitar los filtros y darles mantenimiento. La tabla siguiente muestra la frecuencia recomendada de limpieza.
Cuidado de la lavavajillas Limpieza Limpieza externa En la mayoría de los casos, todo lo que se debe hacer es usar periódicamente un paño suave y húmedo o una esponja con un detergente suave para que el exterior de su lavavajillas se vea limpio y reluciente. Si el exterior de la lavavajillas es de acero inoxidable, se recomienda el uso de un limpiador para acero inoxidable tal como el limpiador de acero inoxidable affresh®†, pieza número W10355016.
Vacaciones o tiempo prolongado sin uso Para reducir el riesgo de daño a la propiedad ■ Si usted no va a usar la lavavajillas durante los meses de verano, cierre el agua y el suministro de energía a la lavavajillas. ■ Asegúrese de que las líneas de suministro de agua estén protegidas contra congelamiento. La formación de hielo en las líneas de suministro pueden aumentar la presión del agua y dañar la lavavajillas o su hogar. Los daños ocasionados por congelamiento no están cubiertos bajo la garantía.
PROBLEMA SOLUCIÓN LA LAVAVAJILLAS NO SECA NOTA: Los objetos de plástico y los artículos con superficies antiadherentes son difíciles de secar, ya que tienen una superficie porosa que tiende a retener las gotas de agua. Puede ser necesario secar con un paño de cocina. Se necesita usar el agente de enjuague junto con la opción de ProDry™ o Heat Dry (Secado con calor) para un secado adecuado. El cargar los artículos adecuadamente puede afectar el secado.
PROBLEMA SOLUCIÓN QUEDA SUCIEDAD DE LOS Asegúrese de cargar correctamente la lavavajillas. Una carga indebida puede disminuir en gran ALIMENTOS EN LOS PLATOS proporción el rendimiento de lavado (vea “Uso de la lavavajillas”). Verifique el filtro para asegurarse de que está instalado correctamente. Límpielo de ser necesario. (Vea “Instrucciones de limpieza” en la sección “Sistema de filtración” para obtener detalles). Seleccione el ciclo y la opción adecuados para el tipo de suciedad.
PROBLEMA SOLUCIÓN FUGAS DE AGUA Asegúrese de que la lavavajillas esté instalada correctamente y de que esté nivelada. La espuma puede hacer que se desborde la lavavajillas. Mida el detergente con precisión y use solamente detergentes diseñados para usarse en una lavavajillas. Se necesita menos detergente en agua blanda. Si continúa el exceso de espuma, pruebe otra marca de detergente.
GARANTÍA LIMITADA DE POR VIDA LO QUE ESTÁ CUBIERTO LO QUE NO ESTÁ CUBIERTO GARANTÍA LIMITADA DURANTE EL PRIMER AÑO (PIEZAS Y MANO DE OBRA) Durante un año a partir de la fecha de compra, siempre y cuando este electrodoméstico principal haya sido instalado, operado y mantenido de conformidad con las instrucciones adjuntas o provistas con el producto, la marca KitchenAid de Whirlpool Corporation o Whirlpool Canada, LP (en lo sucesivo denominada “KitchenAid”) pagará por el costo de las piezas de repuesto espe
INSTRUCTIONS D'UTILISATION DU LAVE-VAISSELLE Merci d’avoir choisi les appareils ménagers KitchenAid®. Notre compagnie a recours aux plus hautes normes de qualité et nous attachons une grande importance à ce que l'acquisition d'un produit KitchenAid®constitue pour vous une expérience positive. Pour votre commodité, nous vous fournissons un manuel d’instructions d’utilisation facile à utiliser.
Sécurité du lave-vaisselle Votre sécurité et celle des autres est très importante. Nous donnons de nombreux messages de sécurité importants dans ce manuel et sur votre appareil ménager. Assurez-vous de toujours lire tous les messages de sécurité et de vous y conformer. Voici le symbole d’alerte de sécurité. Ce symbole d’alerte de sécurité vous signale les dangers potentiels de décès et de blessures graves à vous et à d’autres.
INSTRUCTIONS DE MISE À LA TERRE ■ Pour un lave-vaisselle relié à la terre, branché avec un cordon : Le lave-vaisselle doit être relié à la terre. En cas d'un mauvais fonctionnement ou d'une panne, la mise à terre réduira le risque d'un choc électrique en fournissant le moins de résistance pour le courant électrique. Le lave-vaisselle est équipé d'un cordon avec un conducteur pour relier les appareils à la terre et d'une fiche de mise à la terre.
Pièces et caractéristiques Les jets puissants ProScrub ® Trio (sur certains modèles) dirigent l'eau vers les plats, poêles ou cocottes placés à l'arrière du lave-vaisselle pour décoller la saleté tenace. Lavage au niveau supérieur Tube d'alimentation en eau Plaque signalétique des numéros de modèle et de série Les orifices d'aspersion sous pression et le moteur à vitesse variable assurent un nettoyage efficace.
Démarrage/guide rapide (varie selon le modèle) Pour garantir une performance optimale, nettoyez les filtres amovibles du système de lavage EQ. Express Wash (lavage express) - Lorsqu'il faut des résultats rapides. Un nettoyage régulier des filtres permettra au lavevaisselle de maintenir une performance optimale. Les filtres se trouvent dans le fond du lave-vaisselle, au centre. Voir la section “Système de filtration” pour plus de renseignements sur le retrait et l'entretien des filtres.
Appuyer sur START/RESUME (mise en marche/ reprise) chaque fois que l'on ajoute un plat. IMPORTANT : Si l'on ouvre la porte (par exemple pour ajouter un plat, même pendant le fonctionnement de l'option Delay Hours [mise en marche différée de plusieurs heures]), il faudra appuyer sur le bouton START/ RESUME (mise en marche/reprise) chaque fois.
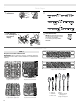
Utilisation du lave-vaisselle ÉTAPE 1 Préparation et chargement du lave-vaisselle IMPORTANT : Enlever les restes alimentaires, os, cure-dents et autres articles durs de la vaisselle. Enlever les étiquettes des récipients avant de les laver. 1 2 3 1. Cuillère à thé 2. Fourchette à salade 3.
■ Un agent de rinçage aide à réduire l'excès d'humidité sur les paniers à vaisselle et à l'intérieur du lave-vaisselle. Verser le détergent ■ REMARQUE : Si vous n'avez pas l'intention d'effectuer un programme de lavage dans l'immédiat, exécuter un programme de rinçage. Ne pas utiliser de détergent. Contrôler l'indicateur d'agent de rinçage. Ajouter l'agent de rinçage lorsque l'indicateur arrive au niveau “Add” (ajouter).
ÉTAPE 4 Démarrer ou reprendre un programme ■ Laisser couler l'eau du robinet le plus proche du lave-vaisselle jusqu'à ce qu'elle soit chaude. Fermer le robinet. ■ Appuyer une fois sur START/RESUME (mise en marche/reprise) pour afficher les sélections utilisées. Sélectionner le programme de lavage et les options souhaités OU appuyer sur START/ RESUME (mise en marche/reprise) pour répéter le même programme et les mêmes options que pour le programme de lavage précédent.
Les durées de lavage dépendent de la température de l'eau, du degré de saleté, de la taille de la charge de vaisselle ainsi que des options sélectionnées. Certaines options augmenteront la durée du programme. *Certaines options augmenteront la durée du programme. Voir la section d'information sur les options. **Durée de programme approximative obtenue avec de l'eau chaude à 120°F (49°C) fournie au lave-vaisselle. Si les durées sont plus longues, cela signifie que l'eau d'arrivée est moins chaude.
SÉLECTION D'OPTIONS OPTIONS ou 54 PEUT ÊTRE SÉLECTIONNÉ AVEC DESCRIPTION DURÉE SUPPLÉMENTAIRE DU PROGRAMME TYPIQUE MAX GALLONS D'EAU SUPPLÉMENTAIRES (LITRES) Sèche la vaisselle à l'air chaud ventilé. Cette option, associée à un agent de rinçage, offrira la meilleure performance de séchage. Les articles en plastique sont moins susceptibles de se déformer si on les place dans le panier à vaisselle supérieur. Désactiver l'option ProDry™ (séchage pro) pour un séchage à l'air.
SÉLECTION D'OPTIONS OPTIONS PEUT ÊTRE SÉLECTIONNÉ AVEC DESCRIPTION DURÉE SUPPLÉMENTAIRE DU PROGRAMME TYPIQUE ou MAX GALLONS D'EAU SUPPLÉMENTAIRES (LITRES) Évite l'utilisation involontaire du lave-vaisselle ou des changements de programme et d'option durant un programme. Pour activer le verrouillage, appuyer sur CONTROL LOCK (verrouillage des commandes) ou sur 4 HOUR DELAY (mise en marche différée de 4 heures) (selon le modèle) pendant 3 secondes.
Section commentaires sur l’utilisation du lave-vaisselle STATUT DES COMMANDES ET PROGRAMMES COMMANDE ou ou A FONCTION COMMENTAIRES Les indicateurs lumineux de l'état d'avancement du programme illustrent la progression du programme du lave-vaisselle. Ils sont situés à l'avant du lavevaisselle sur les modèles disposant des commandes à l'avant, et sur le dessus de la porte pour les modèles dont les commandes sont dissimulées. L'indicateur Clean (propre) s'allume lorsqu'un programme est terminé.
Caractéristiques du lave-vaisselle Votre lave-vaisselle KitchenAid peut comporter toutes ces caractéristiques ou seulement certaines d'entre elles. Option Zone de lavage ProScrub® Panier à couverts L’option Zone de lavage ProScrub® se situe à l'arrière du panier inférieur et sur les coins avant du panier supérieur. Utiliser les fentes des couvercles pour séparer les articles et obtenir une qualité de lavage optimale. Des fentes spéciales (petits trous ronds) ont été prévues pour les baguettes.
Tiges flexibles FLEXI-FOLD DOWN™ La rangée de tiges de chaque côté du panier supérieur peut être réglée pour faire de la place pour divers articles de vaisselle. Pour ajuster les tiges pliables : 1. Saisir la pointe de la tige qui se trouve dans le support de celleci. 2. Pousser doucement la tige à l'extérieur de son support. 3. Rabattre les tiges vers le centre du panier. REMARQUE : Le panier inférieur peut également comporter 1 ou 2 rangées de tiges flexibles situées à l'arrière du panier.
Panier pour ustensiles de cuisson amovible (panier du niveau 3) Le panier amovible pour A ustensiles de cuisson (niveau 3) permet de nettoyer des articles plus grands dans le panier supérieur ou de retirer à la fois le panier pour B ustensiles de cuisson et le panier supérieur pour nettoyer des articles de A. Butée de glissière grande taille dans le panier B. Glissière inférieur. Voir la section “Panier supérieur amovible”. Pour enlever le panier : 1.
Système de filtration Ce lave-vaisselle est équipé de la toute dernière technologie en matière de filtration. Ce système de triple filtration minimise le niveau sonore et réduit la consommation d'eau et d'énergie tout en offrant une performance de nettoyage supérieure. Le filtre doit être entretenu tout au long de la durée de vie du lave-vaisselle pour pouvoir continuer à fonctionner au mieux de sa performance. Le système de triple filtre comporte 2 parties, un filtre supérieur et un filtre inférieur.
Instructions de réinstallation du filtre PUS HD OW LO 1. En s'aidant des illustrations précédentes, placer le filtre inférieur sous les onglets de positionnement situés au fond du lave-vaisselle de sorte que l'ouverture circulaire de filtre supérieur soit aligné avec l'ouverture circulaire du fond de la cuve. K C N & TUR N U 2. Insérer le filtre supérieur dans l'ouverture circulaire du filtre inférieur. 3.
Procédure d'entretien du lave-vaisselle Nettoyage du lave-vaisselle Nettoyer l'extérieur du lave-vaisselle avec un chiffon doux et humide et un détergent doux. Si l'extérieur du lave-vaisselle est en acier inoxydable, un nettoyant pour acier inoxydable est recommandé, comme par exemple un nettoyant pour acier inoxydable affresh®, pièce n° W10355016.
Dépannage Essayer d'abord les solutions suggérées ici. Pour obtenir de l'aide ou des conseils qui permettront peut-être d'éviter une intervention de dépannage, consulter la page de garantie de ce manuel et scanner le code QR avec votre appareil intelligent, ou consultez le site internet www.kitchenaid.ca (le site Web ne sera peut-être pas compatible avec certains appareils sans fil.
PROBLÈME SOLUTION IL RESTE DE L'EAU DANS LA CUVE/PAS DE VIDANGE Vérifier que le programme est terminé (le témoin Clean [nettoyage] est allumé). Si le programme n'est pas terminé, il faut le faire reprendre en fermant la porte et en appuyant sur START/RESUME. Si le lave-vaisselle est relié à un broyeur de déchets, vérifier que le bouchon d'obturation a été retiré de l'orifice du broyeur. Vérifier l'absence de déformation sur le tuyau de vidange.
PROBLÈME SOLUTION TÉMOIN LUMINEUX D'ASSAINISSEMENT CLIGNOTANT Si le témoin lumineux d'assainissement clignote, la charge n'est PAS assainie. Le programme a été interrompu lors du rinçage final ou le réglage du dispositif de chauffage de l'eau est trop bas. Régler le dispositif de chauffage de l'eau à 120ºF (49ºC). DOMMAGES À LA VAISSELLE Un chargement incorrect peut écailler ou endommager la vaisselle. (Voir les instructions spécifiques de chargement dans ce guide.
GARANTIE LIMITÉE DES LAVE-VAISSELLE KITCHENAID® ATTACHEZ ICI VOTRE REÇU DE VENTE. UNE PREUVE D’ACHAT EST OBLIGATOIRE POUR OBTENIR L'APPLICATION DE LA GARANTIE.
CLAUSE D'EXONÉRATION DE RESPONSABILITÉ AU TITRE DES GARANTIES IMPLICITES LES GARANTIES IMPLICITES, Y COMPRIS LES GARANTIES APPLICABLES DE QUALITÉ MARCHANDE OU D'APTITUDE À UN USAGE PARTICULIER, SONT LIMITÉES À UN AN OU À LA PLUS COURTE PÉRIODE AUTORISÉE PAR LA LOI. Certains États et provinces ne permettent pas de limitation sur la durée des garanties implicites de qualité marchande ou d'aptitude à un usage particulier, de sorte que la limitation ci-dessus peut ne pas être applicable dans votre cas.
W10579121B ® /™ ©2014. Utilisé sous licence au Canada. Tous droits réservés. 8/14 Printed in U.S.A. Imprimé aux É.-U.