
Owner's Manual


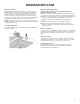
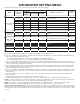
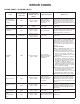
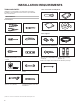


Table Of Contents
- DISHWASHER MAINTENANCE
- Dishwasher Loading Tips
- DISHWASHER care
- Dishwasher Setting Menu:
- ERROR CODES
- INSTALLATION REQUIREMENTS
- Installation Instructions
- Prepare cabinet opening— new utilities
- INSTALL OPTIONAL Moisture barrier - recommended for wood countertops
- ELECTRICAL CONNECTION
- PREPARE DISHWASHER
- Remove access panel and insulation
- DISCONNECT AND REMOVE DRIP tray ASSEMBLY
- CONNECT WATER LINE TO FILL VALVE
- CONNECT FILL HOSE TO FILL VALVE
- DRAIN HOSE CONNECTION
- Power cord Connection
- install DOOR HANDLE (ON SOME MODELS)
- PLACE DISHWASHER IN CABINET
- CUSTOM PANEL INSTALLATION (CUSTOM PANEL MODELS ONLY)
- Choose Anchor Attachment Method
- FINAL INSTALLATION CHECK
- SECURE DISHWASHER IN CABINET OPENING
- CONNECT WATER LINE TO HOUSE SHUT-OFF VALVE
- CONNECT DRAIN HOSE
- Complete Installation
- Check operation
- Install Access Panels
- if dishwasher does not operate
- ENTRETIEN DU LAVE-VAISSELLE
- Conseils de chargement du lave-vaisselle
- ENTRETIEN DU LAVE-VAISSELLE
- Menu de réglage du lave-vaisselle :
- CODES D’ANOMALIES
- EXIGENCES D’INSTALLATION
- Instructions d’installation
- Préparation de l’ouverture d’encastrement de l’armoire – nouveaux raccordements de service
- Installer la barrière anti-humidité en option – recommandée pour les comptoirs en bois
- RACCORDEMENT ÉLECTRIQUE
- PRÉPARATION DU LAVE-VAISSELLE
- Retrait du panneau d’accès et de l’isolation
- DÉBRANCHER ET ENLEVER LE PLATEAU D’ÉCOULEMENT
- BRANCHEMENT DE L’ARRIVÉE D’EAU À LA VALVE DE DISTRIBUTION
- BRANCHEMENT DU TUYAU DE REMPLISSAGE À LA VALVE DE DISTRIBUTION
- RACCORD DU TUYAU DE VIDANGE
- Branchement du cordon d’alimentation
- INSTALLER LA POIGNE DE PORTE (SUR CERTAINS MODÈLES)
- PLACER LE LAVE-VAISSELLE DANS L’ARMOIRE
- INSTALLATION DU PANNEAU PERSONNALISÉ (MODÈLES AVEC PANNEAU PERSONNALISÉ SEULEMENT)
- Choix de l’option de fixation
- VÉRIFICATION FINALE DE L’INSTALLATION
- FIXATION DU LAVE-VAISSELLE DANS L’OUVERTURE D’ENCASTREMENT DE L’ARMOIRE
- BRANCHEMENT DE L’ARRIVÉE D’EAU AU ROBINET D’ARRÊT DE LA MAISON
- RACCORDEMENT DU TUYAU DE VIDANGE
- Terminer l’installation
- Contrôle du fonctionnement
- Installation des panneaux d’accès
- Si le lave-vaisselle ne fonctionne pas
- MANTENIMIENTO DE LA LAVAVAJILLAS
- Consejos para cargar la lavavajillas
- Cuidado DE LA LAVAVAJILLAS
- Menú de ajustes de la lavavajillas:
- CÓDIGOS DE ERROR
- REQUISITOS DE INSTALACIÓN
- Instrucciones de instalación
- Preparación de la abertura del gabinete: instalaciones nuevas
- INSTALACIÓN OPCIONAL de la barrera contra la humedad (recomendado para los mostradores de madera)
- CONEXIÓN ELÉCTRICA
- PREPARE LA LAVAVAJILLAS
- Retire el panel de acceso y el aislante
- DESCONECTE Y RETIRE EL ENSAMBLAJE DE LA BANDEJA DE GOTEO
- CONECTE LA TUBERÍA DE AGUA A LA VÁLVULA DE LLENADO
- CONECTE LA MANGUERA DE LLENADO A LA VÁLVULA DE LLENADO
- CONEXIONES DE LA MANGUERA DE DESAGÜE
- Conexión del cable de alimentación
- instale LA MANIJA DE LA PUERTA (EN ALGUNOS MODELOS)
- COLOQUE LA LAVAVAJILLAS EN EL GABINETE
- INSTALACIÓN DEL PANEL A LA MEDIDA (EN MODELOS CON PANELES A LA MEDIDA SOLAMENTE)
- Selección del método de sujeción de anclaje
- VERIFICACIÓN FINAL DE LA INSTALACIÓN
- ASEGURE LA LAVAVAJILLAS EN LA ABERTURA DEL GABINETE
- CONEXIÓN DE TUBERÍA DE AGUA A MANGUERA DE VÁLVULA DE CIERRE DEL HOGAR
- CONECTE LA MANGUERA DE DESAGÜE
- Complete la instalación
- Verifique el funcionamiento
- Instale los paneles de acceso
- si la lavavajillas no funciona

3
DISHWASHER MAINTENANCE
Detergents
High-quality premeasured tablets and packs are recommended
for improved performance.
Quality tablets and packs have been proven better than powder,
liquid, or gel detergents at reducing lming on dishes. Using
tablets and packs over time will start to reduce or eliminate white
lm. They are suitable for all water hardness and soil levels. Also,
by using a rinse aid, you can minimize repeat buildup of white
lm (not all packs and tablets contain rinse aid). Always place
premeasured detergents in main compartment and close lid.
The Pre-Wash indicator on the dispenser lid is for customers
who use powder or gel detergent and wish to add an amount of
detergent to the Pre-Wash cycle. The volume of detergent added
here is approximately 8 cubic centimeters, if lled full and level.
Any detergent added here would be immediately added to the
wash when the cycle starts versus detergent inside the dispenser
which is added during the main wash cycle.
NOTE: Follow instructions on the package when using other
dishwasher detergent types.
■ Use automatic dishwasher detergent only. Add detergent just
before starting a cycle.
■ Fresh automatic dishwasher detergent results in better
cleaning. Store tightly closed detergent container in a cool, dry
place.
■ Extremely hard water mineral deposits (15 grains per U.S.
gallon or more) can cause damage to your dishwasher and
make it difcult to achieve good results. A water softener is
recommended to avoid damage and achieve good results.
■ For more details about powders, liquids, and gels and hard
water conditions consult the brand website.
Rinse aid
Using rinse aid will optimize your drying and wash performance.
This dishwasher is specically designed to be used with rinse aid
for improved drying performance and controlling buildup of hard
water deposits. Rinse aid needs to be added to the product every
1 to 3 months depending on usage.
Refer to the Quick Start Guide or brand website for information
about lling the rinse aid dispenser.
Cycle Selection and Energy
Efcient dishwashers run longer to save water and energy,
just as driving a car slower saves on gas. Typical cycle time is
approximately 2 1/2 hours, but can take less or signicantly
more time depending on your selections and incoming water
temperature and amount of food soils on the dishes. For
optimum performance the dishwasher should be connected to a
120 F (49° C) hot water supply.
If you rst press the Start button, the main sensor cycle with
heated drying will be automatically selected. This cycle senses
the soil amount, and toughness of soil, to adjust the cycle for
improved cleaning.
Sanitize or Sani
Sanitizes dishes and glassware in accordance with NSF
International NSF/ANSI Standard 184 for Residential
Dishwashers. Certied residential dishwashers are not intended
for licensed food establishments. Only sanitizing cycles have
been designed to meet the requirements of the NSF/ANSI
184 performance standard for soil removal and for sanitization
efcacy. There is no intention, either directly or indirectly, that
all cycles on a NSF/ANSI 184 certied dishwasher meet the
NSF/ANSI 184 performance standard for soil removal and for
sanitization efcacy. The Sani Rinse indicator glows at the end
of the cycle if the Sani Rinse option was successfully completed.
If the indicator does not activate, it is probably due to the cycle
being interrupted.
Tip Over Hazard
Do not use dishwasher until completely installed.
Do not push down on open door.
Doing so can result in serious injury or cuts.
WARNING