KitchenAid BUILT-IN For questions ELECTRIC about features, operation/performance, In Canada, call for assistance 1-800-461-5681, Models KEBCl07 W10203458A KEBC177 CONVECTION pacts accessories or service, KEBC278 KEBV107 or visit our website at,.. or www.KitchenAid.ca ............................................................................................................ KEBC247 OVEN call: 1-800-422-1280 for installation and service, call: 1-800-807-6777 www.kitchenaid.
TABLE OF CONTENTS OVEN SAFETY ................................................................................ PARTS AND FEATURES ELECTRONIC ................................................................ OVEN CONTROL ................................................... 3 5 6 Displays ........................................................................................ Start ..............................................................................................
OVEN SAFETY Your safety and the safety of others are very important. We have provided many important safety messages in this manual and on your appliance. Always read and obey all safety messages. This symbol alerts you to potential hazards that can kill or hurt you and others. All willsymbol. follow the safety alert symbol and either the word "DANGER" or Thissafety is themessages safety alert "WARNING." These words mean: You can be killed or seriously injured if you don't immediately follow instructions.
iMPORTANT SAFETY iNSTRUCTiONS For self-cleaning ovens: • Do Not Clean Door Gasket - The door gasket is essential for a good seal. Care should be taken not to rub, damage, or move the gasket. • Do Not Use Oven Cleaners - No commercial oven cleaner or oven liner protective coating of any kind should be used in or around any part of the oven. • Clean Only Parts Listed in Manual. • Before Self-Cleaning the Oven - Remove broiler pan and other utensils.
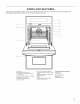
PARTS AND FEATURES This manual appearances covers different of the features models. The oven you have purchased may have some or all of the items shown here may not match those of your model. listed. The locations II E } II A G III B and H 11411 II / i!l II j I K C D !1 A. Oven vent B. Broil elements (not shown) C. CleanBake TM bake element in floor panel) D. Lower oven (on double E. Electronic oven control (hidden oven models) E Automatic oven light switch G. Oven lock latch H.
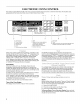
ELECTRONIC This manual appearances OVEN CONTROL covers different models. The oven you have purchased may have some or all of the items of the items shown here may not match those of your model. A H B C D E listed. The locations F and G I A. Oven display B. Timed cooking C. Number pads D. Control lock E. Clock F. Time of day, timer display G. Start H. Upper or lower oven selectors (double oven models only) I. Oven option selectors J. Easy Convect TM conversion K.
Tones areaudible signals, indicating thefollowing: The temperature is preset changed to Celsius. Onetone • Validpadpress • Ovenispreheated • Function hasbeenentered Three • in Fahrenheit, however it can be To Change: Press and hold BROll!MAXI//ECONO for 5 seconds. Depending on your model, a tone will sound and "C °'' or "C" will appear on the display for 3 seconds, or until you press CANCEL. Repeat to change back to Fahrenheit.
,i.,_ IMPORTANT: .,.== _,. Do not use a thermometer OVEN USE +........... to measure oven temperature because opening the oven door and element burner cycling may give incorrect readings. or The oven(s) provide accurate temperatures; however, they may cook faster or slower than your previous oven, so the temperature calibration can be adjusted. It can be changed in Fahrenheit or Celsius. A minus amount. amount.
Traditional Cooking FOOD RACK Frozen pies, large roasts, turkeys, angel food cakes 1 or 2 Bundt cakes, yeast breads, 2 most quick casseroles, Cookies, biscuits, nonfrozen pies breads, meats muffins, cakes, *On models with the CleanBake placed on a lower rack position. Convection TM POSITION* 2 or 3 feature, foods may be NUMBER RACKS material affects cooking results. Follow recommendations and use the bakeware recommended in the recipe.
The Sabbath Mode sets the oven to remain on in a bake setting until turned off. A timed Sabbath Mode can also be set to keep the oven on for only part of the Sabbath. Single and Double Oven Models When the Sabbath Mode is set, the number pads are active. On single oven models, CANCEL OFF and START are also active. On double oven models, UPPER and LOWER OVEN and UPPER and LOWER OVEN CANCEL/OFF are also active. No tones will A sound, and the displays will not show messages or temperature changes.
To Regularly Set, Untimed: 1. On double ovens Temperature Change only, press UPPER OVEN or LOWER Each oven can be independently 2. Press OVEN LIGHT to desired 3. Press BAKE. OVEN. set. option. Press the number pads to enter a temperature other 350°F (177°C). The bake range can be set between 170°F and 500°F (77°C and 260°C). than The oven temperature can be changed when the oven(s) are in the Sabbath Mode. No tones will sound and the display will not change.
A. Broil heat A. Broil heat B. Bake heat Broiling The CleanBake TM element is hidden protected from spills and drips under the floor of the oven, During baking or roasting, the CleanBake TM and broil elements will cycle on and off in intervals to maintain the oven temperature. If the oven door is opened during baking or roasting, the broil elements will turn off immediately and the CleanBake TM element will turn off in 2 minutes. They will come back on once the door is closed.
BROILING CHART For best results, place food 3" (7 cm) or more from the broil elements, rack position 4 is recommended. For diagram, see the "Positioning Racks and Bakeware" section. A temperature of 500°F (260°C) is recommended. Times are guidelines only and may need to be adjusted individual foods and tastes. FOOD • Keep heat loss to a minimum when necessary. • Choose cookie sheets without sides and roasting pans with lower sides to allow air to move freely around the food.
CONVECTION ROASTING CHART FOOD/ RACK POSITION A COOKTIME (min. per 1 Ib [454 g]) OVEN TEMP. INTERNAL FOOD TEMP. Beef, Rack Position 2 B C A. Broil heat B. Convection C. Bake heat If the oven door is opened during convection roasting, the broil element and fan will turn off immediately and the CleanBake TM element will turn off in 2 minutes. They will come back on once the door is closed. Reduce recipe temperature need to be reduced also. To Convection 25°F (14°C).
FOOD/ RACK POSITION COOKTIME (min. per 1 Ib [454 g]) Turkey*, Positions Rack 13 Ibs and under OVEN TEMP. INTERNAL FOOD TEMP. 1 or 2 10-15 300°F (149°C) 180°F (82°C) Over 13 Ibs (5.85 kg) 10-12 300°F (149°C) 180°F (82°C) Cornish Hens*, £ Convect Full Meal lets you choose from 11 preset cooking cycles. A single pad includes an oven setting, an oven temperature, and a cook time or probe temperature. One pad is changeable to allow you to set your own cycle and save it for future use.
3. 4. Press START. To Use: The start time, stop time, vertical bar countdown and minute time countdown will appear on the oven display. The stop time will not appear if not set in the changeable cycle. Before using Convection Temperature Conversion for BAKED GOODS and OTHER FOODS, allow the oven to preheat before placing food in the oven. When the cycle ends, "End" will appear enabled, end-of-cycle tones will sound, will sound every minute. 1. in the oven display.
8. Press CANCEL OFF, UPPER OVEN CANCEL/OFF or, on some models, LOWER OVEN CANCEL/OFF or open the oven door to clear the display and/or stop reminder tones. ,/,_ _;_: Proofing bread yeast. Proofing prepares dough for baking twice is recommended. Before using, insert the probe into the center of the thickest portion of meat or into the inner thigh or breast of poultry, away from fat or bone. Place food in oven and connect the temperature probe to the jack.
To Use Upper Oven with Same Time: Probe 1. Follow 4 under the "To Use" section. 2. Press LOWER OVEN. The probe's disappear from the display. 3. Press BAKE or BROIL. steps 1 through Press the number one displayed. 4. and Lower Oven temperature For the probe to work properly make sure to press the UPPER probe's temperature setting on change has been made to the Press START.
How the Cycle Works OVEN CARE IMPORTANT: The heating and cooling of porcelain on steel in the oven may result in discoloring, loss of gloss, hairline cracks and popping sounds. The Self-Cleaning cycle uses very high temperatures, to a powdery ash. _ _ f "w_ •...... ,_)_ _o_.._Je_;_ __ ........ 1£ (_".....vc_ _ burning soil The oven is preset for a 3 hour 30 minute clean cycle, however the time can be changed.
3, Press STOP TIME. 4. Press the number 5. Press START. OVEN DOOR EXTERIOR pads to enter the time of day to stop. The start time is automatically calculated and displayed. The door will automatically lock and "DOOR LOCKED," "DELAY," and the stop time will also appear on the display. The door will not unlock until the oven cools. 6, and the oven cools, "End" will and "DOOR LOCKED" will IMPORTANT: Before cleaning, the oven is cool. Always follow products.
4, _}_ 1 i_ _ The oven lights are 12-volt, 5-watt maximum halogen bulbs. They will come on when the oven door is opened. On double oven models, both upper and lower lights will come on when either door is opened. The oven lights will not work during the SelfCleaning cycle. When the oven door is closed, press OVEN LIGHT to turn them on or off. To Lift the oven door while holding both sides. Continue to push the oven door closed the oven door frame.
TROUBLESHOOTING Try the solutions suggested here first in order to avoid the cost of an unnecessary service call. • Has the function been entered? Nothing will operate Has a household fuse blown, or has a circuit tripped? Replace the fuse or reset the circuit. Is the appliance See Installation • breaker wired properly?. Instructions. Cycle" Lock set? section. Is the proper temperature a reliable cookbook. Mode set? be set Was the oven section. be set Is the proper section.
ASSISTANCE Before calling for assistance or service, please check "Troubleshooting." It may save you the cost of a service call. If you still need help, follow the instructions below. When calling, please know the purchase date and the complete model and serial number of your appliance. This information will help us to better respond to your request. replacement parts If you need If you need to order replacement parts, we recommend that you use only factory specified parts.
KITCHENAID ®BUILT-IN OVEN & MICROWAVE WARRANTY LIMITED WARRANTY For one year from the date of purchase, when this major appliance is operated and maintained according to instructions attached to or furnished with the product, KitchenAid brand of Whirlpool Corporation or Whirlpool Canada LP (hereafter "KitchenAid") will pay for Factory Specified Parts and repair labor to correct defects in materials or workmanship. Service must be provided by a KitchenAid designated service company.