ELECTRIC COOKTOP Use & Care Guide For questions about features, operation/performance, parts, accessories or service, call: 1-800-422-1230 or visit our website at www.kitchenaid.com In Canada, call 1-800-807-6777 or visit our website at www.KitchenAid.ca TABLE DE CUISSON ÉLECTRIQUE Guide d’utilisation et d’entretien Au Canada, pour assistance, installation ou service, composer le 1-800-807-6777 ou visiter notre site Web au www.KitchenAid.ca Table of Contents/Table des matières.............................
NOTE: This manual covers different models. Refer to the Table of Contents for information regarding your cooktop model. REMARQUE : Ce manuel couvre différents modèles. Consulter la Table des matières pour des renseignements concernant le modèle de votre table de cuisson. TABLE OF CONTENTS TABLE DES MATIÈRES COOKTOP SAFETY........................................................................3 PARTS AND FEATURES TOUCH-ACTIVATED ELECTRONIC CONTROLS .......................
COOKTOP SAFETY Your safety and the safety of others are very important. We have provided many important safety messages in this manual and on your appliance. Always read and obey all safety messages. This is the safety alert symbol. This symbol alerts you to potential hazards that can kill or hurt you and others. All safety messages will follow the safety alert symbol and either the word “DANGER” or “WARNING.
IMPORTANT SAFETY INSTRUCTIONS WARNING: To reduce the risk of fire, electrical shock, injury to persons, or damage when using the cooktop, follow basic precautions, including the following: ■ CAUTION: Do not store items of interest to children in cabinets above a cooktop – Children climbing on the cooktop to reach items could be seriously injured. ■ Proper Installation – Be sure your cooktop is properly installed and grounded by a qualified technician.
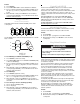
PARTS AND FEATURES TOUCH-ACTIVATED ELECTRONIC CONTROLS Control Panels 30" (76.2 cm) Touch-Activated Electronic Controls A B 36" (91.4 cm) Touch-Activated Electronic Controls C B A C G F A. Left rear control (simmer; keep warm function; melt and hold function) B. Right rear control (simmer; keep warm function; melt and hold function; dual circuit element) C. Increase/decrease temperature control E D H D D. Hot surface indicator light E.
COOKTOP CONTROLS TOUCH-ACTIVATED ELECTRONIC CONTROLS WARNING Fire Hazard Turn off all controls when done cooking. Failure to do so can result in death or fire. The touch-activated electronic controls offer a variety of heat settings for optimal cooking results. When melting foods such as chocolate or butter, or when proofing bread, the surface cooking area can be set to MELT & HOLD for minimal element operation.
To Use: 1. Touch ON/OFF. 2. Touch HEAT ZONE SIZE to select desired zone diameter. 3. Choose a power level between HI and MELT & HOLD. Touch the “plus” (+) or “minus” (-) keypad to increase or decrease power. 4. When finished cooking, touch ON/OFF to turn off surface cooking area(s) individually, or touch ALL OFF to turn off all elements at the same time. Bridge Element (on 36" [91.4 cm] models) The bridge element allows maximum flexibility in the center cooking area.
PARTS AND FEATURES - CUSTOM CONTROLS Control Panels 30" (76.2 cm) Custom Controls 36" (91.4 cm) Custom Controls B A G F E A. Left rear control (simmer; keep warm function; melt function) B. Right rear control (simmer; keep warm function; melt function; dual-circuit element) C. Hot surface indicator light C B A E F D C D D. Right front control (simmer; keep warm function; melt function) E. Power on light F.
COOKTOP CONTROLS - CUSTOM CONTROLS WARNING Fire Hazard Turn off all controls when done cooking. Use the following chart as a guide when setting heat levels. SETTING RECOMMENDED USE Hi ■ Bring liquid to a boil. Medium High Between Med & Hi ■ Hold a rapid boil. ■ Quickly brown or sear food. Med Medium ■ Maintain a slow boil. ■ Fry or sauté foods. ■ Cook soups, sauces and gravies. Medium Low Between Med & Lo ■ Stew or steam food. Lo SIMMER ■ Simmer (range of simmer temperatures).
Dual/Triple Element The dual and triple elements offer flexibility depending on the size of the cookware. Single size can be used in the same way as a regular element. The dual and triple sizes combine single, dual and outer element and are recommended for larger cookware, large quantities of food, and home canning. A B C To use SINGLE (A): 1. Push in and turn center rear knob from OFF position to the SINGLE zone anywhere between MELT and HI. 2. Turn knob to OFF when finished.
PARTS AND FEATURES TRADITIONAL KNOB CONTROLS Control Panels 30" (76.2 cm) Traditional Knob Controls A 36" (91.4 cm) Traditional Knob Controls A B G F E A. Left rear control knob B. Right rear control knob (dual-circuit element) C. Hot surface indicator light F E C D D. Right front control knob E. Power on light F. Left front control knob (triple-circuit element) C B A. Left rear control knob B. Center rear control knob (dual-circuit element “bridge”) C. Right rear control knob D D.
COOKTOP CONTROLS - TRADITIONAL KNOB CONTROLS WARNING Hot Surface Indicator Lights The Hot Surface Indicator Lights are located next to each of the cooktop controls. The Hot Surface Indicator Lights will glow as long as any surface cooking area is too hot to touch, even after the surface cooking area(s) is turned off. A Fire Hazard Turn off all controls when done cooking. Failure to do so can result in death or fire. The controls can be set to anywhere between HI and LO.
Bridge Element (on 36" [91.4 cm] models) The bridge element allows maximum flexibility in the center cooking area. Use the bridge area to create an oblong heated area to cook with large cookware. A B C To use SINGLE and BRIDGE area (A + B): 1. Push in and turn center rear knob from OFF position to the BRIDGE zone anywhere between LO and HI. 2. Turn knob to OFF when finished. To use SINGLE (A): 1. Push in and turn center rear knob from OFF position to the SINGLE zone anywhere between LO and HI. 2.
Use the following chart as a guide for cookware material characteristics. Home Canning When canning for long periods, alternate the use of surface cooking areas, elements or surface burners between batches. This allows time for the most recently used areas to cool. ■ Center the canner on the grate or largest surface cooking area or element. On electric cooktops, canners should not extend more than ½" (1.3 cm) beyond the surface cooking area or element.
A Cooktop Scraper is also recommended for stubborn soils, and can be ordered as an accessory. See “Assistance or Service” section to order. The Cooktop Scraper uses razor blades. Store razor blades out of the reach of children. Light to moderate soil ■ Paper towels or clean damp sponge: Clean while the cooktop is still warm. You may want to wear oven mitts while cleaning the cooktop. Burned-on soil Cooktop Cleaner and Cooktop Scraper: ■ Rub creme into soil with damp paper towel.
■ Is the cooktop control set to the proper heat level? See “Cooktop Controls” section. ■ Is the appliance level? Level the appliance. See the Installation Instructions. Cooktop cooking results not what expected ■ Is the proper cookware being used? See “Cookware” section. ASSISTANCE OR SERVICE Before calling for assistance or service, please check “Troubleshooting.” It may save you the cost of a service call. If you still need help, follow the instructions below.
KITCHENAID® COOKTOP, BUILT-IN OVEN AND RANGE WARRANTY ONE-YEAR LIMITED WARRANTY For one year from the date of purchase, when this appliance is operated and maintained according to instructions attached to or furnished with the product, KitchenAid or KitchenAid Canada will pay for factory specified parts and repair labor costs to correct defects in materials or workmanship. Service must be provided by a KitchenAid designated service company.
SÉCURITÉ DE LA TABLE DE CUISSON Votre sécurité et celle des autres est très importante. Nous donnons de nombreux messages de sécurité importants dans ce manuel et sur votre appareil ménager. Assurez-vous de toujours lire tous les messages de sécurité et de vous y conformer. Voici le symbole d’alerte de sécurité. Ce symbole d’alerte de sécurité vous signale les dangers potentiels de décès et de blessures graves à vous et à d’autres.
IMPORTANTES INSTRUCTIONS DE SÉCURITÉ AVERTISSEMENT : Pour réduire le risque d'incendie, de choc électrique, de blessures ou de dommages lors de l'utilisation de la table de cuisson, observer les précautions élémentaires suivantes, y compris ce qui suit : ■ MISE EN GARDE : Ne pas remiser dans les armoires au-dessus d'une table de cuisson, des articles que des enfants pourraient vouloir atteindre. Les enfants pourraient se brûler ou se blesser en grimpant sur la table de cuisson.
PIÈCES ET CARACTÉRISTIQUES COMMANDES ÉLECTRONIQUES TACTILES Tableaux de commande Commandes électroniques tactiles - Modèle de 30" (76,2 cm) A B Commandes électroniques tactiles - Modèle de 36" (91,4 cm) C B A C G F A. Commande arrière gauche (mijotage, fonction Keep Warm, fonction Melt & Hold) B. Commande arrière droite (mijotage, fonction Keep Warm, fonction Melt & Hold, élément à double circuit) C. Commande d'augmentation/ diminution de la température D.
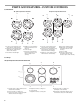
Tables de cuisson Modèle à commande électronique tactile de 36" (91,4 cm) illustré C B D A H G A. Table de cuisson en vitrocéramique (certains modèles comportent une garniture en acier inoxydable ou en métal peint) B. Zone de cuisson à la surface arrière gauche C. Zone de cuisson à la surface centrale arrière (avec “pont” de l'élément à double circuit) F E D. Zone de cuisson à la surface arrière droite E. Tableau de commande F. Zone de cuisson à la surface avant droite G.
Utiliser le tableau suivant comme guide lors du réglage des niveaux de chaleur. RÉGLAGE UTILISATION RECOMMANDÉE Hi (élevé) ■ Si une panne de courant survient alors que la table de cuisson est allumée, les témoins lumineux de surface chaude resteront allumés jusqu'à 45 minutes après le rétablissement de l'alimentation électrique à la table de cuisson. Pour commencer la cuisson des aliments. ■ Pour porter un liquide à ébullition.
Utiliser la zone de pont afin d'obtenir le chauffage d'une zone de forme oblongue pour une cuisson au moyen d'un ustensile de cuisson de grande taille. A B Pour verrouiller la table de cuisson : Appuyer sur la touche CONTROL LOCK/ALL OFF pendant 5 secondes. Au bout de 5 secondes, CONTROL LOCK s'allume en rouge, indiquant que les commandes de la table de cuisson sont en position verrouillée. Pour déverrouiller la table de cuisson : Appuyer sur la touche CONTROL LOCK/ALL OFF pendant 5 secondes.
PIÈCES ET CARACTÉRISTIQUES COMMANDES PERSONNALISÉES Tableaux de commande Commandes personnalisées -Modèle de 30" (76,2 cm) B A Commandes personnalisées -Modèle de 36" (91,4 cm) G F A. Commande arrière gauche (mijotage, fonction Keep Warm, fonction Melt) B. Commande arrière droite (mijotage, fonction Keep Warm, fonction Melt, élément à double circuit) C. Témoin lumineux de surface chaude 24 E D C B A F E D C D. Commande avant droite (mijotage, fonction Keep Warm, fonction Melt) E.
Tables de cuisson Modèle de 36" (91,4 cm) à commande personnalisée illustré B C D F E A H G A. Table de cuisson en vitrocéramique (les modèles en acier inoxydable comportent une garniture métallique) B. Zone de cuisson à la surface arrière gauche C. Zone de cuisson à la surface centrale arrière (avec “pont” de l'élément à double circuit) D. Zone de cuisson à la surface arrière droite E. Tableau de commande F. Zone de cuisson à la surface avant droite G.
Utiliser le tableau suivant comme guide lors du réglage des niveaux de chaleur. RÉGLAGE UTILISATION RECOMMANDÉE Hi (élevé) ■ Pour porter un liquide à ébullition. Medium High (moyen élevé) Entre Med et Hi ■ Pour maintenir une ébullition rapide. ■ Pour brunir ou saisir rapidement les aliments. Med (moyen) ■ Pour maintenir une ébullition lente. ■ Pour faire frire ou sauter les aliments. ■ Pour cuire les soupes et les sauces.
Élément de pont Fonction Warm (maintien au chaud) (sur les modèles de 36" [91,4 cm]) AVERTISSEMENT L'élément de pont permet une souplesse maximale dans la zone de cuisson centrale. Risque d'empoisonnement alimentaire Ne pas laisser des aliments reposer plus d'une heure avant ou après la cuisson. Le non-respect de cette instruction peut causer un empoisonnement alimentaire ou une maladie.
PIÈCES ET CARACTÉRISTIQUES COMMANDES À BOUTON STANDARD Tableaux de commande Commandes à bouton standard - Modèle de 30" (76,2 cm) A Commandes à bouton standard - Modéle 36" (91,4 cm) A B G F A. Bouton de commande arrière gauche B. Bouton de commande arrière droit (élément à double circuit) C. Témoin lumineux de surface chaude 28 E D F C D. Bouton de commande avant droit E. Témoin d'alimentation F. Bouton de commande avant gauche (élément à triple circuit) C B A.
Tables de cuisson Modèle de 36" (91,4 cm) à bouton standard illustré B C D F E A H G A. Table de cuisson en vitrocéramique (les modèles en acier inoxydable comportent une garniture métallique) B. Zone de cuisson à la surface arrière gauche C. Zone de cuisson à la surface centrale arrière (avec “pont” de l'élément à double circuit) D. Zone de cuisson à la surface arrière droite E. Tableau de commande F. Zone de cuisson à la surface avant droite G.
Témoins lumineux de surface chaude Les témoins lumineux de surface chaude sont situés près de chaque commande de la table de cuisson. Les témoins de surface chaude restent allumés tant qu'une zone de cuisson à la surface est trop chaude pour être touchée, même après que la ou les zones sont éteintes. Élément de pont (sur les modèles de 36” [91,4 cm]) L'élément de pont permet une souplesse maximale dans la zone de cuisson centrale.
UTILISATION DE LA TABLE DE CUISSON ■ Utiliser des ustensiles de cuisson à fond plat pour une meilleure transmission de la chaleur et efficacité de l’énergie. Les ustensiles de cuisson dont le fond est arrondi, gauchi, nervuré ou entaillé pourraient causer un chauffage inégal et des résultats de cuisson médiocres. ■ Déterminer si le fond d’un ustensile de cuisson est plat en plaçant le bord d’une règle contre la base de l’ustensile.
Ustensiles de cuisson IMPORTANT : Ne pas laisser un ustensile de cuisson vide sur la surface chaude d’une table de cuisson, d’un élément ou d’un brûleur de surface. Les ustensiles de cuisson idéals doivent avoir un fond plat, des parois droites, un couvercle qui ferme bien et le matériau doit être d’épaisseur moyenne à forte. Les surfaces rudes peuvent égratigner la table de cuisson. L'aluminium et le cuivre peuvent être employés comme fond ou base dans un ustensile de cuisson.
Un grattoir pour table de cuisson est aussi recommandé pour les taches tenaces et peut être commandé comme accessoire. Voir la section “Assistance ou service” pour commander. Le grattoir pour table de cuisson utilise des lames de rasoir. Ranger les lames de rasoir hors de portée des enfants. Souillure légère à modérée ■ Essuie-tout ou éponge humide propre : Nettoyer pendant que la table de cuisson est encore tiède. Vous devriez porter des mitaines de four pour ce nettoyage.
Laisser la table de cuisson refroidir et les témoins clignotants s'arrêteront. Le motif de témoins clignotant en alternance (illustré cidessous) sur le tableau de commande de la table de cuisson indique une situation de mise en veille temporaire pour prévenir une surchauffe de la table de cuisson. A A. Modèles de 30" (76,2 cm) Les résultats de cuisson sur la table de cuisson ne sont pas les résultats prévus B ■ Utilise-t-on un ustensile de cuisson approprié? Voir la section “Ustensiles de cuisson”.
Sur les cuisinières et tables de cuisson en vitrocéramique, de la deuxième à la cinquième année inclusivement à partir de la date d'achat lorsque cet appareil ménager est utilisé et entretenu conformément aux instructions jointes à ou fournies avec le produit, KitchenAid Canada paiera pour les pièces spécifiées par l’usine pour la table de cuisson en vitrocéramique.
8286067A © 2005. All rights reserved. Tous droits réservés. ® Registered Trademark/TM Trademark of KitchenAid, U.S.A., KitchenAid Canada licensee in Canada ® Marque déposée/TM Marque de commerce de KitchenAid, U.S.A., Emploi licencié par KitchenAid Canada au Canada 8/05 Printed in U.S.A. Imprimé aux É.-U.