
Installation guide
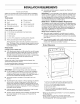

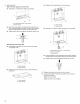


4. Drill two 1/8"(3.0 mm) holes that correspond to the bracket
holes of the determined mounting method. See below.
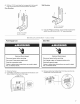
Floor Mounting
A B
Wall Mounting
A. #12 x 1%" screws
B. Anti-tip bracket
A. #12 x 1%" screws
B. Anti-tip bracket
5. Using the Phillips screwdriver, mount anti-tip bracket to the
wall or floor with the two #12 x 1%" screws provided.
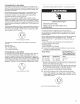
Power Supply Cord Direct Wire
Electrical Shock Hazard
Disconnect power before servicing.
Use a new 40 amp power supply cord.
Plug into a grounded outlet.
Failure to follow these instructions can result in death,
fire, or electrical shock.
Electricam Shock Hazard
Disconnect power before servicing.
Use 8 gauge copper or 6 gauge aluminum wire.
Electrically ground range.
Failure to follow these instructions can result in death,
fire, or electrical shock.
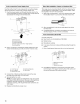
1. Disconnect power.
2. Use Phillips screwdriver to remove the terminal block cover
screw located on the back of the range.
3. Remove plastic tag holding three 10-32 hex nuts from the
middle post of the terminal block.