
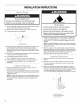
Installation guide


4. Addstrainrelief.
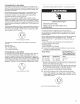
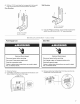
Style 1: Power supply cord strain relief
• Assemble a UL listed strain relief in the opening.
B
A. UL listed strain relief- large opening
B. Smafl opening
Feed the power supply cord through the strain relief on
the cord/conduit plate on bottom of range. Allow enough
slack to easily attach the wiring to the terminal block.
Tighten strain relief screw against the power supply cord.
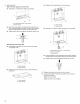
Style 2: Direct wire strain relief
• Use Phillips screwdriver to remove screws and rotate/
conduit plate 180°.
Replace cord/conduit plate and insert screws.
_ ................A
A. Smafl opening
B. Large opening
• Assemble a UL listed conduit connector in the opening.
A ............
.....C
A. Removable retaining nut =smafl opening
B. Conduit connecter
C. Large opening
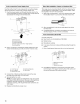
• Feed the flexible conduit through the strain relief, allowing
enough slack to easily attach wiring to the terminal block.
• Tighten strain relief screw against the flexible conduit.
A. Large opening
B. Smafl opening
Position cord/conduit plate as shown in the following
illustration.
A. Smafl opening
B. Large opening
5. Replace back panel and screws on rear of range.
6. Complete installation following instructions for your type of
electrical connection:
4-wire (recommended)
3-wire (if 4-wire is not available)
8