W10660371B_ENv04.
E NESPRESSO BY KITCHENAID We’re committed to helping you create a lifetime of delicious meals for family and friends. To help ensure the longevity and performance of your appliance, keep this guide handy. It will empower you with the best way to use and care for your product. Your satisfaction is our #1 goal. Remember to register your product online at www.kitchenaid.com or by mail using the enclosed Product Registration Card. Nespresso is a unique system creating the perfect espresso, time after time.
TABLE OF CONTENTS ESPRESSO MACHINE SAFETY Important safeguards........................................................................................... 4 Electrical requirements....................................................................................... 7 English ESPRESSO MACHINE INSTRUCTIONS PARTS AND FEATURES Parts and accessories...........................................................................................
ESPRESSO MACHINE SAFETY E Your safety and the safety of others are very important. We have provided many important safety messages in this manual and on your appliance. Always read and obey all safety messages. This is the safety alert symbol. This symbol alerts you to potential hazards that can kill or hurt you and others. All safety messages will follow the safety alert symbol and either the word “DANGER” or “WARNING.
11. This product is designed for indoor household use only. Not designed for commercial use. 12. The safety precautions are part of the appliance. Read them carefully before using your new appliance for the first time. Keep them in a place where you can find and refer to them later on. 13. The appliance is intended to prepare beverages according to these instructions. 14. Do not use the appliance for any use other than the intended use. 15.
ESPRESSO MACHINE SAFETY E 36. Do not open the appliance; dangerous voltage inside. 37. Do not dismantle the appliance. 38. Do not put anything into any openings; doing so may cause fire or electric shock! 39. The appliance has a polarized plug (one blade is wider than the other). To reduce the risk of electric shock, this plug is intended to fit into a polarized outlet only one way. If the plug does not fit fully into the outlet, reverse the plug. If it still does not fit, contact a qualified electrician.
61. Reliability tests under practical conditions are randomly performed on selected units. 62. Some units can therefore show traces of previous use. 63. KitchenAid reserves the right to change instructions without prior notice. Descaling 64. Nespresso descaling agent, when used correctly, helps to ensure the proper functioning of your machine over its lifetime and that your coffee experience is as perfect as on the first day.
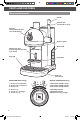
PARTS AND FEATURES A Parts and accessories Handle Capsule door (use handle to open) Brewing button/ Selection dial (see details below) Espresso spout Water tank Maintenance unit: Capsule disposal container (not shown) Drip grid Cup holder Drip tray (not shown) SELECTION DIAL Settings 1: 25 ml / 0.8 oz (ristretto) 2: 40 ml /1.35 oz (espresso) 3: 60 ml / 2 oz 4: 90 ml / 3 oz 5: 110 ml / 3.7 oz (lungo) 6: 130 ml / 4.4 oz 1 2 3 4 SPECIAL FUNCTION Settings 5 6 1: Automatic standby: 15 min.
ASSEMBLING THE ESPRESSO MACHINE Preparing the Espresso Machine for first use English WARNING Electrical Shock Hazard Plug into a grounded 3 prong outlet. 1 Place the Espresso Machine on a clean, dry, level surface. Do not remove ground prong. Do not use an adapter. Do not use an extension cord. Failure to follow these instructions can result in death, fire, or electrical shock. 2 Plug the cord into a grounded 3 prong outlet.
ASSEMBLING THE ESPRESSO MACHINE 6 Fill the water tank with fresh, cold, drinking water (the water level should be at or below the “max” fill line). 7 O Place the water tank back on the Espresso Machine. NOTE: Press water tank in until it snaps completely into place to assure proper function. x3 8 Before brewing espresso for the first time, make sure to run plain water through the Espresso Machine, on the “lungo” setting three times.
OPERATING THE ESPRESSO MACHINE English Brewing espresso 1 Place your cup on the cup holder. 2 Lift the handle to raise the lid on the capsule loading compartment to its fully upright position. NOTE: To avoid damage and injury due to hot vapor when brewing, open the capsule door ONLY by the handle 3 seconds after the brewing cycle has completed. Never try to pull up the capsule door with your fingers. 3 Select the capsule you want to use.
OPERATING THE ESPRESSO MACHINE 7 You can change your selection mid-brew by turning the selection dial to a new selection before brewing ends. 8 O After your espresso is finished brewing, lift the handle to its fully upright position to drop the used capsule into the disposal container. NOTE: Eject the capsule after each coffee or before turning off the machine. The capsule disposal container holds up to 14 used capsules. See the “Care and cleaning” section for more information.
OPERATING THE ESPRESSO MACHINE 20 min. 30 min. English 15 min. 3 Turn the selection dial to the left most position to reset the standby time to 15 minutes; turn to the second left position to reset the standby time to 20 minutes; or turn to the third left position to reset the standby time to 30 minutes. 4 Press the brew button again. The Espresso Machine will blink 3 times to confirm that you have exited the programming mode.
CARE AND CLEANING C 3 Remove and empty the capsule disposal container. Then remove the drip grid from the drip tray. 4 Wipe the Espresso Machine housing with a clean damp cloth and dry with a soft cloth. Do not use abrasive cleansers or scouring pads when cleaning the housing, or any part or accessory. 5 Wash the capsule disposal container, drip grid, and drip tray in the top rack of a dishwasher, or by hand in warm, soapy water.
English CARE AND CLEANING 3 Enter the emptying mode by turning the brew button to the left most position and holding it for 6 seconds until the light starts to blink. 4 Rotate the selection dial until the blinking light is above the middle right position. NOTE: Once Espresso Machine has emptied, allow it to cool down for 10 minutes before using. 5 Press the brew button. The emptying cycle will run until the system is empty.
CARE AND CLEANING T 3 Enter descaling mode by turning the brew button to the left most position and holding it for 6 seconds until the light starts to blink. 4 Then rotate the selection dial until the blinking light is above the first right position. 5 Press the brew button to start descaling and run until the water tank is empty. 6 Fill the water tank with water to the “max” fill line a second time and repeat the cycle with water only to rinse.
TROUBLESHOOTING WARNING Electrical Shock Hazard Plug into a grounded 3 prong outlet. Do not remove ground prong. 2. If coffee does not flow from the spout… • Water tank may be empty. • Espresso Machine may need to be descaled. • Capsule container may need to be emptied: - Check to see that there is not a capsule blocked inside the Espresso Machine. - Check to see that the capsule was inserted in the correct orientation. - Check to see that the handle is completely closed, see “Brewing espresso” section.
WARRANTY AND SERVICE W KitchenAid® Espresso Machine Warranty for the 50 United States, the District of Columbia, Puerto Rico, and Canada This warranty extends to the purchaser and any succeeding owner of the Espresso Machine operated in the 50 United States, the District of Columbia, Puerto Rico, and Canada. Length of Warranty: Two Year Full Warranty from date of purchase. KitchenAid Will Pay for Your Choice of: Hassle-Free Replacement of your Espresso Machine.
WARRANTY AND SERVICE We’re so confident the quality of our products meets the exacting standards of KitchenAid that, if your Espresso machine should fail within the first two years of ownership, KitchenAid will arrange to deliver an identical or comparable replacement to your door free of charge and arrange to have your original Espresso Machine returned to us. Your replacement unit will also be covered by our two year limited warranty.
I NESPRESSO PAR KITCHENAID Nous nous engageons à vous aider à créer de délicieux repas pour votre famille et vos amis, et ce durant tout le cycle de vie de l’appareil. Pour contribuer à la durabilité et à une bonne performance de votre appareil, conserver ce guide à portée de main. Il vous permettra d’utiliser et d’entretenir votre produit de la meilleure manière qui soit. Votre satisfaction est notre objectif numéro 1. N’oubliez pas d’enregistrer votre produit en ligne sur www.kitchenaid.
INSTRUCTIONS DE LA MACHINE À EXPRESSO TABLE DES MATIÈRES SÉCURITÉ DE LA MACHINE À EXPRESSO Consignes de sécurité importantes................................................................... 22 Spécifications électriques................................................................................... 26 ASSEMBLAGE DE LA MACHINE À EXPRESSO Préparation de la machine à expresso pour utilisation...................................... 28 FONCTIONNEMENT DE LA MACHINE À EXPRESSO Préchauffage...................
SÉCURITÉ DE LA MACHINE À EXPRESSO S Votre sécurité et celle des autres est très importante. Nous donnons de nombreux messages de sécurité importants dans ce manuel et sur votre appareil ménager. Assurez-vous de toujours lire tous les messages de sécurité et de vous y conformer. Voici le symbole d’alerte de sécurité. Ce symbole d’alerte de sécurité vous signale les dangers potentiels de décès et de blessures graves à vous et à d’autres.
7. L’utilisation d’accessoires non recommandés par le fabricant de l’appareil peut entraîner un incendie, un choc électrique ou des blessures corporelles. 8. Ne pas utiliser à l’extérieur. 9. Ne pas laisser le cordon pendre sur le côté d’une table ou d’un comptoir, ou toucher une surface chaude. 10. Ne pas placer sur ou près d’un radiateur, d’un brûleur électrique ou à gaz chaud, dans un four chaud ou près d’une flamme nue. 11. Ce produit est conçu uniquement pour un usage domestique d’intérieur.
SÉCURITÉ DE LA MACHINE À EXPRESSO S 28. Pour éviter tout dommage, ne jamais placer l’appareil sur des surfaces chaudes ou près de celles-ci (par exemple des radiateurs, des cuisinières, des fours, des brûleurs à gaz, des flammes nues, etc.). 29. Toujours placer l’appareil sur une surface horizontale, stable et plane. 30. La surface doit être résistante à la chaleur et aux liquides comme l’eau, le café, le détartrant, etc. 31.
51. Vider le réservoir à eau si l’appareil ne sera pas utilisé pendant une période prolongée (vacances, etc.). 52. Remplacer l’eau du réservoir lorsque l’appareil n’est pas utilisé pendant une fin de semaine ou une période de temps équivalente. 53. Ne pas utiliser l’appareil sans bac et grille d’égouttage afin d’éviter de renverser du liquide sur les surfaces environnantes. 54. Ne pas utiliser de détergent puissant ou de solvant. 55.
SÉCURITÉ DE LA MACHINE À EXPRESSO Spécifications électriques AVERTISSEMENT Tension : 120 volts Fréquence : 60 hertz REMARQUE : Si cette fiche ne convient pas à la prise, contacter un électricien qualifié. Ne pas modifier la prise de quelque manière que ce soit. Ne pas utiliser d’adaptateur. Risque de choc électrique Brancher sur une prise à 3 alvéoles reliée à la terre. Ne pas enlever la broche de liaison à la terre. Ne pas utiliser de rallonge.
PIÈCES ET CARACTÉRISTIQUES Pièces et accessoires Poignée Trappe à capsules (utiliser la poignée pour ouvrir) Orifice de sortie de l’expresso Français Bouton d’infusion/de sélection (voir détails ci-dessous) Réservoir d’eau Section d’entretien : Collecteur de capsules usagées (non illustré) Grille d’égouttement Support de tasse Plateau d’égouttement (non illustré) Réglages du BOUTON ROTATIF DE SÉLECTION 1: 25 ml / 0,8 oz (ristretto) 2: 40 ml / 1,35 oz (espresso) 3. 60 ml / 2 oz 4. 90 ml / 3 oz 5.
ASSEMBLAGE DE LA MACHINE À EXPRESSO A Préparation de la machine à expresso pour première utilisation AVERTISSEMENT Risque de choc électrique Brancher sur une prise à 3 alvéoles reliée à la terre. 1 Placer la machine à expresso sur une surface propre, sèche et plane. 3 Lorsque la machine à expresso est allumée, la DEL clignote lors du processus de chauffe. Lorsque la machine est prête, la DEL reste allumée. Ne pas enlever la broche de liaison à la terre. Ne pas utiliser un adaptateur.
4 Faire légèrement basculer le réservoir d’eau puis le retirer en le tirant vers l’extérieur de la machine à expresso. 5 Laver le réservoir d’eau dans une eau chaude et savonneuse et rincer à l’eau propre. Sécher avec un chiffon doux. Le réservoir d’eau ne peut pas être lavé au lave-vaisselle. 6 Remplir le réservoir d’eau potable fraîche et froide (le niveau d’eau ne doit pas dépasser le repère de remplissage “max”). 7 Réinstaller le réservoir d’eau sur la machine à expresso.
FONCTIONNEMENT DE LA MACHINE À EXPRESSO Préchauffage REMARQUE : Il est possible de modifier la sélection du volume pendant que la machine à expresso commence à chauffer. Dans ce cas, la barre de DEL arrête de clignoter mais reste allumée sur la taille de portion sélectionnée et le bouton d’infusion continue de clignoter pendant que la machine chauffe. Appuyer sur le bouton d’infusion. Dès que la bonne température est atteinte, le programme d’infusion démarre automatiquement.
3 Sélectionner la capsule d’expresso à utiliser. Tenir la capsule comme illustré, l’opercule en aluminium face à soi, puis insérer la capsule dans le compartiment de chargement de capsules situé sur le dessus de la machine. 4 Rabaisser la poignée pour fermer le compartiment à capsules. S’assurer que la poignée est en position horizontale. Le compartiment de chargement de capsules doit être complètement fermé.
FONCTIONNEMENT DE LA MACHINE À EXPRESSO 7 Il est possible de modifier la sélection au milieu de l’infusion en tournant le bouton rotatif de sélection sur une nouvelle sélection avant la fin de l’infusion. 8 F Une fois l’infusion de l’expresso terminée, relever la poignée en position complètement verticale pour faire tomber la capsule dans le collecteur de capsules usagées. REMARQUE : Éjecter la capsule après chaque préparation de café ou avant d’éteindre la machine.
FONCTIONNEMENT DE LA MACHINE À EXPRESSO 3 20 min. 30 min. Tourner le bouton rotatif de sélection sur la position la plus à gauche pour régler de nouveau la durée sur 15 minutes; le tourner sur la deuxième position de gauche pour régler de nouveau la durée sur 20 minutes; ou le tourner sur la troisième position de gauche pour régler de nouveau la durée de veille sur 30 minutes. 4 Appuyer de nouveau sur le bouton d’infusion.
ENTRETIEN ET NETTOYAGE E 3 Retirer puis vider le collecteur de capsules usagées. Ensuite, retirer la grille d’égouttage du plateau d’égouttement. 4 Essuyer le logement de la machine à expresso avec un chiffon propre et humide, et sécher avec un chiffon doux. Ne pas utiliser de produits de nettoyage abrasifs ou de tampons à récurer pour nettoyer le logement de la machine, ou tout autre accessoire ou pièce.
3 Entrer dans le mode de vidage en tournant le bouton d’infusion sur la position la plus à gauche et maintenir pendant 6 secondes jusqu’à ce que la lampe commence à clignoter. 4 Faire tourner le bouton rotatif de sélection jusqu’à ce que le témoin lumineux clignotant se trouve sur la position intermédiaire de droite. REMARQUE : Une fois que la machine à expresso s’est vidée, la laisser refroidir pendant 10 minutes avant de l’utiliser.
ENTRETIEN ET NETTOYAGE C 3 Entrer dans le mode de détartrage en tournant le bouton d’infusion sur la position la plus à gauche et en maintenant pendant 6 secondes jusqu’à ce que la lampe commence à clignoter. 4 Puis tourner le bouton rotatif de sélection jusqu’à ce que le témoin clignote au-dessus de la première position à droite. 5 Appuyer sur le bouton d’infusion pour démarrer le détartrage et pour qu’il se termine une fois le réservoir d’eau vide.
1. Si le témoin d’allumage reste éteint et que la machine à expresso ne parvient pas à chauffer lorsque l’on appuie sur le bouton d’infusion AVERTISSEMENT Risque de choc électrique Brancher sur une prise à 3 alvéoles reliée à la terre. Ne pas enlever la broche de liaison à la terre. Ne pas utiliser un adaptateur. Ne pas utiliser un câble de rallonge. Le non-respect de ces instructions peut causer un décès, un incendie ou un choc électrique.
GARANTIE ET SERVICE G Garantie et dépannage du batteur à main KitchenAid® pour les 50 États des États-Unis, le district fédéral de Columbia, Porto Rico et le Canada La présente garantie couvre l’acheteur et les propriétaires suivants de la machine à expresso lorsqu’elle est utilisée dans les 50 États des États-Unis, le district fédéral de Columbia, à Porto Rico et au Canada. Durée de la garantie : Garantie complète des deux ans à compter de la date d’achat.
GARANTIE ET SERVICE Garantie de remplacement sans difficulté – 50 États des États-Unis, district fédéral de Columbia et Porto Rico Centre d’eXpérience à la clientèle au 1-800-541-6390, du lundi au vendredi. Veuillez avoir votre reçu de vente à portée de main au moment de votre appel. Une preuve d’achat est indispensable pour que votre réclamation puisse être traitée. Fournissez votre adresse de livraison complète au représentant.
I NESPRESSO DE KITCHENAID Estamos comprometidos a ayudarle a elaborar deliciosas comidas para su familia y amistades por toda la vida. Para ayudar a asegurar la larga duración y el desempeño de su aparato, mantenga esta guía a mano. Ésta le proveerá información sobre la mejor manera de usar y cuidar su producto. Su satisfacción es nuestra meta número 1. Recuerde registrar su producto en línea en www.kitchenaid.com, o bien por correo usando la Tarjeta de registro del producto adjunta.
INSTRUCCIONES DE LA CAFETERA EXPRESO ÍNDICE SEGURIDAD DE LA CAFETERA EXPRESO Salvaguardias importantes................................................................................. 42 Requisitos eléctricos.......................................................................................... 46 PIEZAS Y CARACTERÍSTICAS Piezas y accesorios............................................................................................
SEGURIDAD DE LA CAFETERA EXPRESO S Su seguridad y la seguridad de los demás es muy importante. Hemos incluido muchos mensajes importantes de seguridad en este manual y en su electrodoméstico. Lea y obedezca siempre todos los mensajes de seguridad. Este es el símbolo de advertencia de seguridad. Este símbolo le llama la atención sobre peligros potenciales que pueden ocasionar la muerte o una lesión a usted y a los demás.
7. El uso de aditamentos de accesorio no recomendados por el fabricante del aparato puede ocasionar un incendio, choque eléctrico o heridas a personas. 8. No la use al aire libre. 9. No deje que el cable cuelgue del borde de la mesa o mostrador ni que toque superficies calientes. 10. No la coloque cerca o sobre un radiador, quemador a gas o eléctrico caliente, dentro de un horno caliente, llama abierta o similar. 11. Este producto ha sido diseñado únicamente para uso dentro del hogar.
SEGURIDAD DE LA CAFETERA EXPRESO S 31. Desconecte la máquina de la red eléctrica cuando no vaya a utilizarla durante un periodo de tiempo prolongado. 32. Desconéctela extrayendo el enchufe sin tirar del cable, ya que de lo contrario este podría resultar dañado. 33. Nunca toque el cable con las manos mojadas. 34. Nunca introduzca la máquina ni ninguna de sus partes en un lavavajillas. 35. La combinación de agua y electricidad es peligrosa y puede provocar descargas eléctricas mortales. 36.
SEGURIDAD DE LA CAFETERA EXPRESO Descalcificación 64. El agente antisarro de Nespresso, usado en forma apropiada, contribuye a asegurar el correcto funcionamiento de la máquina durante su vida útil y que la experiencia de tomar café sea tan perfecta como el primer día. Para obtener las instrucciones de seguridad, la cantidad correcta y los procedimientos a seguir, consulte el manual del usuario incluido en el luego antisarro de Nespresso.
P SEGURIDAD DE LA CAFETERA EXPRESO Requisitos eléctricos ADVERTENCIA Voltaje: 120 Voltios Frecuencia: 60 Hertz NOTA: Si el enchufe no encaja en el tomacorriente, póngase en contacto con un electricista calificado. No modifique el enchufe de ninguna manera. No use un adaptador. Peligro de Choque Eléctrico Conecte a un contacto de pared de conexión a tierra de 3 terminales. No use un cable eléctrico de extensión.
PIEZAS Y CARACTERÍSTICAS Piezas y accesorios Manija Puerta de la cápsula (use la manija para abrir) Botón de elaboración/ Cuadrante de selección (vea los detalles abajo) Pico de salida de café expreso Depósito de agua Unidad de mantenimiento: Recipiente para desecho de cápsulas (no se muestra) Español Rejilla de goteo Portataza Bandeja de goteo (no se muestra) Ajustes del CUADRANTE DE SELECCIÓN 1: 25 ml / 0,8 onzas (ristretto) 1 2: 40 ml / 1,35 onzas (expreso) 3. 60 ml / 2 onzas 4. 90 ml / 3 onzas 5.
ARMADO DE LA CAFETERA EXPRESO A Preparación de la cafetera expreso para su primer uso ADVERTENCIA Peligro de Choque Eléctrico Conecte a un contacto de pared de conexión a tierra de 3 terminales. 1 Coloque la cafetera expreso sobre una superficie limpia, seca y nivelada. 3 Cuando la cafetera expreso está encendida, el LED destellará mientras se calienta. Cuando la cafetera está lista, el LED se iluminará en forma continua. No quite la terminal de conexión a tierra. No use un adaptador.
4 Incline el depósito de agua levemente y luego retírelo jalando de este hacia afuera de la cafetera expreso. 5 Lave el depósito de agua en agua caliente jabonosa y enjuáguelo con agua limpia. Seque con un paño suave. El depósito de agua no debe lavarse en la lavavajillas. 6 Llene el depósito de agua con agua fresca, limpia y potable (el nivel de agua debe estar en la línea de llenado “max” o por debajo de esta). 7 Coloque nuevamente el depósito de agua en la cafetera expreso.
OPERATING FUNCIONAMIENTO THE ESPRESSO DE LA CAFETERA MACHINEEXPRESO F Precalentamiento NOTA: Usted puede cambiar la selección de volumen que desee mientras que la cafetera expreso se está calentando. Al hacerlo, la barra LED ya no destellará pero permanecerá encendida sobre la porción seleccionada y el botón de elaboración continuará destellando mientras la cafetera expreso se calienta. Una vez alcanzada la temperatura correcta, el ciclo de elaboración comenzará por sí solo.
FUNCIONAMIENTO DE LA CAFETERA EXPRESO 5 Gire el cuadrante de selección hacia el ajuste de volumen deseado (de izquierda a derecha): 1: 25 ml (ristretto), 2: 40 ml (expreso), 3: 60 ml, 4: 90 ml, 5: 110 ml (lungo), o 6: 130 ml. 6 Presione el botón de elaboración. La cafetera expreso comenzará a elaborar el café. Presione el botón de elaboración por segunda vez si desea completar la taza o si desea detener el ciclo de elaboración antes de tiempo.
FUNCIONAMIENTO DE LA CAFETERA EXPRESO O C Modo de espera automático Cuando la cafetera expreso está enchufada, esta entra automáticamente en modo de espera. Debe presionar el botón de elaboración o girar el cuadrante para que la cafetera expreso se active. Luego de 9 minutos sin usar, la cafetera entra en un modo de bajo consumo, y el calentador se apaga.
OPERATING CUIDADO Y LIMPIEZA THE ESPRESSO MACHINE Limpieza de la cafetera expreso Mantener la cafetera expreso limpia es crucial para la elaboración del mejor café expreso posible. Los aceites del café viejo arruinarán el sabor incluso del café preparado de la manera más profesional. NOTA: No limpie la cafetera expreso con limpiadores abrasivos, estropajos de acero u otros materiales abrasivos. Apague la cafetera expreso girando el cuadrante por completo hacia la derecha y manténgalo durante 6 segundos.
CUIDADO Y LIMPIEZA 5 Lave el recipiente para desecho de cápsulas, la rejilla y la bandeja de goteo en el estante superior de la lavavajillas o a mano con agua caliente jabonosa. Si lava estos elementos a mano, asegúrese de enjuagarlos con agua limpia y secarlos con un paño suave. C 6 Lave el depósito de agua en agua caliente jabonosa y enjuáguelo con agua limpia. Seque con un paño suave. El depósito de agua no debe lavarse en la lavavajillas.
CUIDADO Y LIMPIEZA NOTA: Una vez que la cafetera expreso se ha vaciado, deje que se enfríe durante 10 minutos antes de usarla. 5 Presione el botón de elaboración. El ciclo de vaciado funcionará hasta que el sistema esté vacío. Remoción de sarro Español Los depósitos de calcio (“sarro”) provenientes del agua se acumularán con el tiempo en la cafetera expreso y esto puede afectar negativamente la calidad del café expreso.
CUIDADO Y LIMPIEZA 5 Presione el botón de elaboración para comenzar la remoción de sarro y ejecute hasta que el depósito de agua se vacíe. S 6 Llene el depósito de agua con agua por segunda vez y repita el ciclo con agua solamente para enjuagar. Al terminar, la cafetera expreso automáticamente pasará al modo Listo. 56 W10660371B_SPv2.
SOLUCIÓN DE PROBLEMAS ADVERTENCIA Peligro de Choque Eléctrico Conecte a un contacto de pared de conexión a tierra de 3 terminales. No quite la terminal de conexión a tierra. No use un adaptador. No use un cable eléctrico de extensión. No seguir estas instrucciones puede ocasionar la muerte, incendio o choque eléctrico. • Verifique si la cafetera expreso está enchufada en un contacto de pared con conexión a tierra de 3 terminales; si es así, vuelva a enchufar y presione el botón de elaboración nuevamente.
GARANTÍA Y SERVICIO TÉCNICO G Garantía de la cafetera expreso manual KitchenAid® para los 50 estados de Estados Unidos, el distrito de Columbia, Puerto Rico y Canadá Esta garantía se extiende al comprador y a cualquier propietario subsiguiente para las cafeteras expreso usadas en los 50 estados de Estados Unidos, el Distrito de Columbia, Puerto Rico y Canadá. Duración de la garantía: Dos años de garantía completa a partir de la fecha de compra.
GARANTÍA Y SERVICIO TÉCNICO Garantía de reemplazo sin dificultades – En los cincuenta estados de Estados Unidos, el Distrito de Columbia y Puerto Rico Confiamos tanto en que la calidad de nuestros productos cumple con las exigentes normas de KitchenAid que, si la cafetera expreso presentara alguna falla durante los primeros dos años de compra, KitchenAid se encargará de entregar un reemplazo idéntico o comparable a su domicilio sin cargo y arreglará la devolución de la cafetera expreso original a nosotros.
®/™ © 2014 KitchenAid. All rights reserved. Used under license in Canada. ®/™ © 2014 KitchenAid. Tous droits réservés. Utilisé sous licence au Canada. ®/™ © 2014 KitchenAid. Todos los derechos reservados. Usada en Canadá bajo licencia. W10660371B W10660371B_SPv2.