
Owner's Manual


ENGLISH
9
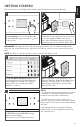
To set the Water Filter: Follow the
instructions on the Display. If you've chosen
to use the supplied Water Filter, make
use of the mounting aid at the end of the
measuring Spoon to install the Water Filter.
4
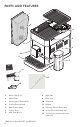
GETTING STARTED
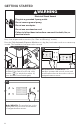
Open hinged lid on the front left of the
Espresso Machine. Remove the Water Tank
and fill to the max fill line (2.2 L). Fill the
Bean Hopper with whole roasted beans,
then close the Lid.
To set the Water Hardness Level: Follow
the instructions on the Display (make use
of the supplied Test Strip or consult the
instructions in the “Setting the Water
Hardness” section).
A HEATING UP and RINSING message
appear on the Display.
The machine is now ready to be used.
NOTE:
- The first time you use the machine, you need
to make 4-5 coffee based drinks before the
results in your cup will be satisfactory.
- The first time you use the machine, the
machine can be noisy due to the water system
being empty. This noise is reduced after being
filled up.
- All settings that were determined during
initial startup can be changed at any time in
the Settings menu.
To set Language: Select and confirm the
desired language by pressing the “ ” icon
on the screen.
IMPORTANT: The opposite end of the ground spoon can be used as a filter mounting aid.
Place the top of the filter into the opposite end of the ground spoon to insert easily into the
tank.
NOTE: If a filter is used, the unit does not need to be descaled as often.
The instructions on the Display will lead through the initial start menu step by step.
3
5
6
7