
Installation guide


Excess,veVVe,ghtHazard IZD
Use two or more people to move and install
range.
Failure to follow this instruction can result
in back or other injury.
_ irmly grasp the range and gently lay it
on its back on the cardboard corners.
[_ ull cardboard bottom and shipping base
firmly to remove.
Use an adjustable wrench
to loosen the leveling legs
1-1/2 turns.
'7 lace cardboard or hardboard in front
of range. Stand range back up onto
cardboard or hardboard.
Tip Over Hazard
A child or adult can tip the range and be
killed.
Connect anti-tip bracket to rear range foot.
Reconnect the anti-tip bracket, if the range
is moved.
Failure to follow these instructions can
result in death or serious burns to
children and adults.
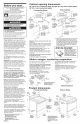
Place the anti-tip
bracket template
on the floor in
the cabinet
opening so that
the left edge is
against cabinets
and the top
edge is against
the rear wall,
molding or
cabinet. If
25" (63.5 cm) counferfop over
24" (61 cm) cabinet
\ _J,-
._J J
J /onti-tip
_braekef
/ _template
countertop opening is deeper than 25 inches
(63.5 cm), measure and mark a distance 25
inches (63.5 cm) in from front of countertop
opening and align template with mark
(or subtract 25 inches (63.5 cm) from countertop
depth and add the difference to the 2-1/4-inch
(5.7 cm) dimension).
A
25" (63.5 c
If countertop is
not flush to the
side of cabinet
opening, align _ Counfeffop
overhangs
the left side of cabinet side.
the template to A = Difference
allow for the _ between
countertop / counterfop
depth and 25"
overhang. Tape (63.5cm).
the range anti-tip A
bracket template
in place, anti-tip
bracket
template
slide-in cutout
shown
Control panels may vary.
Contact a qualified floor covering installer for
the best procedure of drilling mounting holes
through your type of floor covering,
Before moving, slide range onto cardboard
or hardboard,
To mount anti=tip
bracket to wood floor,
use the anti-tip bracket
template to mark
where to drill mounting
holes. Use a drill with a
1/8" (0.3 cm) drill bit to
drill the two holes.
Remove template from
floor.
To mount anti-tip bracket to concrete or
ceramic floor, use the anti-tip bracket template
to mark where to drill mounting holes. Use a drill
with a 3/16" (0.48 cm) masonry drill bit to drill the
two holes. Remove template from floor. Tap
plastic anchors into mounting holes in floor with
hammer.
Line up holes in anti-tip
bracket with holes in floor.
Use the screws provided
to fasten anti-tip bracket
to floor. / /
NOTE: Anti-tip
bracket must be
mounted securely to the
sub floor. Depending on the thickness
of your flooring, longer screws may be
necessary to anchor the bracket to the sub floor.
Longer screws are available from your local
hardware store.
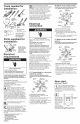
1 0 i Move range close to cabinet opening.
Make electrical connection. See
[] "Electrical requirements" and
"Electrical connection," Panel B, for details. "8888"
should appear in the clock display. Refer to Use
and Care Guide for information on electronic
controls.
[1 1 ] Remove cardboard or hardboard from
under range. Carefully move range
[] into final position.
I1
Press on front
of storage
drawer and
release to open.
Pull open to first stop position.
Lift front of drawer to clear white
wheels in drawer guides. Remove drawer and set
it aside on a protected surface.
113.1
Look under range
(a flashlight may
be needed) to
check that left rear
leveling leg is
engaged in the anti-tip
bracket. If leveling leg is
not properly engaged,
remove and reposition the anti-tip bracket to
insure that the leveling leg fits properly in the
anti-tip bracket.
in
oven. Place
level on rack, fir
to side; then front to back. If the range
is not level, pull range forward until the rear
leveling leg is removed from the anti-tip bracket.
Adjust the leveling legs up or down. Then slide
range back into position. Check that leveling leg
is engaged in anti-tip bracket.
NOTE: Oven must be level for satisfactory baking
conditions.
5 _ Insert storage drawer into slide rails
I
on sides of drawer opening. Lift front
[] of drawer slightly and push firmly to
close drawer.
I 6 ] Push in and
turn each
= surface unit
control knob to "HI"
position. Check the
operation of the cooktop
elements and indicator
lights.
OFF
MED
1 7 I Check the operation of the oven
element. Press the "BAKE" pad.
[] "350°F '' will appear in the temperature
display. Press the "START" pad. "Lo" will appear
in the display; then "170°F '' (when oven reaches
170°F).
The bottom element should glow red and the
indicator light should be on. The upper element
should become hot but not glow red. As the oven
temperature rises, the temperature in the display
will increase in 5°F increments until the oven
reaches the set temperature.
Press "CANCEL/OFF" pad.
1 Check the operation of the broil
element. Close the oven door. Press the
[] "BROIL' pad. "500°F '' will appear in the
temperature display. Press the "START" pad.
Look through the oven window. The top element
should glow red. Press the "CANCEL/OFF" pad.
To get the most efficient use from your
new electric range, read your KitchenAid
Use and Care Guide. Keep Instaflation
Instructions and Guide close to the
electric range for easy reference.
Panel C