ruse and Care Guide KitchenAid* Table of Contents (complete) ................. 2 A Note to You ............... 3 Range Safety ............. 4-6 Getting to Know Your Range .................. 7 Using and Caring for Your Cooktop ............. 11 Using and Caring for Your Oven .................. 18 Using EASY CONVECT* Conversion .............. 36 Using the Self-Cleaning Cycle ... 51 Troubleshooting ........ 55 Requesting Assistance or Service .................... 57 Index .....................
-able of Contents A Note to You ............................................ Range Safety ......................................... 3 Using the temperature probe ............... 31 4-6 Using Convect Full Meal ..................... 33 Getting to Know Your Range ................... 7 Feature locations ................................. 7 Using EASY CONVECT* Conversion ......................................... 36 The oven vent ....................................... 9 Broiling .....................
m Note to You _nkyou for buying a KITCHENAID* appliance! KitchenAid designs the best tools for the most important room in your house. To ensure that you enjoy many years of trouble-free operation, we developed this Use and Care Guide. It contains valuable information concerning how to operate and maintain your new appliance properly and safely. Please read it carefully. Also, please complete and mail the enclosed Product Registration Card.
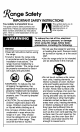
nge Safety IMPORTANTSAFETYINSTRUCTIONS Your safety is important to us. This guide contains safety symbols and statements. Please pay special attention to these symbols and follow any instructions given. Here is a brief explanation of the use of the symbol. This symbol alerts you to hazards such as fire, electrical shock, or other injuries.
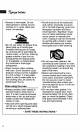
nge *Do not operate the range if it is damaged or not working properly. oDo not wear loose or hanging garments when using the range. They could ignite if they touch a hot surface unit and you could be burned. *Use only dry pot holders. Moist or damp pot holders on hot surfaces could result in burns from steam. Do not let pot holder touch hot heating elements. Do not use a towel or bulky cloth for a pot holder. It could catch on fire. *Keep range vents unobstructed. *Do not heat unopened containers.
_ange Safety *Grease is flammable. Do not allow grease to collect around cooktop or in vents. Wipe spillovers immediately. *Do not use water on grease fires. Never pick up a flaming pan. Smother flaming pan on range by covering with a well-fitting lid, cookie sheet, or flat tray. Flaming grease outside of pan can be extinguished with baking soda or, if available, a multipurpose dry chemical or foam-type extinguisher. *Clean ceramic glass cooktop with care.
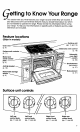
etting to Know Your Range This section tells you what features your range has also discusses some convenience features that you are not needed to operate the range. Please review your range. To help you find information on specific references are included. and where they are located. It should know about, but which this information before using parts or features quickly, page Feature locations (Slide-in models) (pp. 11 and 14) Oven vent (p. 9) (p. 18) Surface unit controls (p.
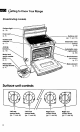
Getting to Know Your Range (Freestanding models) Surface Iigl (p. 16) Oven ven (p. 9) Surface unit (pp. 11 and 14) Surface unit controls (p. 11) Anti-tip brac ket Electronic oven control (p.18) • Automatic oven light switch (p. 50) (p. 10) Model and serial number Broil element (not shown) (p. 21) (p. 3) Removable storage drawer, (p. 9) element (p. 21) Surface unit controls Left rear control knob (pp. ! 1 and 48) Left front control knob (pp. 11 and 48) Right front control knob (pp.
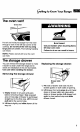
Getting to Know Your Range The oven vent Oven vent Hot air and moisture escape from the oven through a vent in the left rear corner of the cooktop. Do not block the vent by using large pans or covers. Poor baking/roasting _ can result. Burn Hazard Use pot holders when touching Items left near oven vent. Failure to do so can result in burns. NOTE: Plastic utensils left over the vent can melt.
Getting to Know Your Range The anti-tip bracket The range will not tip during normal use. However, tipping can occur if you apply too much force or weight to the open door without the anti-tip bracket properly secured. Tip Over Hazard Connect anti-tip bracket to the range. Reconnect anti-tip bracket, if the range is moved. Do not push down on the open oven door. Follow the Installation Instructions. Do not let children climb onto the oven door.
sing and Caring for Your Cooktop This section tells you how to operate the controls to the cooktop. It aSsodiscusses how the ceramic glass cooktop works, and includes tips on how to cook with and maintain the cooktop. Using the surface units Fire Hazard Control Turn off all controls when done cooking. Failure to do so can result in death, fire, or burns. knobs Push In control knobs before turning them to a setting. Set them anywhere between HI and OFF.
Using and Caring for Your Cooktop Using the dual-size surface unit The ceramic glass cooktop (some models) You can use the right rear surface unit as either a small diameter, lower wattage element or large diameter, full wattage element. for larger pans Use small both element_ element for smaller pans To use the small element (for smaller pans): • Push in and turn the control knob to the left (counterclockwise) to the desired setting in the area marked "SINGLE".
' sing and Caring for Your Cooktop • Do not use the cooktop as a cutting board. • Do not allow anything that could melt, such as plastic or aluminum foil, to come in contact with the cooktop while it is hot. • Dropping a heavy or hard object on the cooktop could crack it. Be careful when using heavy skillets and large pots. Do not store jars or cans above the cooktop. • Sugary spills and soils can cause pitting. See page 15 for more information.
Using and Caring for Your Cooktop Caring for your cooktop This cooktop is designed for easy care. However, ceramic glass cooktops need to be maintained differently than standard electric coil elements. Foods spilled directly on the cooktop will not burn off as on coil elements. Because of this, the surface should be dust-free and soil-free before heating. % Your cooktop has been prepolished at the factory for improved protection and cleanability.
r sing Cleaning and Caring for Your Cooktop steps: 1. Most spills (except sugary spills and soils - see chart on this page) can be wiped off easily using a paper towel or clean, damp sponge as soon as Hot Surface Indicator Light(s) goes off. 2. For stubborn spills, rub Cooktop Polishing Creme into cooked-on soil using a paper towel. If some soil remains, leave some creme on the spot(s) and follow Step 3. 3. Carefully scrape spots with a singleedge razor blade in a holder. 4.
c{.]sing and Caring for Your Cooktop Using and replacing the surface light (Freestanding model) The surface light is in the backguard. It is controlled by the Surface Light Command Pads on the control panel. The On Command Pad turns on the light immediately and keeps it on until you press OFF. The Night Command Pad will turn on the surface light automatically when the light in the room is low enough to require a night light.
'_._sing and Caring for Your Cooktop 5. If the surface light still does not work, you may need to replace the starter. The starter is a knob-shaped part located on the right side of the backguard, under the light tube. To remove and replace the starter, first remove light tube. Push starter in and turn approximately 90 ° counterclockwise. Pull starter out of recessed area. You can find replacement starters at stores that sell fluorescent light tubes. 6. Replace glass and close the top panel.
sing and Caring for Your Oven This section tells you, step by step, how to operate all oven functions controlled by the electronic control. Carefully follow these instructions, along with the cooking tips and cleaning information, for successful use of your range. Your model may not have all the features shown on the control display. Using the electronic oven control Oven display (see below) Number Clock pads set/start Timed and delayed cooking pads (pp. 43, 45) (p.
"Using and Caring for Your Oven Starting an operation To shut off key entry tone: After programming a function, you must press Open the door Then tion. If you do not press the the Start pad to start the funcStart pad within 5 seconds of programming, "START?" will show on the display as a reminder. 8TA{__ Canceling an operation The Cancel/Off pad will cancel any function, xcept for the Clock Set!Start and Timer functions.
Using and Caring for Your Oven Setting your range for the Sabbath_ If you want to set your range to meet "no work" requirements for the Sabbath, follow these steps: 1. Turn the oven light on or off (see page 50). This light will stay turned on or off (whichever you set) while in the Sabbath mode. Opening the door will not turn on the oven light if it is programmed to be off. 2. If a power failure occurs, the oven will automatically run the Favorite Cycle set in Convect Full Meal when power is back on.
Using and Caring for Your Oven Oven settings This chart tells you when to use each setting. It also explains what elements heat up for each setting. SETTING DIAGRAM SETTING INFORMATION BAKE Use this setting for baking and heating casseroles. • The bottom element and outer top element heat up. • During baking, the elements will turn on and off to maintain the oven temperature. BROIL (MAXI/ECONO) Use this setting for broiling regular-sized and smaller cuts of meat, poultry, and fish.
'_sing and Caring for Your Oven Setting the clock NOTE: If an oven function is active or programmed, you cannot change the clock. 1. Press Clock Set/Start pad. PRESS =oc, YOU SEE 1 2. Set time. PRESS YOU SEE 3. Start clock. PRESS YOU SEE PRESS YOU SEE If time has not been entered correctly, three short tones will sound and "Err" will be displayed. The display will show the closest valid time. Repeat Steps 2 and 3 to re-enter the time of day.
Using 2. Set time. and Caring for Your Oven PRESS YOU SEE (example shows a 7-hour timer setting) 3. Start Timer. PRESS YOU SEE The Timer will begin counting down immediately after you press the Timer Set/Start pad or Start pad. YOU SEE 4. When time is up, turn off Timer. When time is up, you will hear four tones (iftones are not turned off - see page 19). Press the Timer Cancel pad to clear the display. To change the timer during its operation: 1. Press Timer Set/Start pad. 2.
,JII Using and Caring for Your Oven Baking or convection 1. Position baking racks. For correct rack placement, see "Rack positions"on page 27 and "Rack placement" chart on page 28. NOTES: • Before turning oven on position oven rack(s) in desired location. • Be sure the rack(s) is level. • Use pot holders or oven mitts to protect hands if rack(s) must be moved while oven is hot. • Do not let pot holder or oven mitt touch hot elements.
Using 4. Preheat oven. and Coring for Your Oven PRESS After the temperature reaches 170°F, the temperature display will show the actual oven temperature at each 5°F increase and stop at the set temperature. One long tone will sound when oven is preheated. YOU SEE (example for Bake) ("Lo" is displayed after 5 seconds if oven temperature is below 170°F) 5. Put food in oven. NOTE: If you want to change the baking temperature after baking has begun, repeat Steps 2, 3, and 4. 6.
Using 2. Choose and Caring for Your Oven setting. 3. Set temperature (optional). PRESS YOU SEE PRESS YOU SEE Do this step if you want to set a temperature other than 300°F. NOTE: See a reliable cookbook or your convection oven cookbook for temperature recommendations. (example shows 325°F temperature setting) 4. Start oven.
Using and Caring for Your Oven Cooking tips Baking/convection baking tips The hot air must circulate around the pans in the oven for even heat to reach all parts of the oven. This results in better baking. Rack positions ® For best air circulation: * Place the pans so that one is not directly over the other. Mdlorl o_J'ler 11/,._2 _ ,-_ -L _ _ 41/,, -_- Iwallor J_ -L panl other Ipen • For best results, allow 11/2to 2 inches of space around each pan and between pans and oven walls.
rU sing and Caring for Your Oven Baking tips Using aluminum (Bake pad) [for thermal baking) For proper cooking, follow these guidelines: • When using one rack, place the rack so the top of the food will be centered in the oven. • When using more than one rack, use the Convection Bake setting. • Use only one cookie sheet in the oven at a time when using the Bake setting. Bakeware tips • When baking with insulated cookie sheets or baking pans, place them in the bottom third of the oven.
Using Convection baking tips (Convection Bake pad) • Do not use aluminum foil when convection baking. Aluminum foil may block airflow. • Reduce recommended recipe oven temperature by approximately 25°F. See recipe adaption chart in your convection oven cookbook for recommended temperatures, or use EASY CONVECT* Conversion (see page 36). • For most recipes, you can reduce convection baking time compared to standard baking times.
Using and Caring for Your Oven Adjusting oven temperature Although your new oven is properly adjusted to provide accurate temperatures, it may cook faster or slower than your old oven. If, after using the oven for a period of time, you are not satisfied with the baking/roasting results, you can change the offset temperature by following the steps below. The control will "remember" the selected offset even after the power has been interrupted or lost.
Using How to determine the amount and Caring for Your Oven of adjustment needed The following chart tells you how much to adjust the offset temperature to get the desired cooking results. You can determine cooking results by amount of browning, moistness, and rising times for baked foods. Using the temperature TO COOK FOOD ...
TJ Using and Caring for Your Oven 5. Set temperature (optional). PRESS YOU SEE Do this step if you want to set an internal food temperature (from 130°F-190°F) other than 160°F. NOTE: See a reliable cookbook or your convection oven cookbook for internal food temperature recommendations. 6. Choose cook setting. • BAKE, • CONVECTION BAKE, or • COHVECTION ROAST 7. Set temperature (optional). Do this step if you want to set an oven temperature other than the one displayed.
r_sing and Caring for Your Oven Burn Hazard Use an oven mitt to remove temperature Do not touch broil element. probe. Failure to follow these instructions can result in burns. 9. After cooking, unplug probe. The probe symbol will remain lit until you unplug the Temperature Probe. 10. Remove food from oven. (This prevents overcooking.) 11. Clean probe. Wash with a soapy sponge and dry thoroughly. Use a plastic scouring pad to remove cooked-on foods. You can also clean the probe in a dishwasher.
r_ sing and Caring for Your Oven 3. Press desired Number pad. Use the "Convect full meal chart" on page 35 as your guide for selecting a cycle. PRESS YOU SEE LL__J NOTES: (example for cycle 1) • You can change the Convect Full Meal cycle any time before pressing the Star[ pad by repeating Step 3. • You can program your own cycle, which you can then select in the future by pressing just CONVECT FULL MEAL and START. (See page 35 for more information.) 4. Start oven. 5.
Using Convect and Caring for Your Oven full meal chart CYCLE NUMBER CONVECTION CYCLE OVEN TEMP TIME OR PROBETEMP 1 Cony. Bake 350°F 45 min Meal # 1 : Chicken pieces, Fruit crisp, Vegetable casserole 2 Conv. Bake 350°F 1 hr Meal # 2: Macaroni and cheese, Baked winter squash, Fruit pie 3 Conv. Bake 350°F 1 hr 15 min Meal # 3: Precooked ham, Baked potatoes, Quick bread loaf OR Baked potatoes only 4 Conv.
rU sing and Caring for Your Oven Using EASYCONVECT* Conversion EASY CONVECT Conversion lets you convection cook without entering convection cook temperatures and times. Simply enter the standard cook temperature and time for the food to be cooked. The oven will reduce the temperature, or the temperature and time, for convection cooking. (Convection temperatures and times are not as long because the heated air is circulated in the oven cavity for quicker cooking.
fusing 4. Enter standard cook time. and Caring for Your Oven PRESS YOU SEE NOTES: • This step is not needed when using the temperature probe. • To delay convection cooking, after Step 4, press the Stop Time pad and enter the desired stop time. Cooking will start at the time equal to the stop time less the cook time. (Example: A cook time of 1 hour and a stop time of 4:00 would give you a start time of 3:00.) 5. Start oven.
E JII fusing and Caring for Your Oven EASY CONVECT* Conversion setting chart EASY CONVECT SETTING FOODS YOU CAN COOK WITH THIS SETTING Baked Goods Cakes, cookies, muffins, quick breads, biscuits, yeast bread Meats Roasts, ham, whole chicken, chicken pieces, chops, meatloaf NOTE: Turkey or large poultry are not included because their cooking times vary.
fusing and Caring for Your Oven PRESS 4. Press Broil pad. YOU SEE Once for Maxi Broil OR (example for Maxi Broil) Twice for Econo Broil PRESS YOU SEE (example for Econo Broil) 5. Set temperature (optional). PRESS YOU SEE Do this step if you want to use variable temperature broiling (see below). NOTE: See "Thermal broiling chart" on page 42 for temperature recommendations. 6. Start oven.
U sing and Caring for Your Oven Convection broiling Convection broiling is actually high-temperature convection roasting. Use this setting when broiling thick cuts of meat. Results are similar to those you get when using a rotisserie. 1. Position rack. See "Thermal broiling chart" on page 42 for recommended rack positions. 2. Put food in oven. Place food on grid in broiler pan and place in center of the oven rack.
Using 5. Set temperature (optional). and Caring for Your Oven PRESS YOU SEE Do this step if you want to set a temperature (up to 450°F) other than 450°F. NOTE: See a reliable cookbook or your convection oven cookbook for temperature recommendations. (example shows 400°F temperature setting) 6. Start oven. PRESS YOU SEE PRESS YOU SEE NOTE: If you want to change the convection broiling temperature after broiling has begun, repeat Steps 4, 5, and 6. " 7. When broiling turn off oven.
Using Thermal and Caring for Your Oven broiling chart The recommended rack position is numbered lowest (1) to highest (5), MEAT Steak, 1" thick • rare RACK POSITION TEMPERATURE 4 500°F • medium • well-done Steak, 11/2"thick 4 APPROXIMATE TIME (MINUTES) SIDE 1 SIDE 2 4 4 6 8 6 8 8 10 8 10 500°F • rare • medium Hamburger patties or steaks, 1/2"thick or less • medium 4 500°F 6 4 Lamb chops, 1" thick 4 400°F 9 9 Ham slice, W' thick precooked, 1" thick 4 4 500°F 500°F 5 10 5 10
r_ sing and Caring for Your Oven Timed cooking The electronic clock/oven control will turn the oven on and off at times you set, even when you are not around. Delayed time baking/roasting is ideal for foods which do not require a preheated oven, such as meats and casseroles. Do not use delayed time cooking for cakes, cookies, etc. - they will not rise properly. Before using timed cooking, make sure the clock is set to the correct time of day. (See "Setting the clock" on page 22.
fusing and Caring for Your Oven 5. Set cook time. PRESS YOU SEE (example shows 2-hour cook time with stop time now 2 hours later than time of day) 6. Start oven. PRESS YOU SEE Vertical bar on display will get shorter as cook time counts down. (cook time is displayed) 7. When baking/roasting YOU SEE is done: "End" will show on the display, Four tones will sound, followed by four short reminder tones every minute until you open the door or press the Cancel/Off pad.
_Using and Caring for Your Oven PRESS 4. Press Cook Time pad. YOU SEE (start time display will light up, showing time of day) 5. Set cook time. PRESS YOU SEE (example shows 2-hour cook time with stop time now 2 hours later than time of day) 6. Press Stop Time pad. PRESS YOU SEE 7. Set stop time. PRESS YOU SEE (stop Ume display shows 3:00 and start time display shows 1:00 - stop time minus 2-hour cook time) 8. Press Start pad.
Using To cancel and Caring for Your Oven timed cooking Press Cancel/Off settings: PRESS YOU SEE o___)FFCANCEL! (display will go blank) pad. Dehydrating You can use your THERMAL-CONVECTION* oven to dehydrate a variety of foods. NOTE: To learn detailed information about dehydration, refer to a book written specifically about dehydrating and/or preserving foods. 1. Prepare food. Prepare foods as recommended recipe. in 2. Arrange food on drying racks. Racks are not included with oven.
Using 5. Press and hold Convection Bake pad for 5 seconds. and Caring for Your Oven PRESS YOU SEE Hold for 5 seconds 6. Set temperature (optional). PRESS YOU SEE Do this step if you want to set a temperature (from 100°F to 200°F) other than 140°F. NOTE: The 100°F setting will cause "RAISING BREAD" to be displayed.(See below for more information on raising bread.) 7. Start oven.
¢_sing and Caring for Your Oven 3. Start oven. PRESS YOU SEE PRESS YOU SEE One long tone will sound when oven is preheated. 4. When proofing turn off oven. is done, fCANCEL I (display will go blank) Cleaning your oven and controls Explosion Hazard Do not store flammable materials such as gasoline near this appliance. Doing so can result in death, explosion, fire, or burns.
Jsing and Caring for Your Oven PART WHAT TO USE HOW TO CLEAN Exterior surfaces (other than control panel) Sponge and warm, soapy water • Wash, wipe with clean water, and dry thoroughly. Broiler pan and grid (clean after each use) Steel-wool pad and warm, soapy water • Wash, rinse, and dry thoroughly. • Do not clean the pan and grid in the Self-Cleaning cycle. Oven racks Steel-wool pad and warm, soapy water OR • Wash, rinse, and dry thoroughly.
Using and Caring for Your Oven Using and replacing the oven light(s) Your oven may have a standard oven light or two side halogen lights. The oven light(s) will come on when you open the oven door. To turn the light(s) on when the oven door is closed, press the Oven Light pad on the control panel. Press the pad again to turn off the light(s). Replacing the oven light (models with light on back Replacing oven lights (models with side halogen wall): 1. Disconnect appliance at main power supply.
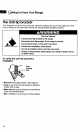
("(.]singthe Self-Cleaning Cycle The Self-Cleaning cycle saves you from the toil and mess that often come with hand-cleaning the oven interior. Like the other functions of your oven, you operate the Self-Cleaning cycle with the easy-to-use electronic control. To use this cycle properly, follow the step-by-step instructions in this section. Burn Hazard Do not touch the oven during the Self-Cleaning cycle. Keep children away from oven during Self-Cleaning cycle.
q_sing the Self-Cleaning Cycle Before setting the controls = Make sure clock is set to correct time of day. = Make sure the oven door is completely closed. Setting the controls To start cleaning immediately: 1. Press Clean pad. PRESS YOU SEE A 31/2-hour Self-Cleaning cycle will be set. (The first 3 hours are for cleaning, the last 30 minutes are for cooling.) (stop time display shows time 3!/= hours later than time of day shown in start time display) 2. Set cleaning time (optional).
r_sing To delay cleaning the Self-Cleaning Cycle start time: 1. Press Clean pad. PRESS YOU SEE A 31/2-hour Self-Cleaning cycle will be set. (The first 3 hours are for cleaning, the last 30 minutes are for cooling.) (stop time display shows time 31/2hours later than time of day shown in start time display) 2. Set cleaning time (optional). PRESS if you want a Self-Cleaning cycle other than 31/2hours, press the desired Number pads for the new time up to 41/2hours.
r_ sing the Self-Cleaning 6. After the Self-Cleaning ends: To stop the Self-Cleaning any time: Cycle YOU SEE cycle cycle at PRESS YOU SEE {c,.c.,I ("DOOR LOCKED" will appear if oven has not cooled down) For best cleaning results • After the oven cools to room temperature, wipe up any residue or ash with a damp cloth or sponge. If any spots remain, clean with a mild abrasive cleanser or cleaning sponge. • Clean the oven before it gets heavily soiled.
'oubleshooting Most tools ance page cooking problems often are caused by little things you can find and fix without of any kind. Check the lists below and on the next page before calling for assistor service. If you still need help, see "Requesting Assistance or Service" on 57 or 58. If nothing operates, check the following: Is the range wired into a live circuit with the proper voltage? (See Installation Instructions.
Troubleshooting PROBLEM CAUSE Cooking results are not what you expected (continued) • The recipe you are using may need to be altered to improve the taste or appearance of the food. • You are using a pan that is not the correct type or size. Refer to a reliable cookbook or recipe for recommended pan type and size. • There is not enough air space around pan when baking. Allow 11/2to 2 inches (4-5 cm) of air space on all sides of pan.
_ questing Service Assistance or Before calling for assistance or service, please check the "Troubleshooting" section. It may save you the cost of a service call. If you still need help, follow the instructions below. If you need assistance or service in the U.S.A.: I.
_questing Assistance or Service If you need assistance or service in Canada: I. If the problem is not due to 2. If you need one of the items listed in "Troubleshooting"t... Contact your nearest KitchenAid Canada Appliance Service branch or authorized servicing outlet to service your appliance. See list below.) Contact the dealer from whom you or call the KitchenAid Canada Consumer Assistance Centre _ toll urchased free, 8:30 youra.m. appliance, - 6 p.m. (EST), at 1-800-461-5681.
questing Assistance or Service Forfurther assistance If you need further assistance, you can write to KitchenAid Canada with any questions or concerns at: Please include a daytime phone number in your correspondence. Consumer Relations Department KitchenAid Canada 1901 Minnesota Court Mississauga, Ontario L5N 3A7 Don't forget, KitchenAid offers a full line of quality home appliances.
..
_tes 61
Index This index is alphabetical. It contains all the topics included in this manual, along with the page(s) on which you can find each topic. TOPIC PAGE ANTI-TIP BRACKETS .............................. ASSISTANCE ..................................... 10 57, 58 TOPIC PAGE Starting .................................................. Timer ..................................................... Tones .................................................... 19 22 19 33 BAKING Aluminum foil ..................
ndex TOPIC PAGE OVEN TEMPERATURE Adjusting ............................................... 30 Setting ......... 24, 26, 30, 32, 39, 41,43, 44 PARTS ................................................... 7, 8 PROOFING BREAD ................................ RACKS Convection roasting rack ....................... Placement ............................................. Positions ............................................... 47 29 28 27 ROASTING Rack ......................................................
Kitchen kid* Electric Range arranty LENGTH OF WARRANTY: KITCHENAID WILL PAY FOR: KITCHENAID WILL NOT PAY FOR: ONE-YEAR FULL WARRANTY FROM DATE OF PURCHASE. Replacement parts and repair labor costs to correct defects in materials or workmanship. Service must be provided by an authorized KitchenAid servicing outlet. A. Service calls to: 1. Correct the installation of the SECONDTHROUGH FIFTHYEAR LIMITED WARRANTY FROM DATE OF PURCHASE.